In this tutorial we will learn how to secure a JAX-RS Service using an Elytron File System Realm, restricting access to methods using javax.annotation.security annotations.
This example will be deployed on WildFly application server so, in order to get started, download the latest WildFly release from http://www.wildfly.org
In order to get started we will at first configure the File System Realm on Elytron and then we will code our JAX-RS secured application.
Defining the File System Realm
A File System Realm in Elytron is a simple security realm definition backed by the filesystem. When using the management CLI, you will need defining at first the Identities to be added to the Realm, then add a simple-role-decoder, configure a security-domain, and finally configure an http-authentication-factory that needs to be set on undertow. The following script will do it:
connect

batch

/subsystem=elytron/filesystem-realm=demoFsRealm:add(path=demofs-realm-users,relative-to=jboss.server.config.dir)


/subsystem=elytron/filesystem-realm=demoFsRealm:add-identity(identity=frank)
/subsystem=elytron/filesystem-realm=demoFsRealm:set-password(identity=frank,clear={password="password123"})
/subsystem=elytron/filesystem-realm=demoFsRealm:add-identity-attribute(identity=frank,name=Roles, value=["Admin","Guest"])

/subsystem=elytron/simple-role-decoder=from-roles-attribute:add(attribute=Roles)


/subsystem=elytron/security-domain=fsSD:add(realms=[{realm=demoFsRealm,role-decoder=from-roles-attribute}],default-realm=demoFsRealm,permission-mapper=default-permission-mapper)


/subsystem=elytron/http-authentication-factory=example-fs-http-auth:add(http-server-mechanism-factory=global,security-domain=fsSD,mechanism-configurations=[{mechanism-name=BASIC,mechanism-realm-configurations=[{realm-name=RealmUsersRoles}]}])


/subsystem=undertow/application-security-domain=httpFsSD:add(http-authentication-factory=example-fs-http-auth)

run-batch

reload
Execute the above CLI script and move on to the next section.
Coding the Secured JAX-RS application
Now let’s start coding a simple JAX-RS Endpoint:
package com.mastertheboss;

import org.json.JSONObject;
import org.wildfly.security.auth.server.SecurityDomain;
import org.wildfly.security.auth.server.SecurityIdentity;
import org.wildfly.security.authz.Attributes;

import javax.annotation.security.PermitAll;
import javax.annotation.security.RolesAllowed;
import javax.ws.rs.*;
import javax.ws.rs.core.Context;
import javax.ws.rs.core.MediaType;
import javax.ws.rs.core.Response;
import javax.ws.rs.core.SecurityContext;

@PermitAll
@Path("/")
public class Endpoint {

    @Context
    private SecurityContext securityContext;

    @GET
    @Path("/info")
    @Produces(MediaType.APPLICATION_JSON)
    @RolesAllowed({"Admin"})
    public String getInfo() {
        return identityInfoAsJson();
    }

    @POST
    @RolesAllowed({"Admin"})
    @Consumes(MediaType.APPLICATION_JSON)
    public Response saveData(Data data) {

        System.out.println(data);
        return Response.ok("Done!").build();
    }

    private String identityInfoAsJson() {
        SecurityIdentity identity = SecurityDomain.getCurrent().getCurrentSecurityIdentity();
        JSONObject response = new JSONObject();
        response.put("name", securityContext.getUserPrincipal().getName());
        response.put("attributes", attributesAsJson(identity.getAttributes()));
        return response.toString();
    }

    private JSONObject attributesAsJson(Attributes attributes) {
        JSONObject attributesObject = new JSONObject();
        for (String attribute : attributes.keySet()) {
            attributesObject.put(attribute, attributes.get(attribute));
        }
        return attributesObject;
    }

}
In this example, we have two methods that are restricted to users belonging to the “Admin” Role. The method getInfo will simply print the user’s identity information. The method saveData, on the other hand, consumes a JSON and requires as well a valid user with the “Admin” Role. Also the saveData method consumes as input a Java Bean named “Data” which contains a single property:
package com.mastertheboss;

public class Data {

    String key;

    @Override
    public String toString() {
        return "Data{" +
                "key='" + key + '\'' +
                '}';
    }

    public String getKey() {
        return key;
    }

    public void setKey(String key) {
        this.key = key;
    }
}
We need a JAX-RS activator in order to activate the REST Service:
package com.mastertheboss;

import javax.ws.rs.ApplicationPath;
import javax.ws.rs.core.Application;


@ApplicationPath("rest")
public class JAXActivator extends Application {
    // Left empty intentionally
}
Within the web.xml file, we need to provide the following information:
<web-app>
    <security-constraint>
        <web-resource-collection>
            <url-pattern>/*</url-pattern>
        </web-resource-collection>
        <auth-constraint>
            <role-name>Admin</role-name>
        </auth-constraint>
    </security-constraint>

    <security-role>
        <role-name>Admin</role-name>
    </security-role>

    <context-param>
        <param-name>resteasy.role.based.security</param-name>
        <param-value>true</param-value>
    </context-param>

    <login-config>
        <auth-method>BASIC</auth-method>
        <realm-name>File System basic Realm</realm-name>
    </login-config>
</web-app>
As you can see, besides the Security-Role, we have set to true the Param resteasy.role.based.security
To get it working, we need to include in the jboss-web.xml file the reference to Elytron’s security domain:
<jboss-web>
    <security-domain>httpFsSD</security-domain>
</jboss-web>
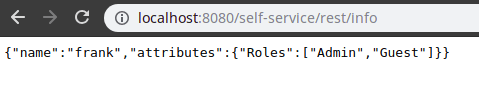
That’s all. We can start testing our application. We will try accessing the getInfo() method from the browser:
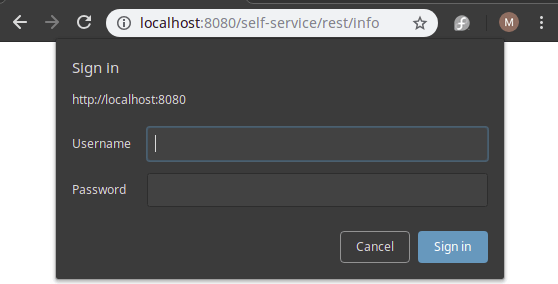
As you can see, a basic Authentication challenge will be sent. Enter the username/password available in the Elytron Realm, and you will be allowed to the getInfo() method:
Testing the POST method
There are several ways to test the POST method. We will show in this tutorial how to do it with the curl utility. First of all, we need to generate the Authorization String, which is a base64 encoded String of the username:password. You can use the following command to do that:
AUTH=$(echo -ne "frank:password123" | base64 --wrap 0)
And now, we can call the POST method, passing as data the JSON and setting the Authorization Header with the encoded username:password:
curl \
  --header "Content-Type: application/json" \
  --header "Authorization: Basic $AUTH" \
  --request POST \
  --data  '{"key":"value"}' \
 http://localhost:8080/self-service/rest/
If you followed the steps so far, you will be allowed in the saveData method of your JAX-RS Service
Please notice that since WildFly 20 you can configure RESTEasy attributes (such as resteasy.role.based.security) using MicroProfile Confiig API. Check this tutorial for more details: Configuring RESTEasy Applications
Conclusion
In this tutorial we have learned several things: first of all we have defined a File System Realm on Elytron and created one Entity in it. Then we have coded a basic JAX-RS application which requires the “Admin” user to grant access to its resources. Also, we have learnt a simple hack to invoke HTTP Resources passing the encoded Authorization in the URL.