This article will detail how to get started quickly with Jakarta EE which is the new reference specification for Java Enterprise API. As most of you probably know, the Java EE moved from Oracle to the Eclipse Foundation under the Eclipse Enterprise for Java (EE4J) project. There are already a list of application servers which offer a Jakarta EE compatible implementation such as WildFly. In this tutorial we will learn how to bootstrap a Jakarta EE project.
In terms of coding, the main difference from a Java EE / Jakarta EE 8 application and a newer one (Jakarta EE 10) is the namespace. You have to use the jakarta namespace when importing the Enterprise API instead of javax. In this article, however, we will focus on how to kick-start a project from the grounds up.
Let’s start from the configuration. We will go through the Maven and Gradle configuration of a Jakarta EE project.
Configuring Jakarta EE with Maven
If you are using Maven to build your Jakarta EE project, then you have two main options:
1) Use the “Vanilla” Jakarta EE dependency system:
<dependencies>
        <dependency>
            <groupId>jakarta.platform</groupId>
            <artifactId>jakarta.jakartaee-api</artifactId>
            <version>10.0.0</version>
            <scope>provided</scope>
        </dependency>
</dependencies>
This is the simplest choice if you stick to standard Jakarta EE API or if you want to quick Test a Jakarta EE application.
2) Use WildFly (or other compatible Jakarta EE server) dependency system:
 <dependencyManagement>
        <dependencies>
            <dependency>
                <groupId>org.wildfly.bom</groupId>
                <artifactId>wildfly-ee-with-tools</artifactId>
                <version>${version.bom.ee}</version>
                <type>pom</type>
                <scope>import</scope>
            </dependency>
        </dependencies>
    </dependencyManagement>
<dependencies>
    <dependency>
        <groupId>jakarta.enterprise</groupId>
        <artifactId>jakarta.enterprise.cdi-api</artifactId>
        <scope>provided</scope>
    </dependency>
  <!-- Other Dependencies here -->
</dependencies>
This options pays back if you are using WildFly features that extend the Jakarta EE umbrella. For example, the wildfly-ee-with-tools BOM includes also the correct versions for Arquillian, so you don’t need to manage their version. Besides it, WildFly extends the Jakarta EE project including a growing subset of the Eclipse MicroProfile API. So, summing up, if you are using features that extend Jakarta EE, it is worthy to use WildFly BOM and dependencies to build your projects.
Configuring Jakarta EE with Gradle
If you are using Gradle to bootstrap your projects, then the recommended gradle.build you can use is the following one, which creates a sample jakartaee-demo.war application under the base package com.mastertheboss:
apply plugin: 'war'

group = 'com.mastertheboss'
version = '1.0-SNAPSHOT'

repositories {
    mavenCentral()
}
dependencies {
    providedCompile 'jakarta.platform:jakarta.jakartaee-api:10.0.0'
}

compileJava {
    targetCompatibility = '11'
    sourceCompatibility = '11'
}

war{
    archiveName 'jakartaee-demo.war'
}
A sample Jakarta EE 10 project
To show you an example, we have moved one Hello World Rest/JPA Example coded for Java EE 8 into the new Jakarta EE 10 style.
This project is made up of a basic REST Endpoint that exposes a set of methods to list and create resources:
@Path("/service")
public class RESTService {

	@Inject
	ServiceBean service;

	@GET
	@Path("/list/{id}")
	@Produces(MediaType.APPLICATION_JSON)
	public Person getById(@PathParam("id") String id)
	{
		return service.findById(id);
	}

	@GET
	@Path("/list")
	@Produces(MediaType.APPLICATION_JSON)
	public List<Person> getAll()
	{
		return service.findAll();
	}
	@POST
	@Produces(MediaType.TEXT_PLAIN)
	public Response createPerson(@FormParam("name")String name, @FormParam("surname")String surname)
	{
		service.add(name,surname);
		return Response.ok("Inserted! Go back and check the list.").build();

	}

}
This is the ServiceBean which is a CDI Bean that contains methods to Query and Insert Data in the default Database:
@ApplicationScoped
public class  ServiceBean   {

	@PersistenceContext
	private EntityManager em;

	@Transactional
	public void add(String name, String surname){
        Person p = new Person();
        p.setName(name);
        p.setSurname(surname);
		em.persist(p);
	}


	public List<Person> findAll(){

		Query query = em.createQuery("SELECT p FROM Person p");
		List <Person> list = query.getResultList();
		return list;

	}

	public Person findById(String id){

		Person p = em.find(Person.class, id);
		return p;

	}

}
To build up this project, we have used the standard Jakarta EE 10 dependencies:
<dependencies>
        <dependency>
            <groupId>jakarta.platform</groupId>
            <artifactId>jakarta.jakartaee-api</artifactId>
            <version>10.0.0</version>
            <scope>provided</scope>
        </dependency>
</dependencies>
You can find the full source code for the project here: https://github.com/fmarchioni/mastertheboss/tree/master/jakartaee/standard
As the project includes also WildFly Maven plugin, you can simply run it as follows:
$ mvn install wildfly:deploy
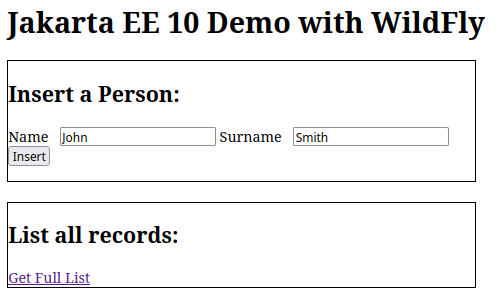
Here is your first, Jakarta EE 10 Project running on WildFly:
Conclusion
This article was a step-by-step guide to get started quickly with Jakarta EE 10 showing the most significant changes you have to apply to your codebase to move to the new Enterprise version. To accelerate your project start up, you can also consider using the Jakarta EE 10 starter. check this article to learn more: A Maven starter for Jakarta EE projects