Batch processing is a crucial component in many enterprise applications that require the execution of repetitive, data-intensive tasks. Jakarta EE Batch provides a standardized and efficient framework for implementing batch processing workflows in Java-based enterprise applications. In this tutorial, we will guide you through the process of running Jakarta EE Batch jobs, exploring the essential steps, configuration, and best practices.
Jakarta Batch Jobs in a nutshell
Batch jobs offer a range of benefits, including improved performance, scalability, and fault tolerance. They are particularly useful in scenarios where data needs to be processed in bulk, such as data integration, ETL (Extract, Transform, Load) processes, and generating reports. Jakarta EE Batch enables developers to implement complex, long-running, and parallelizable batch tasks efficiently.
Batch applications are essentially a set of steps which we need to execute in a specific order. A simple batch might include just to elaborate sequentially a set of records, however more advanced ones may specify additional elements like decision elements or parallel execution of steps.
A step itself can contain chunk-oriented steps and task-oriented steps.
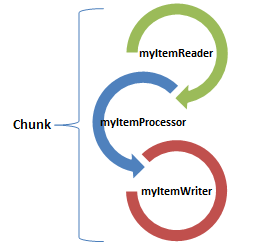
Chunk-oriented steps process data by reading items from a source, applying some transformation/business logic to each item, and storing the results. Chunk steps operate on one item at a time and group the results into a chunk. The results are stored when the chunk reaches a configurable size. Chunk-oriented processing makes storing results more efficient and facilitates transaction demarcation.

Task-oriented steps, on the other hand, execute actions other than processing single items from a source. A typical example of task-oriented step might be some DDL on a database or operation on a file system. In terms of comparison a chunk oriented step can be used for massive, long running tasks whilst a task oriented step might be fit for a set of batch operations that are to be executed periodically.
Jakarta Batch Specification also defines a roll-your-own kind of a step called a batchlet. A batchlet is free to use anything to accomplish the step, such as sending an e-mail. If you want to learn more about the Batchlet API, we recommend checking this article: How to run Jakarta Batchlets with WildFly
Chunk Steps made simple
In this tutorial we will learn how to use a Jakarta Batch Application which uses Chunk-oriented steps. Each chunk step is in turn broken in three parts:
- The Read chunk part which is used to read the single items from a source of data (database/fs/ldap etc.)
- The Processor chunk part manipulates one item at a time using the logic defined by the application. (e.g. sorting, filtering data, trasnforming data etc.)
- The Writer chunk part is used to write the item which has been processed in the earlier phase.
Due to its nature, chunk steps are usually long-running activities, therefore it is possible to bookmark their progress using checkpoints. A checkpoint can be used to restart the execution of a step which has been interrupted.
In the next section of this tutorial we will see a simple yet powerful example of batch job which takes as input a CSV file which is read, processed and inserted into a database.
The Job file
Firstly, each Job must be named uniquely and must be placed in the META-INF/batch-jobs directory. So here’s our job definition file (myJob.xml) :
<job id="simpleJob" xmlns="http://xmlns.jcp.org/xml/ns/javaee" version="1.0">
    <properties>
        <property name="input_file" value="/tmp/input.csv" />
        <property name="output_file" value="/tmp/output.json" />
    </properties>

    <step id="step1">
        <chunk item-count="3">
            <reader ref="batchItemReader" />
            <processor ref="batchItemProcessor" />
            <writer ref="batchItemWriter" />
        </chunk>
    </step>
</job>
This is the Job definition file which describes how many steps and chunks we are going to execute, the reference implementation for them and the size of the chunk, via the item-count attribute.
Besides, we are defining two properties: input_file and output_file which are the CSV file we will manage within our Batch execution.
Next, let’s code the three components of the Chunk Execution.
Writing the ItemReader
The first class is MyItemReader which is in charge to read the CSV file:
@Named
public class BatchItemReader extends AbstractItemReader {
    @Inject private JobContext jobContext;

    private BufferedReader reader;

    @Override
    public void open(Serializable checkpoint) throws Exception {

        Properties jobParameters = jobContext.getProperties();

        String fileName = (String) jobParameters.get("input_file");

        reader = new BufferedReader(new FileReader(fileName));
    }

    @Override
    public String readItem() {
        try {
            String line = reader.readLine();
            return line;
        } catch (IOException ex) {
            ex.printStackTrace();
        }
        return null;
    }
}
The open() overrides is called once before the batch processing starts. Here’s what it does:
- It retrieves the job parameters using the
jobContext.getProperties()method, which returns aPropertiesobject containing the parameters passed to the job. - It obtains the value of the “input_file” job parameter, assuming it is a String.
- It initializes the
readerobject by creating a newBufferedReaderinstance, reading data from the specified file.
Writing the ItemProcessor
The Processor Chunk will transform the data that we are fetching from the ChunkReader:
@Named
public class BatchItemProcessor implements ItemProcessor {

    @Override
    public JsonObject processItem(Object t) {

        StringTokenizer tokens = new StringTokenizer((String)t, ",");

        String name = tokens.nextToken();
        String surname = tokens.nextToken();
        String age = tokens.nextToken();

        JsonObject model = Json.createObjectBuilder()
        		   .add("firstName", name)
        		   .add("lastName", surname)
        		   .add("age", age)
        		   .build();


        return model;
    }
}
The processItem() method receives (from the batch runtime) a String object which is tokenized and used to create a JsonObject as output. Notice that the type of object we return from an ItemProcessor can be (and usually is) different from the input type we receive from the ItemReader.
Coding the ItemWriter
Following here is the ItemWriter which, as we said, is in charge to persist the Item (Person) on the default Database (ExampleDS).
@Named
public class BatchItemWriter extends AbstractItemWriter {

    @Inject
    private JobContext jobContext;

    @Override
    public void writeItems(List list) {

        String resourceName = (String) jobContext.getProperties().get("output_file");

        try(PrintWriter pw =new PrintWriter(new FileWriter(resourceName,true))){

            for (Object json: list) {
                System.out.println("Writer "+((JsonObject)json).toString());
                pw.write(((JsonObject)json).toString());
            }
            pw.flush();

        }catch (Exception e){
            System.err.println("Error: " + e);
        }
    }
}
The BatchItemWriter class is responsible for writing a list of items during batch processing. Here’s what it does:
- It retrieves the value of the “output_file” job parameter from the
jobContext.getProperties(). - It initializes a
PrintWriterobject to write data to the specified file usingnew PrintWriter(new FileWriter(resourceName, true)). Thetrueparameter indicates that the writer should append to the existing file content. - It iterates over the
listof items and writes each item to the file by converting it to a JSON string using((JsonObject) json).toString(). - It flushes the writer to ensure that the data is written to the file immediately.
- If any exception occurs during the write operation, it catches the exception, prints an error message, and logs the exception.
Starting a Batch Job from a Servlet
There are several options to start a Batch Job. We can use a Timer EJB, for example. Otherwise, we can manually trigger the execution for example from a Servlet or a REST API. Here is how to start our “simplejob” from a Servlet:
protected void processRequest(HttpServletRequest request,
        HttpServletResponse response) throws ServletException, IOException {
    response.setContentType("text/html;charset=UTF-8");
    PrintWriter out = response.getWriter();
    try {
        JobOperator jo = BatchRuntime.getJobOperator();

        long id = jo.start("simplejob", null);

        out.println("Job submitted: " + id);

    } catch (JobStartException | JobSecurityException ex) {
        out.println("Error submitting Job! " + ex.getMessage());
        ex.printStackTrace();
    }
    out.flush();

}
The first step is to obtain an instance of JobOperator. This can be done by calling the following:
JobOperator jo = BatchRuntime.getJobOperator();
The servlet then creates a Properties object and stores the input file name in it. Finally, a new batch job is started by calling the following:
jor.start("myJob", new Properties())
The jobname is nothing but the job JSL XML file name (minus the .xml extension). The properties parameter serves to pass any input data to the job.
The batch runtime assigns a unique ID, called the execution ID, to identify each execution of a job whether it is a freshly submitted job or a restarted job. Many of the JobOperator methods take the execution ID as parameter. Using the execution ID, a program can obtain the current (and past) execution status and other statistics about the job. The JobOperator.start() method returns the execution ID of the job that was started.
Compiling the Batch Code
To build the project, you can add the jakarta.jakartaee-api dependency which also includes the Jakarta Batch API:
<dependency>
        <groupId>jakarta.platform</groupId>
        <artifactId>jakarta.jakartaee-api</artifactId>
        <version>${jakartaee.version}</version>
        <scope>provided</scope>
</dependency>
Otherwise, the specific dependency for Jakarta Batch is the following one:
<dependency>
    <groupId>jakarta.batch</groupId>
    <artifactId>jakarta.batch-api</artifactId>
</dependency>
Next, deploy the application on WildFly:
mvn install wildfly:deploy

Before starting the Job, make sure that the input file is available in the location where the BatchItemReader expects it:
cp input.csv /tmp
Then, start the Chunk Job and verify from your logs that the file conversion has been completed correctly:
16:17:47,537 INFO  [stdout] (Batch Thread - 1) Writer {"firstName":"John","lastName":"Smith","age":"45"}
16:17:47,537 INFO  [stdout] (Batch Thread - 1) Writer {"firstName":"Mark","lastName":"Twain","age":"32"}
Conclusion
In this tutorial, we explored the process of running Jakarta Batch chunk jobs, providing a comprehensive guide to help you leverage the power of chunk-oriented processing in your batch workflows.
Source code: https://github.com/fmarchioni/mastertheboss/tree/master/batch/batch-chunk