Are you looking to streamline your software development process and automate your build workflows? Look no further than Jenkins. Jenkins is a popular open-source automation server that allows developers to build, test, and deploy their projects with ease. In this comprehensive tutorial, we will guide you through the process of setting up Jenkins and demonstrate how to build a Maven project using this powerful tool.
Installing Jenkins
Jenkins is available for dowload at the following link: https://www.jenkins.io/download/
The simplest way to get started with it is to run the Web Application Archive as Java Executable as it contains an embedded Web Server.
java -jar jenkins.war
By default, Jenkins will run on port 8080, if you want to start in on another port you can use the following option:
java -jar jenkins.war --httpPort=9090
Before you can start using Jenkins, you need to unlock it. Notice the following message when you start Jenkins for the first time:
Jenkins initial setup is required. An admin user has been created and a password generated.
Please use the following password to proceed to installation:

5431d7aa20de4578a0eccab0aa081840

This may also be found at: /home/francesco/.jenkins/secrets/initialAdminPassword
Take note of the above password and log into the home page of Jenkins, for example http://localhost:9090

Type the temporary administrator password.
Jenkins will store you configuration, by default, in your $HOME/.jenkins folder. To re-install again jenkins simply remove that folder and start it again.
Next, the installer will propose to install a set of plugins to extend the base capabilities of Jenkins. If you are new to Jenkins you can just go for the suggested plugins, otherwise pick up the ones that are the most suitable for your environment:

Creating an Admin User
The next step, is creating an administration user that will manage your Jenkins Server. Enter the information in the following UI::

What is Jenkins default user? Out of the box there is no pre-defined user for jenkins. You can however (not recommended!) disable the need for logging in by setting <useSecurity>false</useSecurity> in $HOME/.jenkins/config.xml
Basic Jenkins configuration
From the Home page, click on the “Manage Jenkins” link:

From there, you can access to a wide set of options which will let you configure (and update too using plugins) your Jenkins configurations. As first step, we will need to enter the location for our JDK installation and our Maven home. Click on the Tools Configuration link:

You will be taken to the Configuration panel. From there, you can configure the JDK Home and the Maven Home to be used.
Firstly, let’s configure the JDK by providing the link to your JDK, if you have one available. Otherwise let Jenkins install it automatically for you:

Finally, complete the Maven configuration. In this case, I’ll let Jenkins “Install automatically” the latest version of Maven:
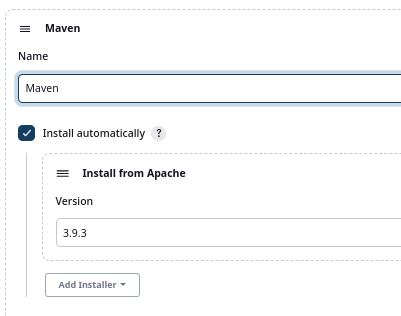
Click Save and continue to the next section.
Installing Maven Integration plugin (optional)
Fine. You have a basic Jenkins configuration which is enough to run your first Job. Although not mandatory we will show how to install the Maven, which will make faster and simpler building up Maven projects.
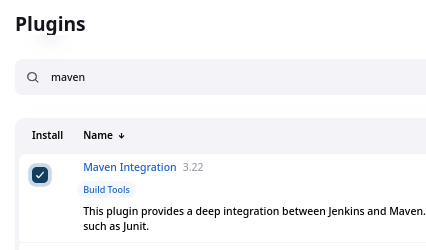
From the Home page of Jenkins select Manage Plugins and add the Maven Integration Plugin to your Jenkins:
Creating your First Jenkins Job
Done with permissions now let’s build our first Job which will automate the built of a Maven project.
Next, from the left menu select “New Item“, enter a Name for it and select “Maven Project“:

In the Job GUI you can leave the default settings (which don’t handle Source Code Management). Scroll to the Build section and specify:
- The Root POM for your Maven Project
- The Goals of the Maven Project
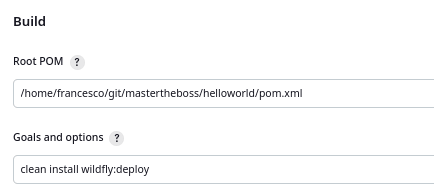
As you can see from the above snapshot, we will run the goals “clean install wildfly:deploy”. The last goal is part of WildFly Maven plugin which lets you deploy the project on a running WildFly Server. To learn more about it check this article: How to configure and run Maven WildFly plugin
Finally, let’s run the first Job from the Job Panel by clicking on the “Build Now” button. The Maven build system will kicking taking a little to complete. Once done, you will find in the Build History of your Job the outcome of your build. (A sunshine icon means that the process completed successfully).

You can further inspect on the Build process by clicking on the link and following the Console Output link in the next page.
Also, verify on WildFly Console that the application is now available:
09:54:19,729 INFO  [org.jboss.as.server.deployment] (MSC service thread 1-2) WFLYSRV0027: Starting deployment of "helloworld.war" (runtime-name: "helloworld.war")
09:54:19,786 INFO  [org.jboss.weld.deployer] (MSC service thread 1-7) WFLYWELD0003: Processing weld deployment helloworld.war
09:54:19,933 INFO  [org.wildfly.extension.undertow] (ServerService Thread Pool -- 86) WFLYUT0021: Registered web context: '/helloworld' for server 'default-server'
09:54:19,978 INFO  [org.jboss.as.server] (management-handler-thread - 1) WFLYSRV0016: Replaced deployment "helloworld.war" with deployment "helloworld.war"
Conclusion
In conclusion, this comprehensive Jenkins tutorial has provided you with the necessary knowledge and skills to embark on your journey towards efficient and automated Maven project builds. By leveraging the power of Jenkins, you can streamline your software development workflow, increase productivity, and achieve continuous integration and deployment.
Throughout this tutorial, we covered various essential aspects, including setting up and configuring Jenkins, integrating Maven for seamless builds, creating Jenkins jobs, and understanding Jenkins pipelines. By implementing the best practices and tips shared, you can optimize your Jenkins builds and take full advantage of this remarkable automation server.