This tutorial (taken from Hands-On Continuous Integration and Delivery) will provide an overview of the best Continuous Integration and Delivery solutions available to automate organizations builds/deployments/tests
There are several terms that are important when trying to learn about Continuous Integration and Continuous Delivery:
Definition of Automation
Automation is essentially any task that is completed without human interaction. Let us say that you manually test a UI feature, if you write a script instead of manually test it than it can be said that you have automated the task.
Definition of Continuous Integration
Continuous Integration can be viewed as a software engineering task where source code is merged and tested in a version controlled project such as Git.
Usually a Continuous Integration Build is triggered via source control management, meaning a developer pushes a commit to a version control system such as git. A Continuous Integration Build is more than just a compilation step. It can consist of a compilation step, a testing phase, a code inspection phase, and a deployment phase. A Continuous Integration Build can act as a kind of verification step that checks that your software is working as a cohesive unit.
Definition of Continuous Delivery
Continuous Delivery (CD) is the point at which you deliver a software product to your end users. A product is only useful if your intended users can actually use the product.
Business Impact of CI/CD and automation
Good CI/CD practices can fundamentally change the way an organization runs. If automation practices are effectively added on a CI/CD pipeline the quality of the software product will improve drastically.
It is important to have a good set of unit tests in the first build of a CI/CD pipeline. We may add additional CI builds that serve as a full regression test suite for our software product. Later builds may incorporate Load Tests and Smoke Tests.
Using Jenkins for CI/CD
You can use freestyle scripting in Jenkins and the new Jenkins 2.0 Pipeline Syntax along with Docker to create a more declarative CI Build System.
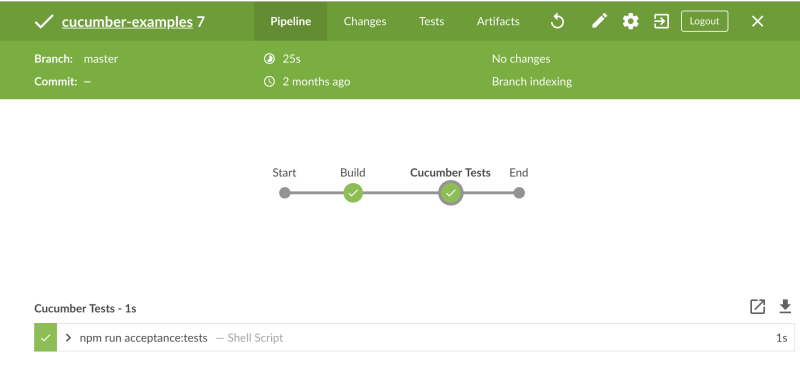
Here is an example of a Jenkins Pipeline File:
pipeline {
  agent {
    docker {
      image 'node:10-alpine'
      args '-v /Users/jean-marcelbelmont/jenkins_data'
    }

  }
  stages {
    stage('Build') {
      steps {
        sh 'npm install'
      }
    }
    stage('Cucumber Tests') {
      steps {
        sh 'npm run acceptance:tests'
      }
    }
  }
}
Here we create a series of stages with the first stage creating a docker image to setup our environment.
Notice that the docker block has image for the docker image and args for the arguments, which in this case specify the location of the Volume data mount.
In the next stage of the pipeline we get our environment ready to build by issuing the command npm install
In the last stage we run an acceptance test suite.
Here is a screenshot of the Jenkins Pipeline:
Using Travis CI for CI/CD
Travis CI is a hosted and automated solution for CI Builds. All you need is just to login with GitHub, tell Travis CI to test a project, and then push to GitHub.
The main difference between Travis CI and Jenkins is that Jenkins is a self managed automation solution for CI/CD. You can configure Jenkins in a fully customized manner whereas Travis CI is generally used in open source software projects.
Here is a .travis.yml script to show a possible CI/CD setup:
language: go
services:
  - docker
go:
  - 1.9.x
os:
  - linux
sudo: false
env:
  matrix:
    - PORT=8080 ENVIRONMENT_NAME=travis
  global:
    secure: AvDa6vD77eIF3JifNegQ0cat2SS0vZpa9ami7E8LqYcnl4iJ3D47RHpR1eSkRrSwT6hJIsSG93y8Yi3WRSI3N8UkAuPs/tbr6mpaFwAHpZ0A+gxOf0Xt/SdV7xc2JEOuBjlwAoK23EXvvNyJwJxzAmg+ye5OzTv57LZu7tbWDoCT5Y1D8WD4IkDoFJUSDoG6SLwY0MWgd8YblhnpSIdWxn7H8cadJsjqhvnTkdyslx7s0rtpLsslNmBOgKu9yHdxAtxHXgBZnLHC9xLv41MDKJ1YNU6PqI/JUK4zHgWEHzXd4ZEATdDiq29WKtMIyJvcoVV8Kr8Tcm41ZuyFH6ZtzQGZOj1lyCmrI+qenMEhr7CvsPFOHpx0zZFQkjPYN9qDQAexzs5zEODMA9qjwpaaBXYm3xC7GHxLYUlXB+LpgB8bgmGIy0jax8Eyqlw8VRsmqyLBuPr5VU4W2ZV7GNYladNCLsNk/0VKWb6qdwzt4nXvCUZwbLeG8+TPIvceItxPA9MBxqdydVyfmwUB4aZSs76KJiALTxn0RcthgN+PE4RP6rcHlmsksd3/uup/LBASaK3yZH+DfFRh5VdzHGSqsYwP1Y2vxmnnWNltUfZMBW3WgPEO2sN29aMplcSFAVK8O2RNbBC2PDPRbmLzT7vrVZYKwCDQi6ywCVeS0xuv7js=
    # This creates the following global variable `COVERALLS_TOKEN`
before_install:
  - export PATH=$PATH:$HOME/gopath/bin
install:
  - make travis-install
before_script:
  - echo -e "Host github.com\n\tHostName github.com\n\tIdentityFile ~/.ssh/id_rsa\n" >> ~/.ssh/config
script:
  - make travis-script
after_success:
  - if [ -n "$TRAVIS_TAG" ]; then rm -rf ./bin; fi
  - if [ -n "$TRAVIS_TAG" ]; then curl -sL https://git.io/goreleaser | bash; fi
Here is a breakdown of the travis yml script:
In the language field we specify the programming language which is Golang
In the services field we specify the services we expect the Travis Virtual Machine to start on each CI build for us.
In the go field we specify the go version we want to use
In the os field we specify the operating system we expect to use which can be mac or linux which you can read more about in Travis Docs
In the sudo field you specify the following values:
- required: You will get a fully virtualized environment
- false: You will get a container based environment
In the env field we specify environment variables to be set for our CI build, which in this case consist of a matrix field which has the environment variables of PORT and ENVIRONMENT. The global field has an encrypted variable that we created with the travis cli.
There are several lifecycle events that we can use in travis ci:
- before_install lifecycle event: This event is useful when you want to set some values and/or install some dependencies before the actual default install lifecycle event
- install lifecycle event: This event is done on every build and essentially gets the environment ready for use to run your tests, lint code and more.
- before_script lifecycle event: This event is useful when you want to run some actions before the actual script lifecycle event.
- script lifecycle event: This event will comprise the bulk of the actions you will do in your CI build
- after_success lifecycle event: This event is used when you want to do some actions on a successful CI build.
Notice that we are using Makefile tasks in the script section.
Makefile Contents
Here are the contents of the makefile:
travis-install:
	go get -u github.com/mattn/goveralls
	go get -u github.com/philwinder/gocoverage
	go get -u github.com/alecthomas/gometalinter
	go get -u github.com/golang/dep/cmd/dep
	go get -u golang.org/x/tools/cmd/cover
	dep ensure

travis-script:
	set -e
	CGO_ENABLED=0 go build -i -o ${BIN_DIR} ${APID_MAIN}
	gometalinter --install
	gometalinter ./cmd/... ./internal/...
	go test ./... -cover
	gocoverage
	goveralls -coverprofile=profile.cov -repotoken=${COVERALLS_TOKEN}
In the travis-install makefile task we install all the golang library dependencies required for a CI build.
In the travis-script makefile task we run a lint task, run tests, and push a code coverage report.
Using Circle CI for CI/CD
Circle CI like Travis CI is a hosted and managed automation solution strongly oriented on Containers and VMs.
CircleCI integrates with GitHub, GitHub Enterprise, and Bitbucket. Every time you commit code, CircleCI creates a build which is automatically tested in a clean container or virtual machine. Your team is notified if a build fails so issues can be fixed quickly. Circle CI uses a yaml syntax like Travis CI but has a very nice dashboard for viewing CI Builds. Here is a sample yml file with CI/CD tasks:
version: 2
jobs:
  build:
    working_directory: /go/src/github.com/packtci/go-template-example-with-circle-ci
    docker:
      - image: circleci/golang:1.9
    steps:
      - checkout
      - run:
          name: "Print go version"
          command: go version
      - run:
          name: "Run Unit Tests"
          command: go test
  integration:
    docker:
      - image: cypress/base:8
        environment:
          ## this enables colors in the output
          TERM: xterm
    steps:
      - checkout
      # special step to restore the dependency cache
      - restore_cache:
          key: v2-{{ checksum "package.json" }}
      - run: npm install
      # special step to save the dependency cache
      - save_cache:
          key: v2-{{ checksum "package.json" }}
          paths:
            - ~/.npm
            - ~/.cache
      - run:
          name: "Run Integration Tests"
          command: npm test
  deploy:
    docker:
      - image: buildpack-deps:trusty
    steps:
      - checkout
      - run:
          name: Deploy Master to Heroku
          command: |
            git push https://heroku:$HEROKU_API_KEYATgit.heroku.com/$HEROKU_APP_NAME.git master
workflows:
  version: 2
  build_integration_and_deploy:
    jobs:
      - build
      - integration:
          requires:
            - build
      - deploy:
          requires:
            - integration
Notice that here we create several steps for the CI/CD build. This is using a yaml syntax like Travis CI with different fields obviously.
- The version field is where we specify the particular version of Circle CI syntax.
- The jobs field is where we specify each job we want to run for Circle CI.
- Using the docker field we can specify the particular docker images we need for our CI builds.
- The workflows field is where we can schedule the jobs to run.
Here is a screenshot of the Circle CI build steps:

You can learn more about Continuous Integration and Delivery by reading Sander Rossel book:
