JBPM 4 candidates as “state of the art” opensource workflow. As a matter of fact, the workflow engine has gone under substantial modifications.
The highlights of the new release are the following:
- Much improved docs, including a split between user guide and developers guide
- BPMN based graphical designer in eclipse
- Command based services as the primary client API
- Decoupled activity implementation API
- Multiple execution modes
- Improved multiple language support
- Easy addition of custom activities
- DB evolution improvements
- DB partitioning per process language
In this tutorial you’ll learn how to install JBPM 4 into your JBoss AS, how to setup your DB schema configuration and, finally, how to deploy a sample JBPM application.
Step 1: Download JBPM 4
Donwload the latest JBPM 4 from http://sourceforge.net/projects/jbpm/files/
Unzip the archive (Approx 113 MB)
Exploding the archive will produce the following structure.
| 22/07/2010 17.52 <DIR> .. 28/12/2009 11.54 <DIR> doc 24/12/2009 13.34 <DIR> examples 22/07/2010 17.50 <DIR> install 28/12/2009 11.53 <DIR> lib 28/12/2009 11.53 <DIR> migration 22/07/2010 17.52 <DIR> signavio-repository 15/12/2009 13.44 <DIR> src 28/12/2009 11.53 1.037.943 jbpm.jar |
This is a short explanation on the single directories/files:
- doc: User guide, javadocs and developers guide
- examples: Example processes that are used in the user guide
- install: this folder contains the build.xml file used to install jBPM
- lib: Third party libs and some special jBPM libraries
- migration: Contains jpdl-migration-4.3.jar used to migrate from the 3.x release
- src: Sources
- jbpm.jar: The jBPM core library archive
Step 2: install the JBPM schema.
We will show how to install JBPM schema into a MySQL database.
At first, create a schema named “jbpm4” on your local MySQL database. Then add an user named “jboss” to the database.
CREATE DATABASE jbpm4;
GRANT ALL PRIVILEGES ON *.* TO jboss@localhost
-> IDENTIFIED BY ‘jboss’ WITH GRANT OPTION;
Then edit the file JBPM4_HOME\db\jdbc\mysql.properties so that it contains our database properties:
jdbc.driver=com.mysql.jdbc.Driver
jdbc.url=jdbc:mysql://localhost:3306/jbpm4
jdbc.username=jboss
jdbc.password=jboss
Now move the the “db” folder where you will find a build.xml. Launch the following command:
C:\jbpm4\install>ant -Ddatabase=mysql create.jbpm.schema
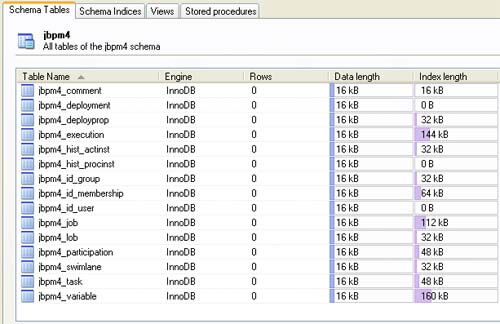
This will create the JBPM tables in your schema. You can verify from your MySQL client that your DB schema is now set up:

Now add some sample data in your schema which will be necessary for logging into the console:
C:\jbpm4\install>ant -Ddatabase=mysql load.example.identities
If everything was fine, you should have the following entries in the jbpm4_id_user tables which you can use to log on to the jbpm console:
| +——-+————+——-+———–+————+————-+——————————–+ | DBID_ | DBVERSION_ | ID_ | PASSWORD_ | GIVENNAME_ | FAMILYNAME_ | BUSINESSEMAIL_ | +—–+—————–+———–+————+————-+—————-+——————–+ | 1 | 0 | alex | password | Alex | NULL | [email protected] | | 2 | 0 | mike | password | Mike | NULL | [email protected] | | 3 | 0 | peter | password | Peter | NULL | [email protected] | | 4 | 0 | mary | password | Mary | NULL | [email protected] | +——-+————+——-+———–+————+————-+——————————–+ |
Step 3: Install JBPM on JBoss
You have to configure the location of your JBoss AS. Move into the “jboss” folder and open the ant build.xml file.
Configure the following properties, at the top of the file:
<property name=”jboss.version” value=”5.1.0.GA” />
<property name=”jboss.home” value=”C:\jboss-5.1.0.GA” />
Now launch the following ant task:
C:\jbpm4\install>ant -Ddatabase=mysql install.jbpm.into.jboss
This will create a “jbpm” folder in your JBoss deploy directory:

Step 4: Install the Graphic designer
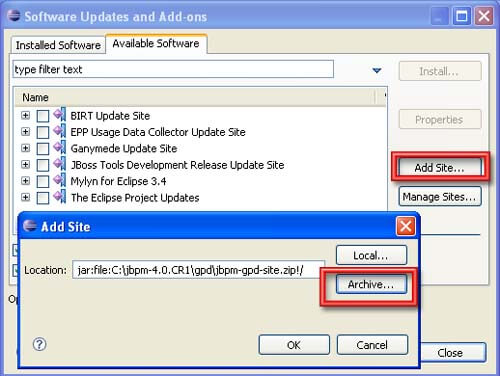
The graphical designer is bundled into JBPM 4 distribution into the directory JBPM4_HOME\install\src\gpd. The filename is jbpm-gpd-site.zip. You can install it from the Menu: Help | Software Updates. Select “Add Site” option and then point at the jbpm-gpd-site.zip with the “Archive” option.

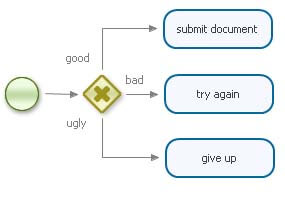
We will deploy a simple web application which contains barely a JSP and a process definition file. The process definition file is taken from JBPM 4 examples distribution:
<?xml version="1.0" encoding="UTF-8"?>

<process name="DecisionExpression" xmlns="http://jbpm.org/4.0/jpdl">

    <start g="16,102,48,48">
        <transition to="evaluate document" />
    </start>

    <decision name="evaluate document" expr="#{content}" g="96,102,48,48">
        <transition name="good" to="submit document" g="120,60:-36,23" />
        <transition name="bad" to="try again" g=":-15,-21" />
        <transition name="ugly" to="give up" g="120,189:-35,-41" />
    </decision>

    <state name="submit document" g="175,35,122,52" />

    <state name="try again" g="176,100,122,52" />
    <state name="give up" g="177,164,122,52" />

</process>
In this process we simply illustrate a transition to a decision node. The decision node choose the workflow path depending on the “content” process variable.

Add to your Web project a simple index.jsp file which deploys the process definition and create a new instance of the process, setting the “content” variable to “good” using an HashMap.
<%@ page import="org.jbpm.api.*, java.util.*" %>
<%  ProcessEngine processEngine = new Configuration()
                         .buildProcessEngine();
       RepositoryService repositoryService = processEngine.getRepositoryService();

       ExecutionService executionService = processEngine.getExecutionService();

       long deploymentDbid = repositoryService.
                                createDeployment().addResourceFromClasspath("sample-process.jpdl.xml").deploy();
       Map<String, Object> variables = new HashMap<String, Object>();

       variables.put("content", "good");

       ProcessInstance processInstance = executionService.startProcessInstanceByKey("DecisionExpression", variables);
       out.println("Process reached state " + processInstance.getState());   %>
This is a tree view of your web project. As you can see you don’t need to add any library to your web application because they are already bundled in the “jbpm” folder.
jbpmtest.war
¦ index.jsp
¦
+—WEB-INF
¦ web.xml
¦
+—classes
sample-process.jpdl.xml
Deploy it on JBoss 5 and verify that the process reached the state “submit document“.
How to run Java code in jPDL
You can use a BeanShell expression to add’ a Java script’ in your JPDL process definition, you can use the <script> tag. For example:
<process-definition>
  <event type="node-enter">
    <script>
      System.out.println("Entered node"+node);
    </script>
  </event>
  ...
</process-definition>You can use in your script' all process variables created plus the following process variables :
- executionContext
- token
- node
- task
- taskInstance