This updated tutorial will teach you how to design a jBPM process with Eclipse designer plugin, make a KJAR out of it and deploy in on jBPM.
First off, you need to take the download link of Eclipse’s plugin for jBPM from https://www.jbpm.org/download/download.html
As you can see from the Download page, the jBPM team stopped to release Eclipse tools synchronously with jBPM, thus the recent version of jBPM and the latest released version of Eclipse tools (update site) may differ.
The update site link, however, shows up in the Downloads page so just copy it from there. The latest one, at the time of writing this article is: https://download.jboss.org/jbpm/release/7.48.0.Final/updatesite/
Next, start Eclipse and choose Help | Install new Software | Add the Update site:
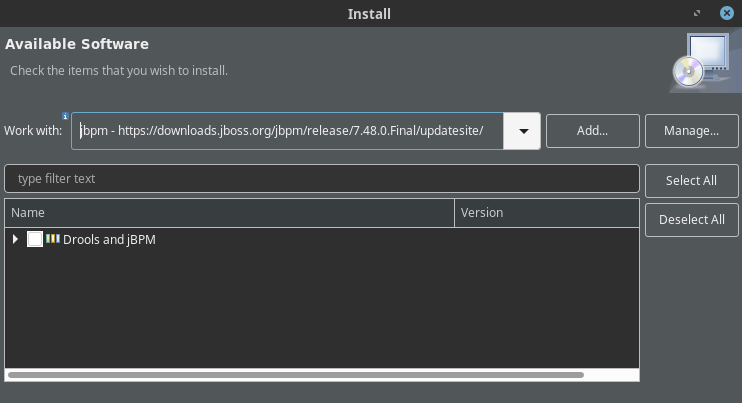
Add the jBPM Update Site and, in the next screen, check “Drools and jBPM” and complete the Installation. Then restart eclipse
Create a new jBPM Project
When eclipse has restarted, you will be able to create a new kind of project: a jBPM Project:
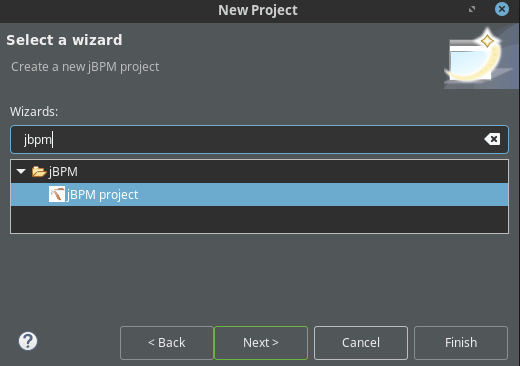
In the next screen you will have to choose one of three options:
- Start with an empty project and basic Runtime configuration.
- Start with an Hello World example project.
- Start from a project available online.
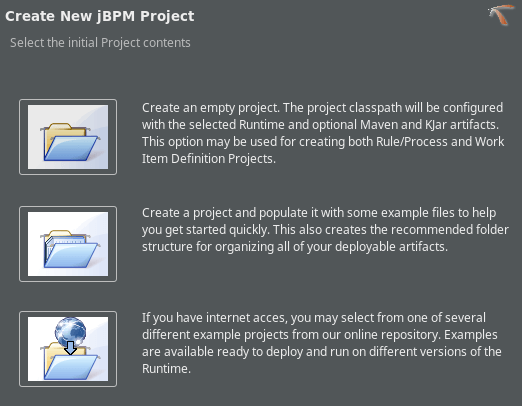
We will choose the first option then click Next.
In the next UI, select thr Project name, the project builder (Maven in our example) and the Maven GAV:
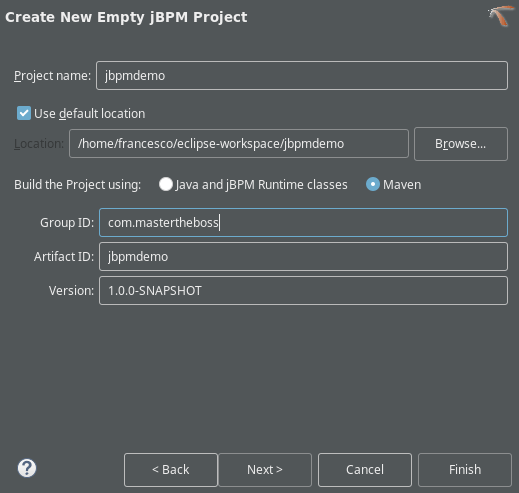
Click Finish.
Design your jBPM Process
In order to design our jBPM process, let’s add a new jBPM Process Diagram. From the top Menu, select New | Other | BPM Process Diagram.
In our example, we have used the following options:
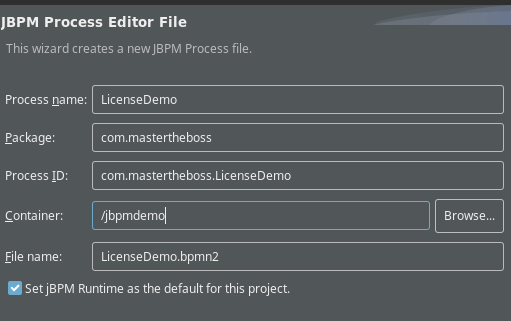
Our sample jBPM process will be used to simulate a Driver’s license request, with an Human Task that needs to be filled up (the age of requester). If the age is equal or over 18 the request is admitted. If not it’s rejected.
First off, our Process needs a variable named “age” which is an Integer. Click on the Process grid and, in the Properties window select the Data Items Tab. Add a new variable named “age”:

Next, design the following jBPM Process diagram:
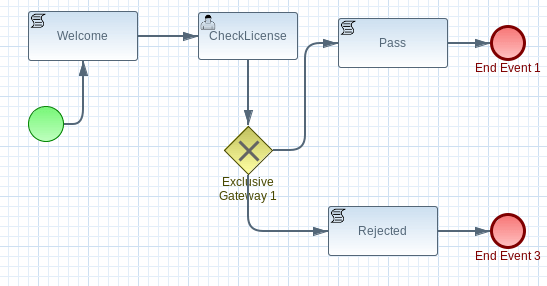
And now a short description of the components:
- Welcome: This is a Script Task which merely Prints a Welcome Message when the Process starts
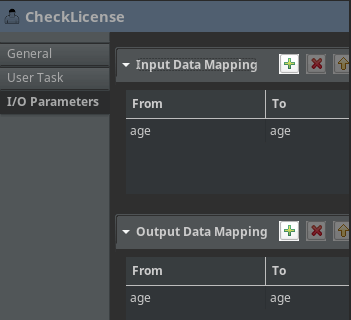
- CheckLicense: This is a Human Task. It accepts as input parameter “age” and writes it to the Process environment variable “age”. You can define the I/O parameters from the Properties window, by selecting the I/O Parameters Tab of the Task:
- Exclusive Gateway: This gateway is used to choose an exclusive condition: one direction takes to the Pass Script task and the other direction takes to the Rejected Script task.
You can enter the condition on the two Sequence Flow. So, the upper sequence Flow will use this Condition Expression:
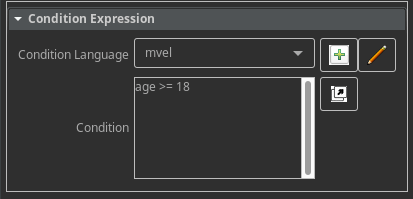
While, the lower Sequence Flow contains this Condition Expression:

- Pass: This Script Tasks prints a message that the request has been approved
- Rejected: This Script Tasks prints a message that the request has been rejected.
Creating a Test Class
To test our process, we will add a JUnit Test class which extends JbpmJUnitbaseTestCase:
public class AppTest extends JbpmJUnitBaseTestCase {

	@Test
	public void testProcess() {

           final RuntimeManager runtimeManager = createRuntimeManager("com/mastertheboss/LicenseDemo.bpmn");
           final RuntimeEngine engine = getRuntimeEngine(null);
           final KieSession ksession = engine.getKieSession();

           final ProcessInstance processInstance = ksession.startProcess("com.mastertheboss.LicenseDemo");
           TaskService taskService = engine.getTaskService();
	   assertProcessInstanceActive(processInstance.getId(), ksession);
	   assertNodeTriggered(processInstance.getId(), "CheckLicense");

	   // let john execute Task 1
	   List<TaskSummary> list = taskService.getTasksAssignedAsPotentialOwner("john", "en-UK");
	   TaskSummary task = list.get(0);
           System.out.println("John is executing task " + task.getName());

           taskService.start(task.getId(), "john");
           Map<String, Object> results = new HashMap<String, Object>();
           results.put("age", new Integer(21));
           taskService.complete(task.getId(), "john", results);

	   assertProcessInstanceCompleted(processInstance.getId(), ksession);

	   manager.disposeRuntimeEngine(engine);
	   manager.close();
	}

	public AppTest() {
	   super(true, true);
	}

}
KJAR Set up
as we want to produce a KJAR, in the pom.xml we have specified as packaging type “kjar”:
<packaging>kjar</packaging>
Also, the following plugin needs to be added:
	<plugin>
		<groupId>org.kie</groupId>
		<artifactId>kie-maven-plugin</artifactId>
		<version>7.51.0.Final</version>
		<extensions>true</extensions>
	</plugin>
Also, within the resources/META-INF folder we have included three files:
- kie-deployment-descriptor.xml : This file contains several settings for our KJAR such as the persistence-unit, the persistence-mode, audit-mode and runtime-strategy
- kmodule.xml: This deployment descriptor contains the list of Kie Sessions (and their type) available to the deployment unit. It can be empty and defaults will be used.
- persistence.xml: This is the standard persistence configuration file, which contains the Persistence Provider (Hibernate) and the Datasource, among other settings.
Here is the resulting project:
src
├── main
│   ├── java
│   │   └── com
│   │       └── mastertheboss
│   └── resources
│       ├── com
│       │   └── mastertheboss
│       │       └── LicenseDemo.bpmn
│       ├── datasource.properties
│       ├── logback-test.xml
│       └── META-INF
│           ├── kie-deployment-descriptor.xml
│           ├── kmodule.xml
│           └── persistence.xml
└── test
    └── java
        └── com
            └── mastertheboss
                └── AppTest.java
You can check the source code at the end of this article to add missing files to your project.
Running the Test
Finally, you can run the project from Eclipse (Right click on the Test class and choose “Run as JUnit Test”. Or you can run it from the command line with:
mvn install
With the value provided in the test class for “age”, the expected outcome is:
Welcome to license check
Enter you age
John is executing task CheckLicense
Thanks
Admitted
Continue Learning jBPM
Do you want to test this example process using the REST API ? Then check this tutorial: jBPM REST API tutorial
Do you want to embed this process in a Web application? Check this out: Developing a jBPM 7 Web application example
You can find the source code for this tutorial here: https://github.com/fmarchioni/mastertheboss/tree/master/jbpm/licensedemo
Found the article helpful? if so please follow us on Socials