Vaadin is a powerful open-source Java framework that allows you to develop modern, responsive web applications with a rich user interface. In this tutorial, we will explore the key features and benefits of Vaadin and guide you through the process of building your own web application. Whether you’re a beginner or an experienced developer, this step-by-step tutorial will help you get started with Vaadin and unleash its full potential.
Getting started with Vaadin Flow
To begin, let’s understand the basic concepts of Vaadin and how to set up your development environment. Follow these steps:
- Install Java Development Kit (JDK): Download and install the latest version of JDK compatible with your operating system.
- Install an Integrated Development Environment (IDE): Choose an IDE like Eclipse or IntelliJ IDEA, and install the Vaadin plugin.
- Create a New Vaadin Project: Use the Vaadin quickstart project available here: https://start.vaadin.com
A Basic Vaadin Flow application
When you unzip the sample application, you will have the following Spring Boot project structure:
├── frontend
│   └── themes
│       └── mytodo
│           ├── components
│           ├── styles.css
│           └── theme.json
├── mvnw
├── mvnw.cmd
├── pom.xml
└── src
    └── main
        ├── java
        │   └── com
        │       └── example
        │           └── application
        │               ├── Application.java
        │               └── views
        │                   └── main
        │                       └── MainView.java
        └── resources
            ├── application.properties
Vaadin offers a wide range of pre-built UI components that you can use to create an interactive user interface.
- The Root project folder contains a Vaadin View. Within the View, you can utilize Vaadin’s extensive collection of components like buttons, forms, tables, and charts to enhance your UI.
- The frontend folder: This folder is to customize Component Styling. Use CSS or Vaadin’s built-in theming options to customize the appearance of your components to match your branding.
Let’s look more in detail our View:
@PageTitle("Main")
@Route(value = "")
public class MainView extends HorizontalLayout {

    private TextField name;
    private Button sayHello;

    public MainView() {
        name = new TextField("Your name");
        sayHello = new Button("Say hello");
        sayHello.addClickListener(e -> {
            Notification.show("Hello " + name.getValue());
        });
        sayHello.addClickShortcut(Key.ENTER);

        setMargin(true);
        setVerticalComponentAlignment(Alignment.END, name, sayHello);

        add(name, sayHello);
    }

}
Let’s break down the code:
@PageTitle("Main")is an annotation that sets the page title of the view to “Main.” This is used by the Vaadin framework to display the title in the browser’s title bar.@Route(value = "")is an annotation that defines the route or URL path for accessing this view. In this case, the value is an empty string, indicating that this view will be the default view when accessing the application’s root URL.- Our
MainViewincludes two components: aTextField“name"and aButton“sayHello". - When the user clicks on the Button, it triggers the listener, which displays a notification using the
Notification.show()method. - Finally, we are configuring the layout properties of the
MainViewobject, which is aHorizontalLayout(inheriting from it). ThesetMargin(true)method adds margins around the layout. ThesetVerticalComponentAlignment(Alignment.END, name, sayHello)method aligns thenameandsayHellocomponents vertically at the end (bottom) of the layout.
Running the Basic View
The Vaadin project is a Spring Boot project, therefore to run it you can simply execute the spring-boot:run goal:
mvn install spring-boot:run
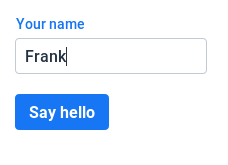
As a result, a simple textbox field will display with a button. By clickin on the button the listener will print the content of the text field at the bottom of the screen:
Implementing a more complex Vaadin example
Now let’s be a bit more adventurous! We will add a simple Grid component to display a List of Java objects.
Firstly, we will add an Entity Person object we will display in a Vaadin Grid:
@Entity
public class Person implements Cloneable {

    @Id
    @GeneratedValue(strategy = GenerationType.IDENTITY)
    private int id;
    private String name;
    private String surname;
    private int age;

    // Getter/Setter methods omitted for brevity


}
Next, we will add a Repository Class that extends JpaRepository, therefore we will have available the basic CRUD methods:
public interface PersonRepository extends JpaRepository<Person, Integer> {
}
Finally, this is the Vaadin Grid that loads the Entity from the Repository Class:
@Route("")

public class MainView extends VerticalLayout {
    private PersonRepository personRepository;
    @Autowired
    public void setPersonRepository(PersonRepository personRepository) {
        this.personRepository = personRepository;
    }

    @PostConstruct
    public void init() {

        setJustifyContentMode(JustifyContentMode.CENTER);
        setWidth("100%");

        Grid<Person> grid = new Grid<>(Person.class);
        grid.setItems(personRepository.findAll());

        grid.removeColumnByKey("id");
        grid.setColumns("name", "surname", "age");

        add(grid);
        setSizeFull();
    }


}
In this View we use the com.vaadin.flow.component.grid.Grid which displays tabular data in a grid format. It provides a powerful and flexible way to present data in a structured manner with features like sorting, filtering, pagination, and selection.
We can add a META-INF/import.sql file to have some data available at start up:
INSERT INTO person (name, surname, age) VALUES ('John', 'Doe', 25);
INSERT INTO person (name, surname, age) VALUES ('Jane', 'Smith', 30);
When running the application, we will see our Person Entity objects in a Grid as in this snapshot:

Source code: https://github.com/fmarchioni/mastertheboss/tree/master/web/vaadin/basic
For a more advanced example of a Vaadin grid check this article: Vaadin Grid: Basic and Advanced example
Conclusion
By combining Vaadin, the server-side UI framework, with Spring Boot, you can create powerful and responsive web applications. The integration between Vaadin and Spring Boot opens up a world of possibilities for Java web development. With the provided steps and examples, you are now equipped to embark on your journey of building Vaadin applications on Spring Boot. Happy coding!