Important notice: Richfaces framework reached End of Life in 2016. Therefore, you cannot expect fixes or enhancements unless you fork the project and upgrade yourself the framework.
We recommend reading these guidelines, if you want to modernize your Richfaces application: How to migrate Richfaces Web applications to another Web UI
We have already published a tutorial about Richfaces 3.2 running on JBoss 4.X
You are adviced to read this tutorial at first if you don’t have any notion about RichFaces, otherwise just go on reading.
Let’s divide the installation in a few steps:
Step 1 download richfaces latest stable release
http://www.jboss.org/richfaces/download/stable.html
Unpack the archive in a folder of your preference.
Step 2 Create a new Web Project from your favourite IDE

Once created you need to add a set of libraries to your Web Project.
Step 3 Add libraries to your Web Project
A Richfaces project needs a set of core libraries plus a few dependancies which needs to be downloaded. Here’s the list of libraries which need to be included in your project:
| Library | Location |
| richfaces-api-3.3.2.SR1.jar | lib folder of your RichFaces distribution |
| richfaces-impl-3.3.2.SR1.jar | lib folder of your RichFaces distribution |
| richfaces-ui-3.3.2.SR1.jar | lib folder of your RichFaces distribution |
| commons-beanutils-1.7.0.jar | http://archive.apache.org/dist/commons/beanutils/binaries/ |
| commons-digester-1.8.jar | http://archive.apache.org/dist/commons/digester/binaries/ |
| jhighlight-1.0.jar | http://nixbit.com/cat/text-editingprocessing/markup/jhighlight/ |
Step 4 Configure web.xml to load Richfaces libs.
Configure your Web application’s web.xml to use JSF Servlet and Richfaces filters. Copy and paste the following XML in your web.xml
<?xml version="1.0" encoding="UTF-8"?>
<web-app xmlns:xsi="http://www.w3.org/2001/XMLSchema-instance" xmlns="http://java.sun.com/xml/ns/javaee" xmlns:web="http://java.sun.com/xml/ns/javaee/web-app_2_5.xsd" xsi:schemaLocation="http://java.sun.com/xml/ns/javaee http://java.sun.com/xml/ns/javaee/web-app_2_5.xsd" id="WebApp_ID" version="2.5">
 <!-- Plugging the "Blue Sky" skin into the project -->
<display-name>SampleRichFaces</display-name>
<context-param>
 <param-name>javax.faces.STATE_SAVING_METHOD</param-name>
 <param-value>server</param-value>
</context-param>

<context-param>
 <param-name>org.richfaces.SKIN</param-name>
 <param-value>blueSky</param-value>
</context-param>

<context-param>
 <param-name>org.richfaces.CONTROL_SKINNING</param-name>
 <param-value>enable</param-value>
</context-param>

<filter>
 <display-name>RichFaces Filter</display-name>
 <filter-name>richfaces</filter-name>
 <filter-class>org.ajax4jsf.Filter</filter-class>
</filter>

<filter-mapping>
 <filter-name>richfaces</filter-name>
 <servlet-name>Faces Servlet</servlet-name>
 <dispatcher>REQUEST</dispatcher>
 <dispatcher>FORWARD</dispatcher>
 <dispatcher>INCLUDE</dispatcher>
</filter-mapping>

<listener>
 <listener-class>com.sun.faces.config.ConfigureListener</listener-class>
</listener>

<!-- Faces Servlet -->
<servlet>
 <servlet-name>Faces Servlet</servlet-name>
 <servlet-class>javax.faces.webapp.FacesServlet</servlet-class>
 <load-on-startup>1</load-on-startup>
</servlet>

<!-- Faces Servlet Mapping -->
<servlet-mapping>
 <servlet-name>Faces Servlet</servlet-name>
 <url-pattern>*.jsf</url-pattern>
</servlet-mapping>

<login-config>
 <auth-method>BASIC</auth-method>
 </login-config>
</web-app>
Step 5 Create’ a sample application
<!doctype html public "-//w3c//dtd html 4.0 transitional//en">
<%@ taglib uri="http://java.sun.com/jsf/core" prefix="f" %>
<%@ taglib uri="http://java.sun.com/jsf/html" prefix="h" %>
<!-- RichFaces tag library declaration -->
<%@ taglib uri="http://richfaces.org/a4j" prefix="a4j"%>
<%@ taglib uri="http://richfaces.org/rich" prefix="rich"%>

<html>
 <head>
 <title>RichFaces Greeter</title>
 </head>
 <body>
 <f:view>
 <a4j:form>
 <rich:panel header="RichFaces Greeter" style="width: 315px">
 <h:outputText value="Your name: " />
 <h:inputText value="#{UserBean.userName}" >
 <f:validateLength minimum="1" maximum="30" />

 </h:inputText>

 <a4j:commandButton value="Get greeting" reRender="greeting" />

 <h:panelGroup id="greeting" >
 <h:outputText value="Hello, " rendered="#{not empty UserBean.userName}" />
 <h:outputText value="#{UserBean.userName}" />
 <h:outputText value="!" rendered="#{not empty UserBean.userName}" />
 </h:panelGroup>
 </rich:panel>
 </a4j:form>
 </f:view>
 </body>
</html>
package bean;

public class UserBean {
  String userName;

  public UserBean() {}

  public String getUserName() {
     return userName;
  }
  public void setUserName(String userName) {
     this.userName = userName;
  }


}
<?xml version="1.0" encoding="UTF-8"?>
<faces-config version="1.2"
 xmlns="http://java.sun.com/xml/ns/javaee"
 xmlns:xi="http://www.w3.org/2001/XInclude"
 xmlns:xsi="http://www.w3.org/2001/XMLSchema-instance"
 xsi:schemaLocation="http://java.sun.com/xml/ns/javaee http://java.sun.com/xml/ns/javaee/web-facesconfig_1_2.xsd">

  <managed-bean>

    <managed-bean-name>UserBean</managed-bean-name>
    <managed-bean-class>bean.UserBean</managed-bean-class>
    <managed-bean-scope>request</managed-bean-scope>
    <managed-property>
      <property-name>userName</property-name>
      <property-class>java.lang.String</property-class>
      <value></value>
    </managed-property>

 </managed-bean>

</faces-config>
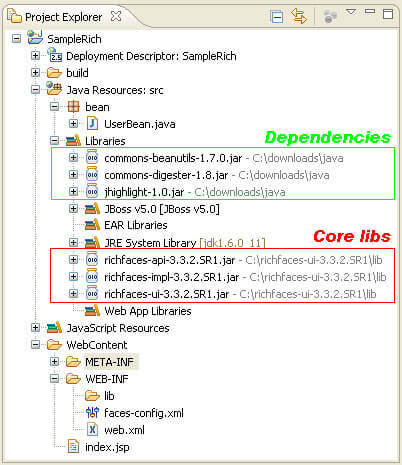
At this point your Project is ready to run. We include a snapshot of how the Project Explorer should look like :
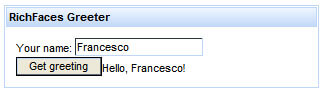
Now run your application by pointing to your index.jsp page:
http://localhost:8080/SampleRich/index.jsf