Podman is a popular containerization tool that allows users to manage containers, images, and other related resources. The Podman Desktop Tool is an easy-to-use graphical interface for managing Podman containers on your desktop. In this tutorial, we’ll go over how to use the Podman Desktop Tool to manage WildFly container image, covering some of its key features.
Why would you use an UI for Podman?
The never ending debate between command line and Destktop application also applies for Podman Desktop. From my experience, I’ve found some valuable benefits in using Podman Desktop UI:
- Graphical User Interface (GUI): The Podman Desktop application provides a user-friendly graphical interface for managing containers, images, and volumes. This can make it easier for users who are not familiar with command line tools to manage their containers.
- Integrated Image Builder: Podman Desktop includes an integrated image builder that makes it easy to build and test container images. Users can create Dockerfiles, build and test images, and publish them to a container registry all within the same application.
- Management of Kubernetes Clusters: Podman Desktop enables users to manage Kubernetes clusters from within the application. Users can deploy, manage, and monitor Kubernetes clusters directly from the Podman Desktop interface.
- Simplified Networking Configuration: Podman Desktop provides a simplified interface for configuring network settings for containers. Users can create networks, assign IP addresses, and configure port mappings all through the Podman Desktop GUI.
- Improved Debugging: Podman Desktop includes several features that make it easier to debug containers, such as the ability to view container logs and execute commands inside running containers.
Prerequisites
Before you start, you’ll need to have Podman installed on your system. You can install Podman by following the instructions for your specific operating system on the Pod Man installation page.
Then, you can move to the installation which consists in downloading the tool from the PodMan Desktop Installation Page. Once installed, open the tool to start using it.
Starting Podman Desktop
Firstly, let’s have a look at the User Interface of Podman Desktop:

As you can see, the Dashboard contains a set of handy options to manage your Environment such as:
- Containers: This option allows you to view, create, and manage containers using a graphical user interface. You can see a list of running and stopped containers, create new containers from images, prune unused containers, and even deploy containers on a Kubernetes cluster.
- Pods: This option allows you to create and manage Pods, which are groups of containers that share the same network namespace and storage volumes. You can create Pods by playing a Kubernetes YAML file or by creating them manually through the user interface.
- Images: This option allows you to view, pull, build, and manage Docker images. You can see a list of images that are available on your local system, pull new images from a registry, build new images from a Dockerfile, and prune unused images to save disk space.
- Volumes: This option allows you to manage persistent volumes, which are used to store data that needs to persist even when a container is stopped or deleted. You can create new volumes, see a list of existing volumes, and delete unused volumes.
Example: starting a WildFly Image
To illustrate the usage of Podman Desktop, we will start a Container Image of WildFly Application Server and monitor its status using the Desktop Options. To know more details about WildFly Images check this article: How to run WildFly with Docker
Firstly, if the WildFly Image is not available in your Repository, we will pull it from the Images | Pull Image option:

Then, we will see in the Image list the quay.io/wildfly/wildfly Image:

Click on the right arrow to start a Container Image for WildFly:
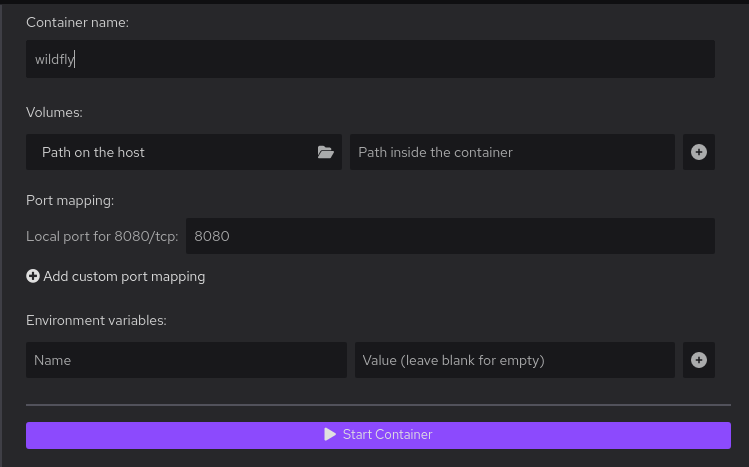
In the above UI you can define a set of basic and advanced settings for your Image such as the Container name, the Volumes you want to mount, Port mapping and Environment Variables.
Click on Start Container when you are ready to start WildFly.
Next, move to the Container tab and check that the Container “wildfly” is in there:
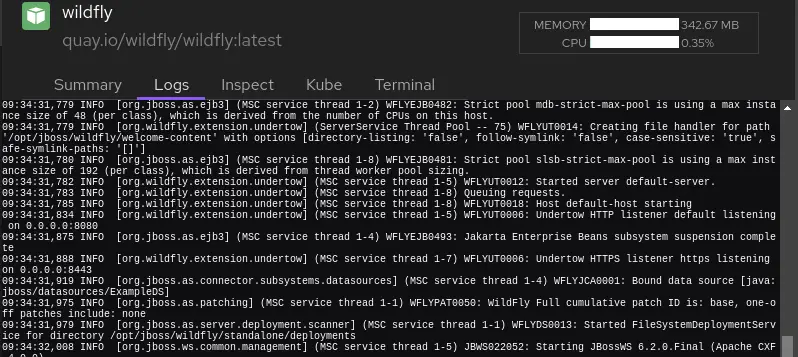
As you can see, when you select the Container Image you can do several things such as:
- Checking a Summary of the container status
- Track the logs of the Containers (see the above picture).
- Inspect the container image
- Generate a YML file for the Container that you can later use to create a Pod for Kubernetes. For example:
apiVersion: v1
kind: Pod
metadata:
  creationTimestamp: "2023-05-12T12:40:23Z"
  labels:
    app: wildfly
  name: wildfly
spec:
  containers:
  - image: quay.io/wildfly/wildfly:latest
    name: wildfly
    ports:
    - containerPort: 8080
      hostPort: 8080
Finally, you can also:
- Access to the Command Line of the running container by clicking on Terminal
- Monitor the CPU and Memory resources of the Container.
- Deploy the Image to a Kubernetes cluster
Conclusion
In this tutorial, we’ve covered how to use the Podman Desktop Tool to manage your containers on your desktop. We’ve gone over how to create a container, start and stop a container, and view container logs. By following these steps, you can easily manage your Podman containers in a graphical interface.