In this tutorial we will learn how to install and configure a Datasource on WildFly which uses MySQL or MariaDB as Database. We will show how to set up MySQL database using Docker. Then, we will show the Datasource configuration in both standalone mode and domain mode.
Step 1: Set up MySQL Database
In order to install MySQL, please follow the Installation Guide available: https://dev.mysql.com/doc/mysql-getting-started/en/#mysql-getting-started-installing
As an alternative, if you have available docker, you can start a MySQL instance in a minute with:
docker run -p3306:3306 --name mysql -e MYSQL_USER=jboss -e MYSQL_PASSWORD=jboss -e MYSQL_DATABASE=mysqlschema -e MYSQL_ROOT_PASSWORD=secret mysql:8.0
As you can see from the output of ‘docker ps’, all available IP addresses will go through the default MySQL Port (3306):
e51c8b03ff34 mysql:8.0 "docker-entrypoint.s…" 5 minutes ago Up 5 minutes 0.0.0.0:3306->3306/tcp, :::3306->3306/tcp, 33060/tcp mysql
Therefore, we can access MySQL using the localhost loopback address.
Finally, if you want to have an Admin interface for your MySQL image, then a better option could be starting the Container Image with Docker compose. This option also simplifies the execution of init scripts (such as SQL commands to create tables). Refer to this article for more details: Orchestrate containers using Docker compose
Step 2: Download the JDBC Driver
Next you will need a JDBC Driver for MySQL. MySQL Connector/J is the official JDBC driver for MySQL and it’s available at: https://dev.mysql.com/downloads/connector/j/
You can download the platform independent zip driver and place in a folder of your likes, for example in the bin folder of WildFly.
We recommend using the MySQL Connector/J 8.0.23 to connect with MySQL 8.0
Hack: you can also download directly the JDBC Driver from Maven with a single command:
wget -q "http://search.maven.org/remotecontent?filepath=mysql/mysql-connector-java/8.0.23/mysql-connector-java-8.0.23.jar" -O mysql-connector-java.jar
How to configure MySQL in Wildfly in Standalone mode
Now start the Command Line Interface:
$ ./jboss-cli.sh -c
We will The following command will install the com.mysql module creating for you the module directory structure:
module add --name=com.mysql --resources=mysql-connector-java.jar --dependencies=javax.api,javax.transaction.api
Next, we need to install the JDBC driver using the above defined module:
/subsystem=datasources/jdbc-driver=mysql:add(driver-name=mysql,driver-module-name=com.mysql)
Then, install the data source by using the data-source shortcut command, which requires as input the Pool name, the JNDI bindings, the JDBC Connection parameters and finally the security settings. Assumed that the MySQL Database is available at the IP Address 172.17.0.2:
data-source add --jndi-name=java:/MySqlDS --name=MySQLPool --connection-url=jdbc:mysql://localhost:3306/mysqlschema --driver-name=mysql --user-name=jboss --password=jboss
Finally, test the connection pool as follows:
/subsystem=datasources/data-source=MySQLPool:test-connection-in-pool
Solving ClassNotFoundException: javax.security.sasl.SaslException
If your Datasource requires support for the IETF Simple Authentication and Security Layer (SASL), then make sure you also include the java.security.sasl dependency in your module declaration:
<dependencies>
        <module name="javax.api"/>
        <module name="javax.transaction.api"/>
        <module name="java.security.sasl"/>
        <module name="org.slf4j"/>
</dependencies>
Failure to include the java.security.sasl module will trigger the following Exception:
([
    ("subsystem" => "datasources"),
    ("jdbc-driver" => "mysql")
]) - failure description: "WFLYJCA0115: Module for driver [com.mysql] or one of it dependencies is missing: [javax.security.sasl]"
How to configure MySQL in Wildfly in Domain mode
Installing the MySQL Datasource in Domain mode requires that you associate the Datasource with the Domain Profile.
Start with the CLI in disconnected mode and install MySQL module on every Host Controller:
module add --name=com.mysql --resources=mysql-connector-java.jar --dependencies=javax.api,javax.transaction.api
Next, we need to install the JDBC driver on a server Profile:
/profile=full-ha/subsystem=datasources/jdbc-driver=mysql:add(driver-name=mysql,driver-module-name=com.mysql)
Finally, install the data source by using the data-source shortcut command, which requires also the –profile additional option:
data-source add --jndi-name=java:/MySqlDS --name=MySQLPool --connection -url=jdbc:mysql://localhost:3306/mysqldb --driver-name=mysql --user-name=jboss --password=jboss --profile=full-ha
Creating an XA Datasource
If you are going to use an XA Datasource in your applications there are some changes that you need to apply to your CLI scripts. Start as usual by creating the module at first:
module add --name=com.mysql --resources=mysql-connector-java.jar --dependencies=javax.api,javax.transaction.api
Next, install the JDBC driver using the above module:
/subsystem=datasources/jdbc-driver=mysql:add(driver-name=mysql,driver-module-name=com.mysql)
The twist now is to use the xa-data-source shortcut command in order to create the XA Datasource. This command requires that you specify the Datasource name, its JNDI Bindings, the XA Datasource class, the Security settings and at least one property:
xa-data-source add --name=MySqlDSXA --jndi-name=java:/MySqlDSXA --driver-name=mysql --xa-datasource-class=com.mysql.jdbc.jdbc2.optional.MysqlXADataSource --user -name=jboss --password=jboss --xa-datasource-properties=[{ServerName=localhost}]
Next, you can add additional properties needed for your Database connections, such as the Database schema:
/subsystem=datasources/xa-data-source=MySqlDSXA/xa-datasource-properties=DatabaseName:add(value="mysqlschema")
Tuning MySQL
Besides the standard datasource tuning information (you can read also here) MySQL has some specific parameters which can be used for tuning:
- innodb_buffer_pool_size: this is the most important setting to look at after you have completed the Database installation. The buffer pool is where data and indexes are cached: having it as large as possible will ensure you use memory and not disks for most read operations. Typical values are 5-6GB (8GB RAM), 20-25GB (32GB RAM), 100-120GB (128GB RAM).
- innodb_log_file_size: this is the size of the Database redo logs. The redo logs are used to make sure writes are fast and durable and also during crash recovery. Since MySQL 5.5 so you can now have good write performance and fast crash recovery. Starting with innodb_log_file_size = 512M (giving 1GB of redo logs) should give you plenty of room for writes. If you know your application is write-intensive and you are using MySQL 5.6, you can start with innodb_log_file_size = 4G.
- max_connections: Even if you configure WildFly with a huge Connection Pool, if this parameter is not adequate you might end up with the ‘Too many connections’ error because max_connections is too low. The main drawback of high values for max_connections (like 1000 or more) is that the server will become unresponsive if for any reason it has to run 1000 or more active transactions. Using a connection pool at the application level or a thread pool at the MySQL level can help here.
For example, as you can see in the following picture, a max-pool-size configuration of 500 will not be enough to enable that number of connections if MySQL is configured with default settings:
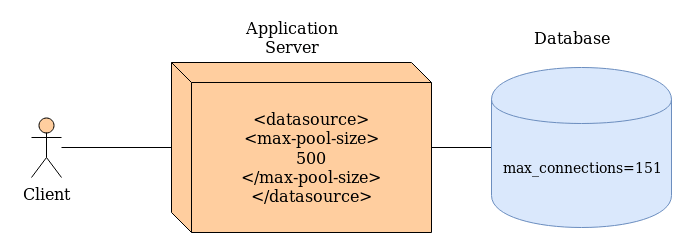
If you are using Docker, you can easily configure the following environment variables to set the above parameters:
MYSQL_INNODB_BUFFER_POOL_SIZE (default: 32M or 50% of available memory): The size of the buffer pool where InnoDB caches table and index data

MYSQL_INNODB_LOG_FILE_SIZE (default: 8M or 15% of available available): The size of each log file in a log group

MYSQL_MAX_CONNECTIONS (default: 151): The maximum permitted number of simultaneous client connections
For example:
$ docker run -d --name mysql -e MYSQL_USER=jboss -e MYSQL_PASSWORD=jboss -e MYSQL_DATABASE=mysqlschema -e MYSQL_ROOT_PASSWORD=secret mysql -e MYSQL_MAX_CONNECTIONS=500
Troubleshooting MySQL Connectivity
SSL Warning in your server logs:
WARN: Establishing SSL connection without server's identity verification is not recommended. According to MySQL 5.5.45+, 5.6.26+ and 5.7.6+ requirements SSL connection must be established by default if explicit option isn't set. For compliance with existing applications not using SSL the verifyServerCertificate property is set to 'false'. You need either to explicitly disable SSL by setting useSSL=false, or set useSSL=true and provide truststore for server certificate verification.
If your connection is not exposed over an external network (typically a localhost connection), or you are working in a non-production environment, then you can disable SSL by including the option useSSL=false.
jdbc:mysql://localhost:3306/mydb?autoReconnect=true&useSSL=false
Alternatively, you can keep SSL conections on but disable Server Certificate verification. For example:
jdbc:mysql://localhost:3306/mydb?verifyServerCertificate=false&useSSL=true
Finally, if your MySQL Client needs to verify the identity of the server it’s connecting to, you need to enable the allowPublicKeyRetrieval option as discussed in this article: allowPublicKeyRetrieval option in the MySQL JDBC connector