JBoss Remoting is a project which provides the ability for making synchronous and asynchronous remote calls, push and pull callbacks, and automatic discovery of remoting servers. As a matter of fact, JBoss Remoting provides the basis for more complex and heavyweight remoting frameworks such as Enterprise Java Beans.
The version 2 of JBossRemoting is available here: https://jbossremoting.jboss.org/ . This version, includes documentation and a distribution zip.
The version 3 of JBoss Remoting is available on GitHub: https://github.com/jboss-remoting/jboss-remoting . This version is the next generation of Remoting. It is one of the core modules available in WildFly and JBoss EAP. There is no official documentation so this project is meant to be used internally as an application server module.
We will provide here a brief overview on both versions of JBoss remoting.
JBoss Remoting 3 short guide
Remoting 3 is the next generation of JBoss Remoting, which carries on and expands upon capabilities from previous generations, as well as introducing completely new features.
- Pluggable Transport Protocols
- Additional protocols detected at runtime
- Pluggable Marshalling Strategies
- Uses the powerful JBoss Marshalling library
- Much more efficient than plain Java Serialization
- Security Features
- SSL support for integrity and confidentiality protection, as well as server authentication
- SASL support for client authentication and authorization
- Streaming Support
- InputStream/OutputStream
- Reader/Writer
- Special Object streaming types: ObjectSource/ObjectSink
- Synchronous and asynchronous invocation
- Synchronous, or blocking, invocation sends request, waiting for a reply before execution continues
- Asynchronous invocation does not block, instead using the powerful IoFuture interface to allow deferred or callback-driven evaluation of the invocation result
- Efficient request multiplexing – one connection handles any number of requests in either direction (client to server or server to client)
- Local and remote protocols
- Local protocol runs invocations within the same VM without marshalling/unmarshalling
- Deterministic handling of all failure cases
- Including server and connection failure cases
- Logical and well-documented exception hierarchy allows user applications to take appropriate action such as retrying an operation if appropriate
Let’s see an example of it. The example includes the following classes:
- CharSequenceReceiver play a role as Server, it use JBoss Remoting 3, listen on localhost/30123, it will output every received char sequence.
- CharSequenceSender play a role as Client, it connect to Server, create a Remoting 3 Connection, use this connection it can send char sequence repeated
Here is the CharSequenceReceiver Class:
package org.jboss.remoting3.sample;

import java.io.IOException;
import java.net.InetSocketAddress;

import org.jboss.remoting3.Channel;
import org.jboss.remoting3.Endpoint;
import org.jboss.remoting3.MessageInputStream;
import org.jboss.remoting3.OpenListener;
import org.jboss.remoting3.Remoting;
import org.jboss.remoting3.remote.RemoteConnectionProviderFactory;
import org.jboss.remoting3.security.SimpleServerAuthenticationProvider;
import org.jboss.remoting3.spi.NetworkServerProvider;
import org.xnio.IoUtils;
import org.xnio.OptionMap;
import org.xnio.Options;
import org.xnio.Sequence;
import org.xnio.channels.AcceptingChannel;
import org.xnio.channels.ConnectedStreamChannel;

public class CharSequenceReceiver {

    private static final int THREAD_POOL_SIZE = 100;
    private static final int BUFFER_SIZE = 8192;
    private static byte[] buffer;

    protected final Endpoint serverEndpoint;

    private AcceptingChannel<? extends ConnectedStreamChannel> server;

    public CharSequenceReceiver() throws IOException {
        serverEndpoint = Remoting.createEndpoint("connection-test-server", OptionMap.create(Options.WORKER_TASK_CORE_THREADS, THREAD_POOL_SIZE, Options.WORKER_TASK_MAX_THREADS, THREAD_POOL_SIZE));
        serverEndpoint.addConnectionProvider("remote", new RemoteConnectionProviderFactory(), OptionMap.create(Options.SSL_ENABLED, Boolean.FALSE));
        final NetworkServerProvider networkServerProvider = serverEndpoint.getConnectionProviderInterface("remote", NetworkServerProvider.class);
        SimpleServerAuthenticationProvider provider = new SimpleServerAuthenticationProvider();
        provider.addUser("bob", "test", "pass".toCharArray());
        server = networkServerProvider.createServer(new InetSocketAddress("localhost", 30123), OptionMap.create(Options.SASL_MECHANISMS, Sequence.of("CRAM-MD5")), provider, null);
        System.out.println("Server Created, " + server.getLocalAddress());

        serverEndpoint.registerService("test", new OpenListener(){

            public void channelOpened(Channel channel) {
                channel.receiveMessage(new Channel.Receiver(){

                    public void handleError(Channel channel, IOException error) {

                    }

                    public void handleEnd(Channel channel) {
//                        System.out.println(channel.getConnection().getRemoteEndpointName() + " ended");
                    }

                    public void handleMessage(Channel channel, MessageInputStream message) {
                        try {
                            channel.receiveMessage(this);
                            buffer = new byte[BUFFER_SIZE];
                            while (message.read(buffer) > -1);
                            System.out.println("    Receive: " + new String(buffer));
                        } catch (Exception e) {
                            e.printStackTrace();
                        } finally {
                            IoUtils.safeClose(message);
                        }
                    }
                });
            }

            public void registrationTerminated() {

            }}, OptionMap.EMPTY);
    }


    public static void main(String[] args) throws IOException {
        new CharSequenceReceiver();
    }

}
Here is the CharSequenceSender Class:
package org.jboss.remoting3.sample;

import java.io.BufferedReader;
import java.io.IOException;
import java.io.InputStreamReader;
import java.net.InetSocketAddress;

import org.jboss.remoting3.Channel;
import org.jboss.remoting3.Connection;
import org.jboss.remoting3.Endpoint;
import org.jboss.remoting3.MessageOutputStream;
import org.jboss.remoting3.Registration;
import org.jboss.remoting3.Remoting;
import org.jboss.remoting3.remote.RemoteConnectionProviderFactory;
import org.xnio.IoFuture;
import org.xnio.IoUtils;
import org.xnio.OptionMap;
import org.xnio.Options;

public class CharSequenceSender {

    private static final Integer THREAD_POOL_SIZE = 100;

    protected final Endpoint clientEndpoint;

    protected final Registration clientReg;

    protected final Connection conn;

    public CharSequenceSender() throws IOException {
        clientEndpoint = Remoting.createEndpoint("connection-test-client", OptionMap.create(Options.WORKER_TASK_CORE_THREADS, THREAD_POOL_SIZE, Options.WORKER_TASK_MAX_THREADS, THREAD_POOL_SIZE));
        clientReg = clientEndpoint.addConnectionProvider("remote", new RemoteConnectionProviderFactory(), OptionMap.create(Options.SSL_ENABLED, Boolean.FALSE));
        conn = clientEndpoint.connect("remote", new InetSocketAddress("localhost", 0), new InetSocketAddress("localhost", 30123), OptionMap.EMPTY, "bob", "test", "pass".toCharArray()).get();
        System.out.println("Connection created, " + conn.getEndpoint().getName());
        send();
    }


    private void send() {
        System.out.println("enter 'quit' or 'exit' exit the ChatDemo");

        BufferedReader in = new BufferedReader(new InputStreamReader(System.in));

        while (true) {
            try {
                String line = in.readLine().toLowerCase();
                if (line.startsWith("quit") || line.startsWith("exit")) {
                    break;
                }

                MessageOutputStream stream = null;
                Channel channel = null;

                try {
                    final IoFuture<Channel> future = conn.openChannel("test", OptionMap.EMPTY);
                    channel = future.get();
                    stream = channel.writeMessage();
                    stream.write(new String(line.getBytes(), "UTF-8").getBytes());
                } catch (Exception e) {
                    throw new RuntimeException("send char sequence error", e);
                } finally {
                    stream.close();
                    IoUtils.safeClose(channel);
                }

            } catch (Exception e) {
                throw new RuntimeException("send char sequence error", e);
            }
        }

        IoUtils.safeClose(clientReg);
        IoUtils.safeClose(clientEndpoint);
    }


    public static void main(String[] args) throws IOException {
        new CharSequenceSender();
    }

}
To build the project, you need to include the following dependencies in your pom.xml:
<dependency>
   <groupId>org.jboss.remoting3</groupId>
   <artifactId>jboss-remoting</artifactId>
   <version>3.2.16.GA</version>
</dependency>
<dependency>
    <groupId>org.jboss.xnio</groupId>
    <artifactId>xnio-nio</artifactId>
    <version>3.0.7.GA</version>
</dependency>
JBoss Remoting 2 short guide
JBossRemoting is a standalone project,which enables you to very easily design, implement, and deploy services that can be remotely invoked by clients using several different transport mechanisms transparently. As a matter of fact, JBoss Remoting provides the basis for more complex and heavyweight remoting frameworks. For instance, JBoss web services stack, JBossWS, is based on JBoss Remoting with a custom SOAP data marshaller, also JBoss ESB relies on JBoss remoting as transport and data marshaller.
Until now, when you had to connect to a remote server your only option was to use the necessary interfaces which speak the same protocol as the server: for example a Socket would require a Socket client, a Web resource needed an URLConnection and so on…
With JBoss remoting all you have to provide is the endpoint reference:
transport://host:port
for example if you had to connect to a socket server you could use the following transport protocol
socket://host:8888
while if you are an http client all you have to do is switching to :
http://host:8080
The class which wraps the transport protocol is the InvokerLocator:
InvokerLocator myLocator =
     new InvokerLocator("socket://127.0.0.1:8084");
The remoting framework will then take the information embedded within the InvokerLocator and construct the underlying remoting components needed and build the full stack required for either making or receiving remote invocations.
Installing JBoss remoting
Before building a working sample download the JBoss remoting API from JBoss site:
http://www.jboss.org/jbossremoting/downloads/
Now unzip the JBoss remoting zip file and add the following libraries to your favourite development IDE:
JBoss remoting core libs:
- jboss-remoting.jar
- jboss-remoting-core.jar
Apache libs:
- log4j.jar
JBoss libs:
- jboss-logging-log4j.jar
- jboss-logging-spi.jar
- jboss-serialization.jar
- jnpserver.jar
- jboss/jboss-common-core.jar
Third part libs (oswego libs):
- concurrent.jar
A JBoss Remoting Server:
package test;

import org.jboss.remoting.InvokerLocator;
import org.jboss.remoting.transport.*;


public class Server {


 public Server() throws Exception {


  InvokerLocator myLocator = new InvokerLocator("socket://127.0.0.1:8888");
  Connector connector = new Connector();
  connector.setInvokerLocator(myLocator.getLocatorURI());
  connector.start();

  connector.addInvocationHandler("MYSYS",new MyInvocationHandler());

  }

  public static void main(String[] args) throws Exception {
    new Server();

 }

}
The InvokerLocator merely indicates where and how clients can connect to the server. The server must create a Connector and start it in order to actually be live on the network. It does this by creating an org.jboss.remoting.transport.Connector, associating that Connector with our InvokerLocator URL, and then starting the Connector.
Ok but how to deal with incoming requests? That’s where invocation handlers come in. You plug your service-specific code into the JBoss Remoting framework by implementing org.jboss.remoting.ServerInvocationHandler and installing that handler into your Connector :
package test;

import javax.management.MBeanServer;
import javax.management.ObjectName;

import org.jboss.remoting.InvocationRequest;
import org.jboss.remoting.ServerInvocationHandler;
import org.jboss.remoting.ServerInvoker;
import org.jboss.remoting.callback.InvokerCallbackHandler;

public class MyInvocationHandler implements ServerInvocationHandler {
  public Object invoke(InvocationRequest invocation) {
    System.out.println("New Message incoming!");
    return "Received:" + invocation.getParameter();
  }

   public void addListener(InvokerCallbackHandler arg0) {

   }

   public void removeListener(InvokerCallbackHandler arg0) {

   }

   public void setInvoker(ServerInvoker arg0) {

   }

   public void setMBeanServer(MBeanServer arg0) {

   }

}
As you can see, you need to implement several methods, but we are going to use only the invoke method for our sample: that’s the method which receives notification when a new connection kicks and perform the work your service actually needs.
A JBoss Remoting Client:
package test;
import org.jboss.remoting.Client;
import org.jboss.remoting.InvokerLocator;


public class TestClient {


 TestClient() throws Throwable {
   InvokerLocator myLocator = new InvokerLocator("socket://127.0.0.1:8888");
   Client myClient = new Client(myLocator, "MYSYS");
   myClient.connect();
   System.out.println(myClient.invoke("Message for you!"));

  }
  public static void main(String args[]) throws Throwable{
   new TestClient();
  }
}
As you can see, you only need to use a generic Client interface with your InvokerLocator URL. Now you can remotely invoke our service and obtain its results via the Client.invoke().
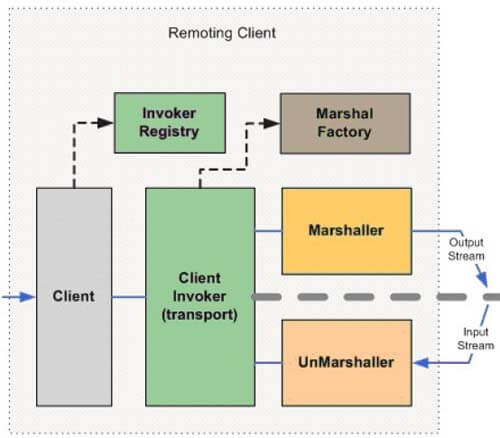
How it works:
Ok the code is quite easy to understand but how it happens to work ? let’s see in detail the process of a request:
When a user calls on the Client to make an invocation, it will pass this invocation request to the appropriate client Invoker, based on the transport specified by the locator url.
The client invoker will then use the Marshaller to convert the invocation request object to the proper data format to send over the network.
On the server side, an Unmarshaller will receive this data from the network and convert it back into a standard invocation request object and send it on to the Server Invoker.
The server invoker will then pass this invocation request on to the user’s implementation of the Invocation handler.
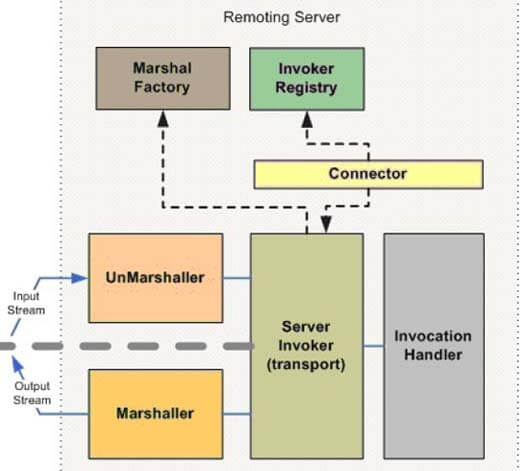
The response from the invocation handler will pass back through the Server invoker and on to the Marshaller, which will then convert the invocation response object to the proper data format and send back to the client. The Unmarshaller on the client will convert the invocation response from wire data format into standard invocation response object, which will be passed back up through the client invoker and Client to the original caller.