In this tutorial we will learn how to configure a dedicated Nexus repository Manager to be as proxy server for JBoss’Maven public repository.
A Repository Manager is a dedicated server application which can be used to manage repositories of binary components. Using a repository Manager is commonly referred as a best practice providing the following benefits:
- Greatly reduced number of downloads from remote repositories, saving time and bandwidth
- Improved stability of your builds due to reduced reliance on external repositories
- Increased control of consumed and provided artifacts
- Manages and configes a central storage and access to artifacts and meta data to be shared with developers or QA
Installing Nexus
Nexus CSS is available at: https://www.sonatype.com/nexus-repository-oss
Download the format required for your platform. On Linux/Unix start it as:
$ nexus start
A Server Web application will be available at: http://localhost:8081/
Login with the default credentials: admin/admin123
Create a Maven Proxy
Next step will be creating a Maven proxy for the jboss-public-repository-group. If you check the default repositories used in your Maven, you will see something like that:
$ mvn dependency:list-repositories
[INFO] Scanning for projects
[INFO] Repositories Used by this build:
[INFO]       id: central
      url: https://repo.maven.apache.org/maven2
   layout: default
snapshots: [enabled => false, update => daily]
 releases: [enabled => true, update => daily]

[INFO]       id: jboss-public-repository-group
      url: http://repository.jboss.org/nexus/content/groups/public
   layout: default
snapshots: [enabled => false, update => never]
 releases: [enabled => true, update => never]
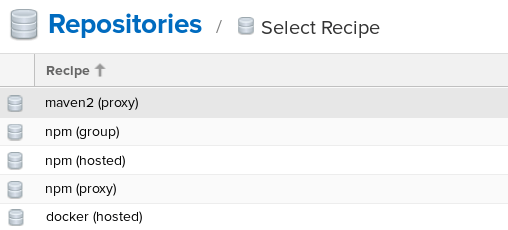
In our case, we will replace the jboss-public-repository-group with a Mirror configured to run on the local Nexus. So as first step, select the upper Server Administration gear and pickup Repositories from the left panel. Next click on the Button Create Repository.

Choose as Repository type Maven 2 proxy:
Finally in the repository window enter the Name for your Proxy and the Remote Storage which is http://repository.jboss.org/nexus/content/groups/public
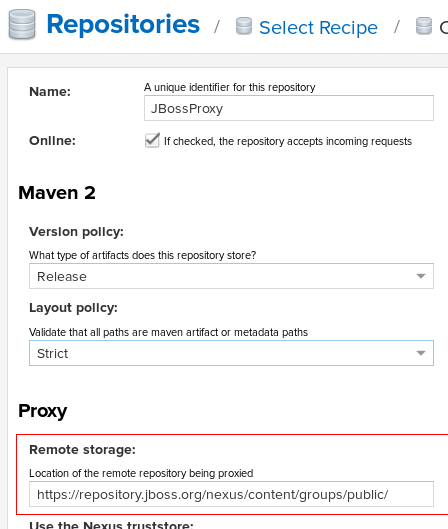
Save your data.
Now create a custom settings.xml file which points to your local Nexus Mirror. Here’s an example:
<?xml version="1.0" encoding="UTF-8"?>
<settings xmlns="http://maven.apache.org/SETTINGS/1.0.0"
          xmlns:xsi="http://www.w3.org/2001/XMLSchema-instance"
          xsi:schemaLocation="http://maven.apache.org/SETTINGS/1.0.0 http://maven.apache.org/xsd/settings-1.0.0.xsd">

  <servers>
  </servers>
   <mirrors>
    <mirror>
      <id>proxy-jboss-public</id>
      <name>JBoss Public</name>
      <mirrorOf>jboss-public-repository-group</mirrorOf>
      <url>http://localhost:8081/repository/JBossProxy/</url>
    </mirror>
  </mirrors>
</settings>
Great, now pickup a sample JEE project, clean your local Maven repository and run:
mvn clean install -s settings.xml
When building your artifacts, you should see that the components are being downloaded through your Nexus repository Manager:
[INFO] Scanning for projects..
Downloading: http://localhost:8081/repository/JBossProxy/org/jboss/jboss-parent/19/jboss-parent-19.pom
Downloaded: http://localhost:8081/repository/JBossProxy/org/jboss/jboss-parent/19/jboss-parent-19.pom (31 KB at 8.9 KB/sec)
Downloading: http://localhost:8081/repository/JBossProxy/org/jboss/shrinkwrap/resolver/shrinkwrap-resolver-bom/2.2.1/shrinkwrap-resolver-bom-2.2.1.pom
 ....
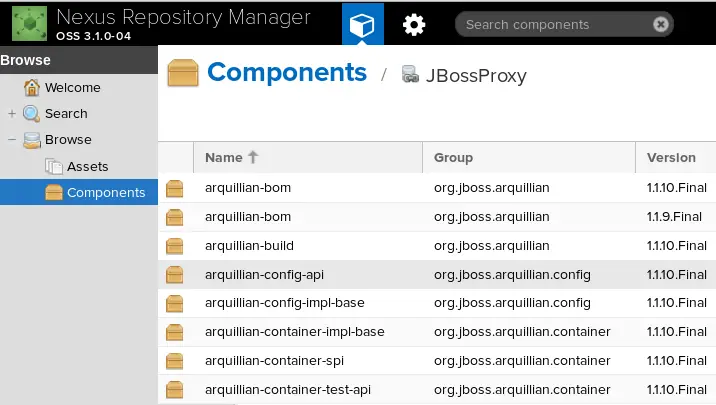
As a proof of concept, you can check through your Repository to see that now it has been populated with Jboss Artifacts:
Great! Now you ready to improve the efficiency of your team by using Nexus’ Central Repository Manager!