This tutorial will show you how to develop some basic portlets using GateIn portal along with some basic background for those that are new to Portlets.
A portlet is a pluggable user interface component that provides specific content, which could be a service or information from existing systems. Portlets provide the user interface of the portal by accessing distinct applications, systems, or data sources and generating markup fragments to present their content to portal users.
A typical example of a portlet can be a eather portlet that provides weather information for a city by accessing a Search Engine, or a facebook Portlet which shows recent messages that you have received.
So the primary responsibility of a portlet is to generate a markup fragment (such as HTML, XML, or WML), which is then displayed on a portal page within a window,called a portlet window. A portal page usually displays multiple portlets in distinct port-let windows, each with its own title and set ofbuttons to change its look and feel, set its preferences, and maximize, minimize, or remove the window.
Difference with Servlets: Unlike Servlets where the user interface isn’t componentized a portlet is responsible for generating the user interface specific to one visual component.
The responsibility of displaying the complete portal page remains of the portal server, which aggregates fragments generated by portlets and displays them in the portlet windows on the portal page. This division of responsibility makes it possible for a portlet to focus on generating its own user interface.
Libraries needed to run GateIn portlet application
The main dependency that you need when working with Maven and Portlets is:
<dependency>
<groupId>javax.portlet</groupId>
<artifactId>portlet-api</artifactId>
<version>2.0</version>
<scope>provided</scope>
</dependency>
If you are compiling your GateIn Project using Eclipse, you need to provide the following import in order to compile your Portlets. (It is part of the GateIn distribution).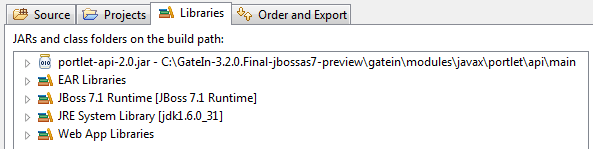
So create a new Java Dynamic Web project and add a Java class named HelloWorldPortlet to it:
package com.sample;
import java.io.IOException;
import java.io.PrintWriter;
import javax.portlet.ActionRequest;
import javax.portlet.ActionResponse;
import javax.portlet.GenericPortlet;
import javax.portlet.PortletException;
import javax.portlet.ProcessAction;
import javax.portlet.RenderMode;
import javax.portlet.RenderRequest;
import javax.portlet.RenderResponse;
public class HelloWorldPortlet extends GenericPortlet {
@RenderMode(name = “view”)
public void showTime(RenderRequest request,
RenderResponse response) throws
PortletException, IOException {
PrintWriter out = response.getWriter();
out.println(“Hello! Time is “+new java.util.Date().toString());
}
}
A portlet class must implement the javax.portlet.Portletinterface, directly or indirectly. The portlet API has a GenericPortlet abstract class that implements the Portletinterface and provides a default implementation for its methods. Developers will usually subclass the GenericPortletclass and override one or more methods to provide a specific implementation.
The @RenderMode annotation for the showTime method informs that this method will use the portlet’s VIEW mode
The getWriter() method of RenderResponse is similar to the getWriter() method of HttpServletResponse, which returns a PrintWriterobject.
The following table discusses about Portlet modes and the content generated in those modes
| VIEW | A portlet generates content that reflects the current state of the portlet instance. This content carries business value. The GenericPortletclass provides the doView method, which is used to support the VIEW mode. It’s mandatory for portlets to support VIEW mode. |
| EDIT | A portlet generates content that allows users to personalize the content and behavior of the portlet. This content doesn’t carry any business value; it’s meant for users to specify their preferences. The GenericPortletclass provides the doEdit method, which is used to support the EDIT mode. |
| HELP | A portlet generates content that shows help information. This content doesn’t carry any business value; it’s meant to provide users with information on how to use the portlet. The GenericPortletclass provides the doHelp method, which is used to support the HELP mode. |
Finally, before deploying your Portlet you need to provide a configuration file named portlet.xml:
<?xml version=”1.0″ encoding=”UTF-8″?>
<portlet-app xmlns=”http://java.sun.com/xml/ns/portlet/portlet-app_2_0.xsd”
xmlns:xsi=”http://www.w3.org/2001/XMLSchema-instance”
xsi:schemaLocation=”http://java.sun.com/xml/ns/portlet/portlet-app_2_0.xsd http://java.sun.com/xml/ns/portlet/portlet-app_2_0.xsd”
version=”2.0″>
<portlet>
<portlet-name>HelloWorld</portlet-name>
<portlet-class>com.sample.HelloWorldPortlet</portlet-class>
<supports>
<mime-type>text/html</mime-type>
<portlet-mode>view</portlet-mode>
</supports>
<portlet-info>
<title>Hello World portlet</title>
</portlet-info>
</portlet>
</portlet-app>
This file needs to be placed into the WEB-INF folder of your Web application and contains the Portlets which are used by your applications (just like the web.xml does for your Servlets) and their rendering mode.
Deploy your first GateIn portlet application
In order to deploy your first portlet you need to follow these steps:
At first deploy the web application WAR file just as an ordinary Web application
Log in as an Administrator user
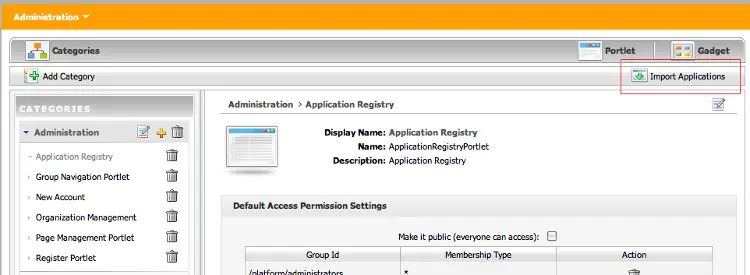
Go to to Group > Administration > Application Registry to import the custom portlets that form part of the portlet application.
The Application Registry shows all the portlets that have been imported into the GateIn portal. Import the deployed portlets by clicking the Import Applications button shown in the following picture.
Once that your portlets has been installed, it will appear in the Category panel.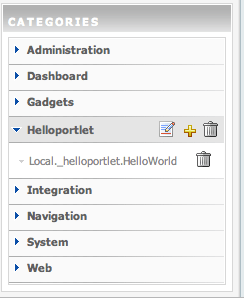
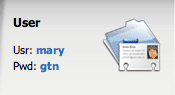
Now login with an User to the GateIn Portal
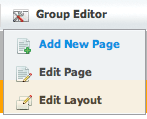
And add a New Page to the base portal:
Choose a path of your like (while reflects the path on the Menu) and enter a Node Name which will display in the Menu: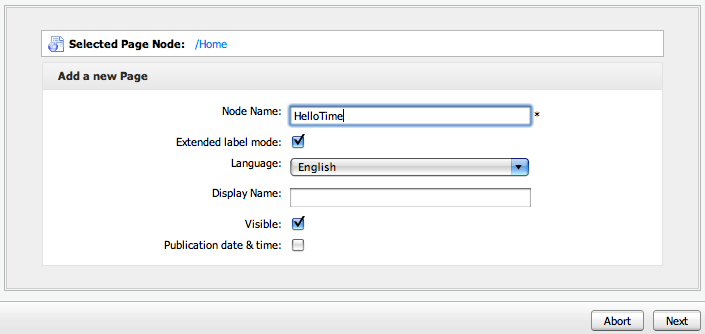
Now Drag and Drop into the page the HelloWorld portlet we have just created.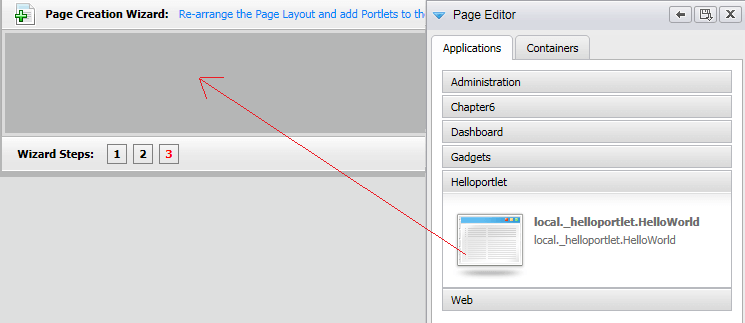
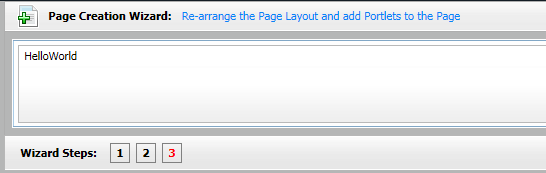
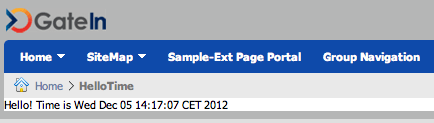
You should see that now your page contains the HelloWorld portlet as shown by the following picture:
Now you save your work and check that your Portlet is working, by navigating to the Upper Menu.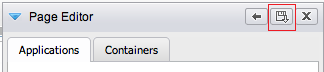
Now recall your first GateIn portlet from the upper menu: Home > HelloTime:
Creating a portlet using JSPs
So here’s a more complex example where we will use JSP pages to handle some interaction between the Portlet views.
This application will display the result of a simple Math addition, making use of PortletContext to navigate between the pages of the application.
As first step create a new Web application named for example formexample.
Next add a class to it named FormPortlet:
package com.sample;
import java.io.IOException;
import java.io.PrintWriter;
import javax.portlet.ActionRequest;
import javax.portlet.ActionResponse;
import javax.portlet.GenericPortlet;
import javax.portlet.PortletException;
import javax.portlet.ProcessAction;
import javax.portlet.RenderMode;
import javax.portlet.RenderRequest;
import javax.portlet.RenderResponse;
public class FormPortlet extends GenericPortlet {
@RenderMode(name = “view”)
public void display(RenderRequest request, RenderResponse response) throws PortletException, IOException {
if (request.getParameter(“result”) != null) {
getPortletContext().getRequestDispatcher(“/output.jsp”).include(request, response);
}
else {
getPortletContext().getRequestDispatcher(“/form.jsp”).include(request, response);
}
}
@ProcessAction(name = “calculateAction”)
public void nameAction(ActionRequest request, ActionResponse response) throws PortletException {
int number1=Integer.parseInt(request.getParameter(“number1”));
int number2=Integer.parseInt(request.getParameter(“number2”));
response.setRenderParameter(“result”, String.valueOf(number1+number2));
}
}
As you can see, this Portlet uses the PortletContext to navigate between JSP pages.
The concept of a PortletContext is similar to a ServletContext: it provides access to the environment in which the portlet is running. In the case of portlets, the environ-ment is the portlet application to which the portlet belongs, and the portlet container in which the portlet is running.
In our example, the PortletContext retrieves the PortletRequestDispatcher which defines the following methods to include content generated by a resource or forward request to a resource:
include: This method includes the content generated from the resource in the portlet response.
forward: This method forwards the request for generating content to another resource.
Let’s add two JSP pages to our Project so it will be easier to understand the flow. This is form.jsp which contains a basic form, collecting two numbers as request parameter:
<%@ taglib uri=”http://java.sun.com/portlet_2_0″ prefix=”portlet” %>
<portlet:defineObjects/>
<div>
<div class=”portlet-section-header”>Calculator Machine</div>
<br/>
<div class=”portlet-section-body”>
<form action='<portlet:actionURL name=”calculateAction”/>’ method=”post”>
<span class=”portlet-form-label”>Enter two numbers</span>
<input class=”portlet-form-input-field” type=”text” name=”number1″/>
<input class=”portlet-form-input-field” type=”text” name=”number2″/>
<input class=”portlet-form-button” type=”Submit” value=”Calculate Sum”/>
</form>
</div>
<br/>
</div>
At first, notice the <defineObjects> tag is used to introduce scripting variables in the JSP page. Then you can use implicit Portlet objects such as the renderRequest object which is used to obtain the current portlet mode and window state information.
Next pay attention to tge actionURL tag which can be used in the form action attribute (or in in hyperlinks as well) to send an action request to a portlet when a user clicks on it. This will recall the FormPortlet’s calculateAction.
Next jsp is output.jsp which will merely display the result which will be contained into the result request variable.
<%@ taglib uri=”http://java.sun.com/portlet_2_0″ prefix=”portlet” %>
<portlet:defineObjects/>
<div>
<div class=”portlet-section-header”>Calculator Machine</div>
<br/>
<div class=”portlet-section-body”>Result: <%=renderRequest.getParameter(“result”) %></div>
<br/>
<a href=”<portlet:renderURL portletMode=’view’ />”>Reset</a>
<br/>
</div>
Nothing new here, just notice the Reset hyperlink below that is used to restart the application. The only missing piece is portlet.xml which follows here:
<?xml version=”1.0″ encoding=”UTF-8″?>
<portlet-app xmlns=”http://java.sun.com/xml/ns/portlet/portlet-app_2_0.xsd”
xmlns:xsi=”http://www.w3.org/2001/XMLSchema-instance”
xsi:schemaLocation=”http://java.sun.com/xml/ns/portlet/portlet-app_2_0.xsd http://java.sun.com/xml/ns/portlet/portlet-app_2_0.xsd”
version=”2.0″>
<portlet>
<portlet-name>FormPortlet</portlet-name>
<portlet-class>com.sample.FormPortlet</portlet-class>
<supports>
<mime-type>text/html</mime-type>
<portlet-mode>view</portlet-mode>
</supports>
<portlet-info>
<title>FormPortlet</title>
</portlet-info>
</portlet>
</portlet-app>
Now load the Portlet using in the Application Registry as shown in the earlier example, and add a new page containing this portlet.
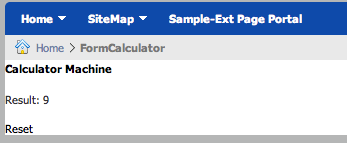
Here’s the expected output:

Once you click on the “Calculate Sum” button, the outout.jsp page will appear:
For the sake of brevity there are no validation controls on the numbers entered- we leave this as an exercise to the reader. Enjoy GateIn!