Visual Studio Community Edition is completely free IDE for individual developers. Despite being free, it provides a rich set of features and capabilities comparable to the paid editions of Visual Studio. In this article we will learn how to use it to develop applications on top of WildFly application Server.
Harness the Advantages of Visual Studio
There are several Development IDEs for Enterprise applications. Visual Studio, however is gaining a huge popularity between developers for some good reasons:
- Vibrant Ecosystem: Visual Studio Community Edition benefits from a vibrant and active developer community. It provides access to a vast ecosystem of extensions, plugins, and tools developed by Microsoft and the community. These extensions enhance productivity and add additional functionality to the IDE, catering to diverse development needs.
- Collaboration and Version Control: Visual Studio Community Edition integrates with popular version control systems such as Git and provides features for team collaboration. It enables developers to efficiently collaborate on projects, manage source code repositories, and track changes using built-in version control tools.
- Continuous Integration and Delivery: The IDE supports continuous integration and delivery (CI/CD) workflows. It seamlessly integrates with services like Azure DevOps and GitHub Actions, enabling developers to automate build, test, and deployment processes to deliver high-quality software efficiently.
Installing Visual Studio
Firstly, download Visual Studio Community edition from https://visualstudio.microsoft.com/vs/community/
As it is, Visual Studio is a basic Development Editor so we will install an extension to run Java applications and an extension for JBoss EAP or WildFly application Server
In the left corner of Visual Studio select “Manage” and “Extensions“. Firstly, install the Java Language Support extension by searching “java“:

Next, search “jboss” and install the “Server Connector” for JBoss Middleware:

Start WildFly from Visual Studio
With your extensions in place, the first thing we will show is how to start/stop WildFly or JBoss EAP from Visual Studio. From the bottom of the Editor, check the Red Hat Connector and right-click on it to Create New Server:

Then, choose the location of WildFly or JBoss EAP and the initial configuration settings:
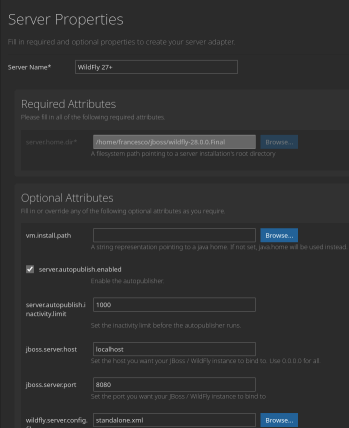
Finally, after the application server settings are complete, you will be able to perform the standard management actions on WildFly application server. Right-click on the Server definition to access them:
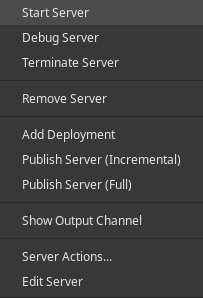
For example, if you select the Start Server option, WildFly application Server will start in the Console window of Visual Studio:

Server Management actions from Visual Studio
Besides application server start/stop, you can also perform some other actions that are integrated with the extension. For example, if you choose “Server Actions”, you can select Edit Configuration File to edit WildFly’s configuration:

Besides, you can also choose to Add Deployment and deploy the application in the Editor on top of WildFly.
Finally, as most IDE do, also Visual Studio allows you to start WildFly in debug mode, which will start a listening socket to debug your applications:
Listening for transport dt_socket at address: 46489
Conclusion
In conclusion, developing WildFly applications with Visual Studio provides developers with a powerful and comprehensive environment that enhances productivity, streamlines workflows, and enables seamless integration with the WildFly application server. By leveraging the extensive features and tools offered by Visual Studio, developers can expedite development cycles, improve code quality, and deliver high-performing applications.