How to run WildFly with Helm Charts
Helm is a package Manager that simplify the management of manifest resources you need for Kubernetes projects. In this article we will walk through an example WildFly application which we will deploy on OpenShift using Helm Charts
Helm overview and setup
Helm charts can simplify the complexities of dependency management for a Kubernetes project. With a single command (helm) you can install an entire application, and Helm will pull the required dependencies and apply the manifests.
Helm Charts also enable IT admins to version manifest files, which keeps specific configurations for the infrastructure in the form of code. Installing Helm is also fairly simple. You can use an installer script that will automatically grab the latest version of Helm and install it locally:
$ curl -fsSL -o get_helm.sh https://raw.githubusercontent.com/helm/helm/main/scripts/get-helm-3
$ chmod 700 get_helm.sh
$ ./get_helm.sh
When done, check your helm version:
$ helm version
version.BuildInfo{Version:"v3.8.0", GitCommit:"d14138609b01886f544b2025f5000351c9eb092e", GitTreeState:"clean", GoVersion:"go1.17.5"}
Deploying WildFly on the Cloud
Hard requirements: Install a Kubernetes platform such as OpenShift. For this purpose, check this tutorial to get started quickly with a single cluster node: Getting started with Code Ready Containers
Next, start OpenShift:
crc startYour Ops layer is ready. To deploy WildFly application, we need to add WildFly Helm Chart Repository:
helm repo add wildfly https://docs.wildfly.org/wildfly-charts/To verify which WildFly version is that Repository, use the “helm search” command:
helm search repo wildfly
NAME                  	CHART VERSION	APP VERSION	DESCRIPTION
wildfly/wildfly       	1.5.4        	26.0       	Build and Deploy WildFly applications on OpenShift
wildfly/wildfly-common	1.4.1        	1.0.0      	A library chart for WildFly-based applications
Then, to build a WildFly application, we will specify into a YAML configuration file the information that the Helm Chart requires. For example:
- The Source Repository of your application
- The mode, which can be s2i and bootable-jar. the former will use S2I to provision a full-blown WildFly application server. The latter will instead provision a WildFly Bootable JAR
- Environment Properties and Maven options
- Deployment options: such as the number of replicas
Here is a minimalist sampleapp.yaml which deploys the example JAXRS Application from this tutorial: Turn your WildFly applications in bootable JARs
build:
  uri: https://github.com/fmarchioni/mastertheboss.git
  ref: master
  contextDir: bootable-jar/basic
  mode: bootable-jar
deploy:
  replicas: 1
Use the helm install command to deploy the application by referencing the “wildfly” Helm Chart:
helm install sample-app wildfly/wildfly -f sampleapp.yamlIn a while, your application will be ready:
$ oc get pods
NAME                          READY     STATUS      RESTARTS   AGE
sample-app-1-build            0/1       Completed   0          76m
sample-app-7b56cb8bdd-9rvlz   1/1       Running     0          73m
To test it, check the Route address:
oc get route
NAME         HOST/PORT                               PATH      SERVICES     PORT      TERMINATION     WILDCARD
sample-app   sample-app-helm-demo.apps-crc.testing             sample-app   <all>     edge/Redirect   None
Finally, access one of the available JAX-RS Endpoints:
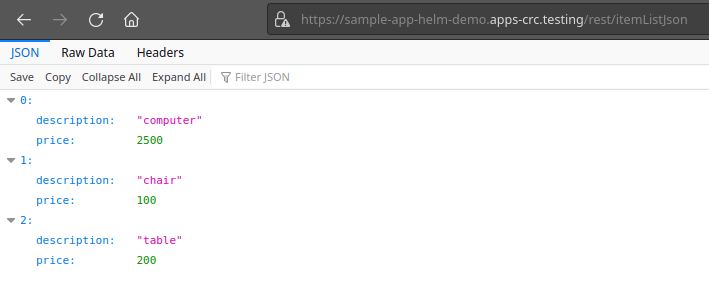
Great! You have just deployed a WildFly application in the Cloud using Helm Charts! The documentation of the WildFly Helm Chart options is available here: https://github.com/wildfly/wildfly-charts/blob/main/charts/wildfly/README.md