In the previous Facelets Tutorial we have shown a simple facelet example that demonstrates the use of templates to promote code reuse. In this tutorial we will show how to create composition components to create extensible components.
What is a Facelets Composite Component?
A composite component is a special type of template that acts as a component.
In practice, a composite component consists of a collection of markup tags and other existing components. This reusable, user-created component has a customized, defined functionality and can have validators, converters, and listeners attached to it like any other component.
We will show how to improve our existing Facelets application by adding a Composite Component to it.
Firstly, let’s have a look at the UI from our previous Facelets Tutorial. :

Next, let’s add a Form to the UI. This form will let us add new Users to the Datatable. For this purpose, add the page signup.xhtml to your project:
<html xmlns="http://www.w3.org/1999/xhtml"
      xmlns:cc="http://xmlns.jcp.org/jsf/composite"
      xmlns:h="http://xmlns.jcp.org/jsf/html">

    <!-- INTERFACE -->
    <cc:interface>
        <cc:attribute name="name"/>
        <cc:attribute name="surname"/>
        <cc:attribute name="email"/>
        <cc:attribute name="actionListener"
                      method-signature="void action(javax.faces.event.Event)"
                      targets="signup:saveButton"/>
    </cc:interface>

    <!-- IMPLEMENTATION -->
    <cc:implementation>
        <div  style="border: thin solid orange">
        <h:form id="signup" >
        <h2>JSF Composite component Demo</h2>
            <h:panelGrid columns="3" >
                <h:outputText value="Name:" />
                <h:inputText value="#{cc.attrs.name}" id="name"/>
                <h:message for="name" style="color: red" />
                <h:outputText value="Surname:" />
                <h:inputText value="#{cc.attrs.surname}" id="surname"/>
                <h:message for="surname" style="color: red" />
                <h:outputText value="Email:" />
                <h:inputText value="#{cc.attrs.email}" id="email"/>
                <h:message for="email" style="color: red" />
            </h:panelGrid>
             <h:commandButton id="saveButton" value="Save"/>
        </h:form>
        </div>
    </cc:implementation>
</html>
- The cc:interface section declares the usage contract for the composite component. You can use a composite component as a single component whose set of features is the union of the features declared in the usage contract. Within the contract section, the cc:attribute declares an attribute that may be given to an instance of the composite component in which this tag is declared. We have included here all the attributes, which are admitted in the sign up form.
- The cc:implementation defines the implementation of the composite component.
We will store the page signup.xhtml into a folder resources/mycomponents, under the application web root directory. This directory will be considered a library by Java Server Faces, and a component can be accessed from such a library.
Accessing your composite components is pretty easy: you have just out figure out which is the namespace for referencing your components. In our case this “mycomponents“. So, here is our home page index.xhtml using composite components:
<?xml version="1.0" encoding="UTF-8"?>
<html xmlns="http://www.w3.org/1999/xhtml" xmlns:f="http://xmlns.jcp.org/jsf/core" xmlns:h="http://xmlns.jcp.org/jsf/html" xmlns:mc="http://xmlns.jcp.org/jsf/composite/mycomponents" xmlns:ui="http://xmlns.jcp.org/jsf/facelets">
   <body>
      <ui:composition template="/templates/template.xhtml">
         <ui:define name="content">
            <h:form id="jsfexample">
               <mc:signup name="#{user.name}" surname="#{user.surname}" email="#{user.email}" actionListener="#{manager.save()}" />
               <h:dataTable value="#{userList}" var="item" styleClass="table" headerClass="table-header" rowClasses="table-odd-row,table-even-row">
                  <h:column>
                     <f:facet name="header">Name</f:facet>
                     <h:outputText value="#{item.name}" />
                  </h:column>
                  <h:column>
                     <f:facet name="header">Surname</f:facet>
                     <h:outputText value="#{item.surname}" />
                  </h:column>
                  <h:column>
                     <f:facet name="header">Email</f:facet>
                     <h:outputText value="#{item.email}" />
                  </h:column>
               </h:dataTable>
            </h:form>
         </ui:define>
      </ui:composition>
   </body>
</html>
Finally, we need to add the save method to the Manager bean to store additional Users:
@Model
public class Manager {

    List<User> userList;

    @PostConstruct
    public void retrieveAllItems() {
        user = new User();

        userList = new ArrayList<User>();
        userList.add(new User("John","Smith","[email protected]"));
        userList.add(new User("Frank","Walker","[email protected]"));
        userList.add(new User("Fiona","Middleton","[email protected]"));
    }

    @Produces
    @Named
    User user;

    @Produces
    @Named
    public List<User> getUserList() {
        return userList;
    }

    public void save() {
        userList.add(user);
        FacesMessage facesMsg = new FacesMessage(FacesMessage.SEVERITY_INFO, "Added user "+user.getName(), null);
                FacesContext.getCurrentInstance().addMessage(null, facesMsg);
        user = new User();

    }
}
Running the application
Here is the project tree of our Facelets application after adding the Composite Component:
src
└── main
    ├── java
    │   └── com
    │       └── itbuzzpress
    │           └── jsf
    │               ├── bean
    │               │   └── Manager.java
    │               └── model
    │                   └── User.java
    └── webapp
        ├── index.xhtml
        ├── resources
        │   ├── mycomponents
        │   │   └── signup.xhtml
        │   └── style.css
        ├── templates
        │   ├── footer.xhtml
        │   ├── header.xhtml
        │   └── template.xhtml
        └── WEB-INF
            ├── beans.xml
            ├── faces-config.xml
            └── web.xml
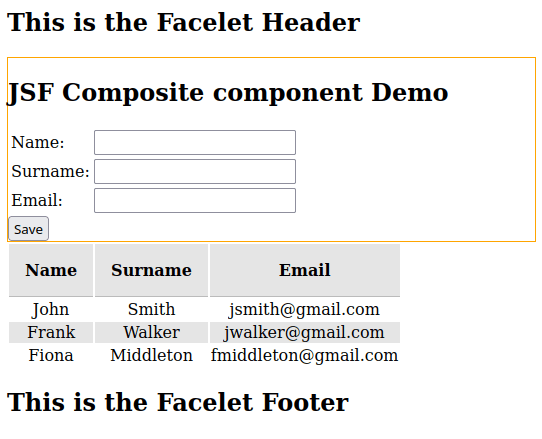
Deploy the application on WildFly. Here is how the index.html page looks like after adding the Composite Component:

Source code
You can find the source code for this application here: https://github.com/fmarchioni/mastertheboss/tree/master/web/jsf-facelets-composite
Found the article helpful? if so please follow us on Socials