This tutorial will teach you how to run WildFly applications on Openshift using WildFly S2I images. At first, we will learn how to build and deploy applications using Helm Charts. Then, we will learn how to use the S2I legacy approach which relies on ImageStreams and Templates.
WildFly Cloud deployments
There are two main strategies to deploy WildFly applications on OpenShift:
- Use Helm charts, by deploying the repository for the Helm charts for WildFly. Then use WildFly S2I images
- Use Image Streams and Templates to deploy legacy S2I images.
Using Helm Charts is the recommended approach for WildFly 26.0.1 and newer. If you are using an older WildFly version we recommend the legacy approach. Let’s see both options
1) Deploying WildFly with Helm Charts
Helm Charts are Kubernetes YAML manifest files combined into a single package. Onca packaged, you can install it into a Kubernetes/OpeShift cluster with as little as a single helm install. This greatly simplifies the deployment of containerized applications.
Pre-requisites: You need to install Helm on your machine. Please refer to the official documentation to learn how to do that: https://helm.sh/docs/intro/install/
Firstly, you need to have an available WildFly project on Github. For example, we will deploy the following sample project: https://github.com/wildfly/wildfly-s2i/tree/main/examples/web-clustering
Then, within your project’s pom.xml you need to define the Galleon Layers that wildfly-maven-plugin will use to provision WildFly. In our example, we will use the following Galleon layers:
<layers>
   <layer>cloud-server</layer>
   <layer>web-clustering</layer>
</layers>
Next, to deploy our project on OpenShift, we need to install WildFly Helm Charts:
helm repo add wildfly http://docs.wildfly.org/wildfly-charts/
If you have already installed WildFly’s Helm Chart you can update it with the update command:
$ helm repo update
...Successfully got an update from the "wildfly" chart repository
Next, create a project “wildfly-demo” in your OpenShift cluster:
oc new-project wildfly-demo
Then, create a YAML file, for example helm.yaml with the following content:
build:
  uri: https://github.com/wildfly/wildfly-s2i
  mode: s2i
  contextDir: examples/web-clustering
deploy:
  replicas: 2
- The build section contains a reference to the URI / contextDir for your project.
- The deploy section contains the number of replicas we will start for the application
Finally, install the YAML file in your project as follows:
helm install web-clustering-app -f helm.yaml wildfly/wildfly
In a few minutes the application web-clustering-app will be available with two replicas:
$ oc get pods
NAME                                         READY     STATUS      RESTARTS   AGE
web-clustering-app-657f4468c8-glmn5          1/1       Running     0          2m48s
web-clustering-app-657f4468c8-j6llr          1/1       Running     0          2m48s
The following Route is available
$ oc get routes
NAME                 HOST/PORT                                          PATH      SERVICES             PORT      TERMINATION     WILDCARD
web-clustering-app   web-clustering-app-wildfly-demo.apps-crc.testing             web-clustering-app   <all>     edge/Redirect   None
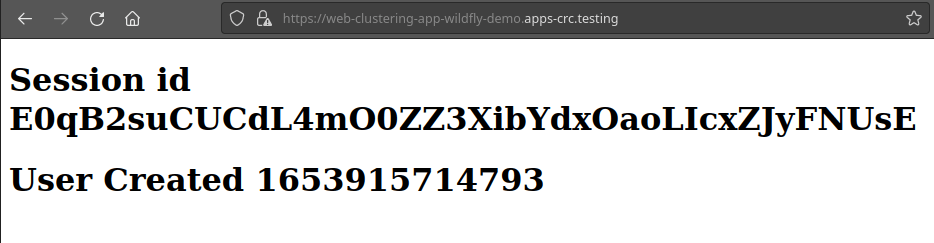
By opening the browser to that location, you will be able to reach your example WildFly application:
Running a CLI script during the Build of WildFly
To update the configuration of WildFly, we can reply on the capability offered by the WildFly S2I builder and runtime images to execute a WildFly CLI script at launch time.
Firstly, let’s create a sample CLI script. for example, the following transaction.cli sets a Transaction timeout of 400 seconds:
/subsystem=transactions:write-attribute(name=default-timeout,value=400)
Next, we will store this script in a ConfigMap:
oc create configmap sample-cli --from-file=./transaction.cli
Then, we are mounting the CLI script that this configmap references in the /tmp/cli-scripts directory:
oc set volume deployment/web-clustering-app --add --type=configmap --configmap-name=sample-cli --mount-path=/tmp/cli-scripts
Add the CLI_LAUNCH_SCRIPT to the Environment of the web-clustering-app deployment:
oc set env deployment/web-clustering-app CLI_LAUNCH_SCRIPT=/tmp/cli-scripts/transaction.cli
Then do an upgrade of the Helm charts to reflect your changes done to the deployment:
helm upgrade web-clustering-app wildfly/wildfly

Release "web-clustering-app" has been upgraded. Happy Helming!
NAME: web-clustering-app
LAST DEPLOYED: Mon May 30 15:05:55 2022
NAMESPACE: wildfly-demo
STATUS: deployed
REVISION: 2
TEST SUITE: None
NOTES:
We are done. Verify in your Pod that the Configuration of WildFly includes the updated Transaction Timeout:
$ oc rsh web-clustering-app-596b5fbfb9-lz7lb

sh-4.4$ cat ./opt/server/standalone/configuration/standalone.xml | grep timeout

 <coordinator-environment statistics-enabled="${wildfly.transactions.statistics-enabled:${wildfly.statistics-enabled:false}}" default-timeout="400"/>
As you can see, we have managed to upgrade WildFly configuration by uploading a CLI script in a ConfigMap.
2) Deploying WildFly in the Cloud with wildfly-s2i Image Streams
Openshift uses Image Streams to reference a Docker image. An Image Stream comprises one or more Docker images identified by tags. It presents a single virtual view of related images, similar to a Docker image repository, and may contain images from any of the following:
- Its own image repository in OpenShift’s integrated Docker Registry
- Other image streams
- Docker image repositories from external registries
The evident advantage of using Image Streams vs a standard Docker image is that OpenShift components such as builds and deployments can watch an image stream to receive notifications when new images are added and react by performing a build or a deployment. In other words, the Image Stream can let you decouple your application from a specific Docker Image.
Firstly, check if you have WildFly Image Streams available with:
$ oc get is -n openshift | grep wildfly

wildfly-runtime                                      default-route-openshift-image-registry.apps-crc.testing/openshift/wildfly-runtime
wildfly-s2i                                          default-route-openshift-image-registry.apps-crc.testing/openshift/wildfly-s2i
If you don’t have the ImageStreams in the Registry, you can create them as follows:
oc create -f https://raw.githubusercontent.com/wildfly/wildfly-s2i/main/imagestreams/wildfly-s2i.yaml -n openshift
oc create -f https://raw.githubusercontent.com/wildfly/wildfly-s2i/main/imagestreams/wildfly-runtime.yaml -n openshift
These Image Streams provide the latest LTS JDK builder image. In the next section we will create a sample application using these Image Streams
Creating an example application
Firstly, create a new project:
$ oc new-project wildfly-demo
Then, create a new app using a one of the examples available in the S2I Git Hub project:
$ oc new-app --name=my-app wildfly-s2i~https://github.com/wildfly/wildfly-s2i --context-dir=examples/jsf-ejb-jpa
Next, expose the Service to the router so that it’s available to outside:
$ oc expose service/my-app
Finally, checkout the Route for your application:
$ oc get route
NAME            HOST/PORT                                        PATH   SERVICES        PORT
my-app   my-app-wildfly-demo.apps-crc.testing          my-app     8080-tcp                 None
Open the browser at the Route Host address, and here is your example application on Openshift:

How to override WildFly settings
In WildFly 26 there is a nice shortcut to override the configuration settings of the application server. You can inject configuration values through environment variables, using a conversion pattern.
Let’s see it with an example. Supposing you want to set the following attribute:
/subsystem=io/worker=default:write-attribute(name=task-max-threads,value=50)
To set the task-max-threads attribute of the io subsystem, you will set the following environment variable:
SUBSYSTEM_IO_WORKER_DEFAULT__TASK_MAX_THREADS=30
Here’s how the conversion works:
- Remove the trailing slash
- Turn the CLI command to uppercase
- Then, replace non-alphanumeric characters with an underscore (_)
- Add two underscores (__) to the name of the attribute you are going to set
The transformation is not on by default. You have to set this environment variable to enable it:
WILDFLY_OVERRIDING_ENV_VARS=1
Let’s wrap it up! Here is how you can create the WildFly example application setting the task-max-threads attribute:
$ oc new-app --name=my-app wildfly-s2i~https://github.com/wildfly/wildfly-s2i --context-dir=examples/jsf-ejb-jpa -e WILDFLY_OVERRIDING_ENV_VARS=1 -e SUBSYSTEM_IO_WORKER_DEFAULT__TASK_MAX_THREADS=30
That’s it! You can rsh into the Pod to verify that the attribute is in the configuration:
<subsystem xmlns="urn:jboss:domain:io:3.0">
    <worker name="default" task-max-threads="50"/>
    <buffer-pool name="default"/>
</subsystem>
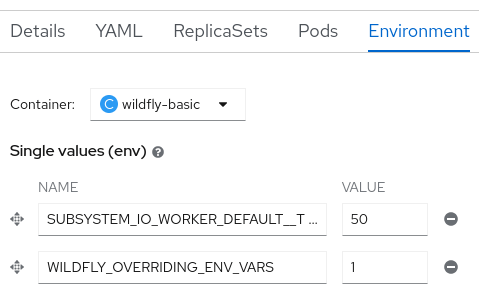
It is worth mentioning, that you can also set the Environment variables on the Deployment of your application. That will, by default, trigger a restart of your Pod:
Provisioning WildFly layers on Openshift with Galleon
If you don’t need the full sized WildFly application server, you can provision an Image of it which just contains the layers you need. For example, if you only need to use REST Server API (and their dependencies such as the Web Server), you can create the above example:
oc new-app --name=my-app wildfly-s2i~https://github.com/wildfly/wildfly-s2i --context-dir=examples/jsf-ejb-jpa --build-env GALLEON_PROVISION_LAYERS=cloud-server
Please note that if you want to provision a custom WildFly distribution on OpenShift the recommended approach is to use WildFly Bootable JAR. You can automatically discover the Galleon layers using WildFly Glow project and deploy the Bootable JAR on OpenShift. Check this article to learn more: How to deploy WildFly Bootable jar on OpenShift
Conclusion
In conclusion, deploying Wildfly applications on OpenShift using Helm and S2I images offers a streamlined and efficient approach to managing Java-based applications in a cloud-native environment. By leveraging the capabilities of Helm charts and S2I images, developers can easily package, deploy, and manage Wildfly applications with greater flexibility and scalability.
Found the article helpful? if so please follow us on Socials


