In this tutorial we will learn how to create a remote JMS connection to a Queue which has been deployed on WildFly application server.
In order to create a remote JMS Connection to an HornetQ server, we need to perform a set of steps. At first we need to deploy the Queue to the JMS server, next we need to create an application user with a Role that is enabled to send JMS messages. Last step, we need obviously create a JMS consumer and a JMS deployer.
Let’s start from the first step, we will deploy a Queue named demoQueue which is bound into the java:/jms/queue/demoQueue JNDI binding. From the CLI execute:
jms-queue add --queue-address= jms.queue.ExampleQueue --entries=java:/jms/queue/exampleQueue,java:/jboss/exported/jms/queue/exampleQueue
Please note that we had to include as well the JNDI binding “java:/jboss/exported/jms/queue/demoQueue” as remote JNDI bindings are only available if registered under the “java:/jboss/exported” namespace
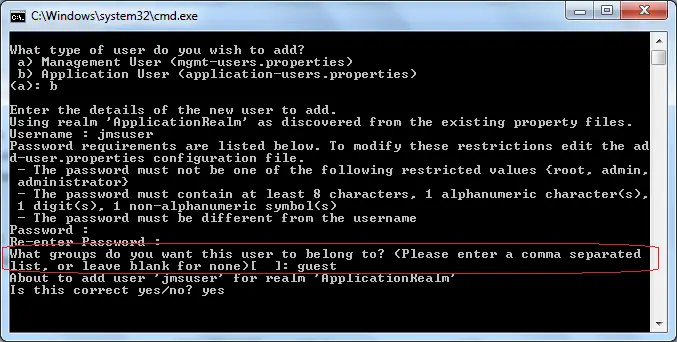
Next, launch the add-user.sh/add-user.cmd to create an application user that belongs to the “guest” Role.

You can choose any other kind of role, as long as it’s compliant with the JMS security settings:
<security-settings>
    <security-setting match="#">
        <permission type="send" roles="guest"/>
        <permission type="consume" roles="guest"/>
        <permission type="createNonDurableQueue" roles="guest"/>
        <permission type="deleteNonDurableQueue" roles="guest"/>
    </security-setting>
</security-settings>
And now the code for the TestJMSClient:
package com.itbuzzpress.chapter12.test;

import static org.junit.Assert.assertEquals;

import java.util.Properties;

import javax.jms.ConnectionFactory;
import javax.jms.Destination;
import javax.jms.JMSConsumer;
import javax.jms.JMSContext;
import javax.naming.Context;
import javax.naming.InitialContext;

import org.junit.Test;

public class TestJMSClient {

	private String MESSAGE = "Hello, World!";
	private String CONNECTION_FACTORY = "jms/RemoteConnectionFactory";
	private String DESTINATION = "jms/queue/exampleQueue";

	@Test
	public void testSendReceive() throws Exception {

		Context namingContext = null;
		JMSContext context = null;

		try {

			// Set up the namingContext for the JNDI lookup
			final Properties env = new Properties();
			env.put(Context.INITIAL_CONTEXT_FACTORY,
					"org.jboss.naming.remote.client.InitialContextFactory");
			env.put(Context.PROVIDER_URL, "http-remoting://127.0.0.1:8080");
			env.put(Context.SECURITY_PRINCIPAL, "jmsuser");
			env.put(Context.SECURITY_CREDENTIALS, "Password1!");
			namingContext = new InitialContext(env);

			ConnectionFactory connectionFactory = (ConnectionFactory) namingContext
					.lookup(CONNECTION_FACTORY);
			System.out.println("Got ConnectionFactory " + CONNECTION_FACTORY);

			Destination destination = (Destination) namingContext
					.lookup(DESTINATION);
			System.out.println("Got JMS Endpoint " + DESTINATION);

			// Create the JMS context
			context = connectionFactory.createContext("jmsuser", "Password1!");

			context.createProducer().send(destination, MESSAGE);
			System.out.println("Sent message " + MESSAGE);

			// Create the JMS consumer
			JMSConsumer consumer = context.createConsumer(destination);
			// Then receive the same number of messages that were sent

			String text = consumer.receiveBody(String.class, 5000);
			if (text == null) System.out.println("No message Received! Maybe another Consumer listening on the Queue ??");
			System.out.println("Received message with content " + text);
			assertEquals(text,MESSAGE);

		} catch (Exception e) {
			System.out.println(e.getMessage());
			throw e;
		} finally {
			if (namingContext != null) {
				namingContext.close();
			}

			// closing the context takes care of consumer too
			if (context != null) {
				context.close();
			}
		}
	}
}
As you can see, this code does not use anymore the AS 7 / EAP 6 Remoting port (port 4447) from the client side to connect to the server but the connection lands on port 8080 where it’s (behind the hoods) plumbed into HornetQ by the Undertow Web server.
private static final String PROVIDER_URL = "http-remoting://localhost:8080";
In order to compile and run the Test class, it’s recommended to use Maven as you will be able to import the JMS client BOM so that you can easily switch between different versions of WildFly by changing the Property version.wildfly :
<project xmlns="http://maven.apache.org/POM/4.0.0" xmlns:xsi="http://www.w3.org/2001/XMLSchema-instance"
	xsi:schemaLocation="http://maven.apache.org/POM/4.0.0 http://maven.apache.org/maven-v4_0_0.xsd">
	<modelVersion>4.0.0</modelVersion>

	<groupId>com.itbuzzpress.chapter12</groupId>
	<artifactId>javaee7-jms-client</artifactId>
	<version>1.0</version>
	<packaging>jar</packaging>
	<name>JMS Remote client example</name>
	<description>JMS Remote client example</description>

	<url>http://wildfly.org</url>
	<licenses>
		<license>
			<name>Apache License, Version 2.0</name>
			<distribution>repo</distribution>
			<url>http://www.apache.org/licenses/LICENSE-2.0.html</url>
		</license>
	</licenses>

	<properties>

		<project.build.sourceEncoding>UTF-8</project.build.sourceEncoding>

		<version.wildfly>10.0.0.Final</version.wildfly>

		<!-- other plugin versions -->
		<version.compiler.plugin>3.1</version.compiler.plugin>
		<version.jar.plugin>2.2</version.jar.plugin>
		<version.exec.plugin>1.1.1</version.exec.plugin>

		<!-- maven-compiler-plugin -->
		<maven.compiler.target>1.7</maven.compiler.target>
		<maven.compiler.source>1.7</maven.compiler.source>
	</properties>

	<repositories>
		<repository>
			<id>JBoss Repository</id>
			<url>https://repository.jboss.org/nexus/content/groups/public/</url>
		</repository>
	</repositories>

	<dependencies>
		<dependency>
			<groupId>org.wildfly</groupId>
			<artifactId>wildfly-jms-client-bom</artifactId>
			<version>${version.wildfly}</version>
			<type>pom</type>
		</dependency>

		<dependency>
			<groupId>junit</groupId>
			<artifactId>junit</artifactId>
			<version>4.11</version>
		</dependency>
	</dependencies>

	<build>
		<finalName>${project.artifactId}</finalName>
		<plugins>
			<plugin>
				<groupId>org.codehaus.mojo</groupId>
				<artifactId>exec-maven-plugin</artifactId>
				<version>${version.exec.plugin}</version>
				<configuration>
					<mainClass>com.itbuzzpress.chapter12.client.RemoteJMSClient</mainClass>
				</configuration>
			</plugin>
			<plugin>
				<artifactId>maven-jar-plugin</artifactId>
				<version>2.4</version>
				<configuration>
				</configuration>
			</plugin>
			<!-- WildFly plugin to deploy war -->
			<plugin>
				<groupId>org.wildfly.plugins</groupId>
				<artifactId>wildfly-maven-plugin</artifactId>
				<version>1.0.2.Final</version>

			</plugin>
			<!-- Compiler plugin enforces Java 1.6 compatibility and activates annotation
				processors -->
			<plugin>
				<artifactId>maven-compiler-plugin</artifactId>
				<version>${version.compiler.plugin}</version>
				<configuration>
					<source>${maven.compiler.source}</source>
					<target>${maven.compiler.target}</target>
				</configuration>
			</plugin>
		</plugins>
	</build>
</project>
That’s all! You can run the code with:
$ mvn clean install test
As a result a message will be sent to the remote Queue and dequeued from the JMSConsumer:
Got ConnectionFactory jms/RemoteConnectionFactory
Got JMS Endpoint jms/queue/exampleQueue
Sent message Hello, World!
Received message with content Hello, World!
Tests run: 1, Failures: 0, Errors: 0, Skipped: 0, Time elapsed: 1.137 sec

Results :

Tests run: 1, Failures: 0, Errors: 0, Skipped: 0
Found the article helpful? if so please follow us on Socials