A JDBC Driver is able to call standard SQL statements into the vendor-specific database protocol. In this tutorial we will learn how to download and install a JDBC Driver on WildFly / JBoss EAP 7.
Step 1: download the JAR file
Firstly, we need to download the JDBC Driver. For example, we will download PostgreSQL Driver from Maven repository:
wget https://repo1.maven.org/maven2/org/postgresql/postgresql/42.2.5/postgresql-42.2.5.jar
Once downloaded, we will install it on WildFly.
Step 2: Where do I put the JDBC Driver on WildFly ?
There are mainly two strategies for installing the JDBC Driver:
- Install it as a Module on WildFly
- Deploy it using the deployment scanner or management instruments
Installing it as a Module is the recommended option. Connect to the CLI (bin/jboss-cli.sh) and perform the following steps:
Firstly, install the JDBC Driver as a Module:
module add --name=org.postgres --resources=postgresql-42.2.5.jar --dependencies=javax.api,javax.transaction.api
Next, register the Driver in the datasources subsystem:
/subsystem=datasources/jdbc-driver=postgres:add(driver-name="postgres",driver-module-name="org.postgres",driver-class-name=org.postgresql.Driver)
Next, complete the Datasource installation as follows:
data-source add --jndi-name=java:/PostGreDS --name=PostgrePool --connection-url=jdbc:postgresql://localhost:5432/postgres --driver-name=postgres --user-name=postgres --password=postgres
When running in Domain mode, you have to complete the "module add" on each Host Controller. Besides, you have to refer to your profile when accessing the datasources subsystem.

Example:
/profile=full-ha/subsystem=datasources/jdbc-driver=postgres:add(driver-name="postgres",driver-module-name="org.postgres",driver-class-name=org.postgresql.Driver)
Using the deployment strategy
You can deploy JDBC drivers just like any other applications. Any JDBC 4-compliant driver will automatically be recognized and installed into the system by name and version.
Firstly, deploy the JAR file:
cp postgresql-42.2.5.jar /opt/wildfly-25.0.0.Final/standalone/deployments
You will notice that the application server will emit a log message like this:
14:57:29,684 INFO [org.jboss.as.server] (DeploymentScanner-threads - 1) WFLYSRV0010: Deployed "postgresql-42.2.5.jar" (runtime-name : "postgresql-42.2.5.jar")
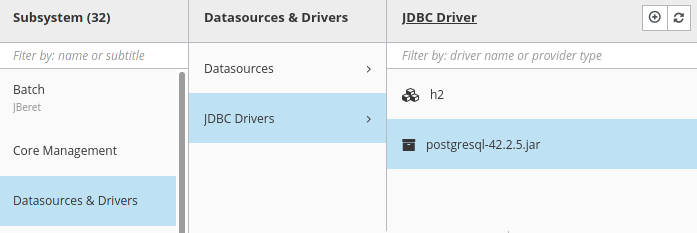
Meantime, in the Web Console you will see that the JDBC Driver has been registered:

Next step is to install the Datasource:
data-source add --name=PostgrePoolDeploy --jndi-name=java:/PostgreDSDeploy --driver-name=postgresql-42.2.5.jar --connection-url=jdbc:postgresql://localhost/postgres --user-name=postgres --password=postgres
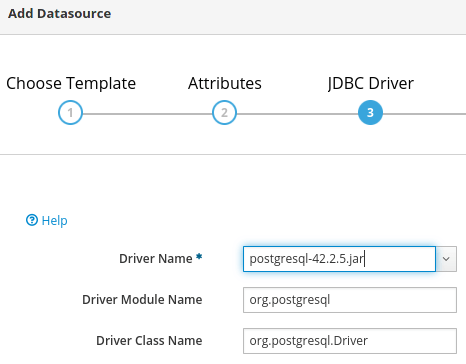
As you can see, when we install the Datasource using a deployed JDBC Driver we are referring to the JAR file and not to the module name.
Same thing if you are using the Web Console to add the Datasource:

Conclusion
In this article we have covered some specific details about the JDBC Driver installation and where to put it on WildFly. If you want more details about Datasource configuration we suggest the following tutorial: How to configure a Datasource with JBoss / WildFly
Found the article helpful? if so please follow us on Socials