Spring Boot offers a new paradigm for developing Spring applications with more agility while focusing on your business methods rather than the thought of configuring Spring itself. Spring Boot does not require complex configuration files as it is able to discover classes by looking in the classpath of your applications and building a single runnable JAR of it, which makes it convenient to make your service portable too.
Creating a Spring Boot project
The simplest way to get started with Spring Boot is via the Spring Boot inizializer that is available on http://start.spring.io/
From there, choose the Spring Boot version (3.0.0) and the starters that you want to include in the project. Also you can opt for a Maven or Gradle project type.
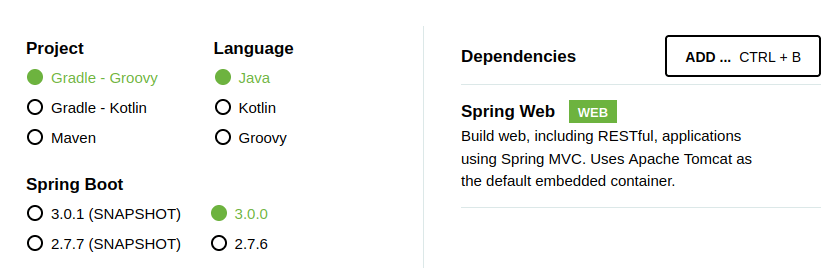
As you can see, the only dependency we need for our tutorial is Spring Web. That will enable us to create a simple Web application with a REST endpoint.
Next, unzip the demo application in a folder of your hard drive. In the next section we will show how to adapt this Spring Boot 3 application to run on top of WildFly 27.
Shaping the Spring Boot 3 application for WildFly
In order to run the Spring Boot 3 application on Jakarta EE 10 container such as WildFly you need to apply some changes to the example. This is due to the fact that some of the application libraries overlap with WildFly modules. Also, in order to initialize our application, we need to use a special Servlet: the SpringBootServletInitializer.
The first change will be extending the org.springframework.boot.web.servlet.support.SpringBootServletInitializer which is a WebApplicationInitializer that enables running a SpringBootApplication as WAR deployment:
package com.mastertheboss.springboot.springbootwildfly;

import org.springframework.boot.SpringApplication;
import org.springframework.boot.autoconfigure.SpringBootApplication;
import org.springframework.boot.builder.SpringApplicationBuilder;
import org.springframework.web.bind.annotation.PathVariable;
import org.springframework.web.bind.annotation.RequestMapping;
import org.springframework.web.bind.annotation.RestController;

import org.springframework.boot.web.servlet.support.SpringBootServletInitializer;


@SpringBootApplication
public class SpringbootwildflyApplication extends SpringBootServletInitializer {

    public static void main(String[] args) {
        SpringApplication.run(applicationClass, args);
    }

    @Override
    protected SpringApplicationBuilder configure(SpringApplicationBuilder application) {
        return application.sources(applicationClass);
    }

    private static Class<SpringbootwildflyApplication> applicationClass = SpringbootwildflyApplication.class;
}

@RestController
class HelloController {

    @RequestMapping("/hello/{name}")
    String hello(@PathVariable String name) {

        return "Hi " + name + " !";

    }
}
If you are new to Spring Boot, here is a short recap of the annotations you will find in the code:
Firstly, the class contains the @SpringBootApplication annotation. This is equivalent to applying the following Spring annotations:
- @Configuration which identifies the class as a source of bean definitions for the application context.
- @EnableAutoConfiguration which enables Spring Boot to add beans based on the application’s classpath, and various property settings.
- @ComponentScan which tells Spring to look for other beans,configurations, and services in the same package as your application class so that you will be able to find the SimpleBean class.
Next, to test our application, we will be using the @RestController annotation to enable REST APIs. We will also use the @RequestMapping annotation to define the URL path to our API as well as HTTP method and path parameters for our APIs.
Applying changes in the pom.xml
Next, we need to apply some changes in our pom.xml.
- Firstly, we set “war” as packaging unit
- Then, from within the spring-boot-starter-web we exclude logback-classic logging and tomcat dependencies. This is to avoid conflicts with WildFly existing Web server and logging modules
- Finally, we need the Servlet dependency in order compile the SpringBootServletInitializer
Here is the final pom.xml file:
<?xml version="1.0" encoding="UTF-8"?>
<project xmlns="http://maven.apache.org/POM/4.0.0" xmlns:xsi="http://www.w3.org/2001/XMLSchema-instance" xsi:schemaLocation="http://maven.apache.org/POM/4.0.0 https://maven.apache.org/xsd/maven-4.0.0.xsd">
    <modelVersion>4.0.0</modelVersion>
    <parent>
        <groupId>org.springframework.boot</groupId>
        <artifactId>spring-boot-starter-parent</artifactId>
        <version>3.0.6</version>
        <relativePath /> <!-- lookup parent from repository -->
    </parent>
    <groupId>com.example</groupId>
    <artifactId>springbootwildfly</artifactId>
    <version>0.0.1-SNAPSHOT</version>
    <name>demo</name>
    <packaging>war</packaging>
    <description>Demo project for Spring Boot</description>
    <properties>
        <java.version>17</java.version>
    </properties>
    <dependencies>
        <dependency>
            <groupId>org.springframework.boot</groupId>
            <artifactId>spring-boot-starter-web</artifactId>
            <exclusions>
                <exclusion>
                    <groupId>ch.qos.logback</groupId>
                    <artifactId>logback-classic</artifactId>
                </exclusion>
                <exclusion>
                    <groupId>org.springframework.boot</groupId>
                    <artifactId>spring-boot-starter-tomcat</artifactId>
                </exclusion>
            </exclusions>
        </dependency>

        <dependency>
            <groupId>jakarta.servlet</groupId>
            <artifactId>jakarta.servlet-api</artifactId>
            <scope>provided</scope>
        </dependency>

        <dependency>
            <groupId>org.springframework.boot</groupId>
            <artifactId>spring-boot-starter-test</artifactId>
            <scope>test</scope>
        </dependency>
    </dependencies>

    <build>
        <finalName>springbootwildfly</finalName>
        <plugins>
            <plugin>
                <groupId>org.wildfly.plugins</groupId>
                <artifactId>wildfly-maven-plugin</artifactId>
                <version>4.0.0.Final</version>
            </plugin>

            <plugin>
                <groupId>org.springframework.boot</groupId>
                <artifactId>spring-boot-maven-plugin</artifactId>
            </plugin>
        </plugins>
    </build>

</project>
Please notice that the Spring Boot 3 needs to reference the jakarta.servlet-api as Spring Boot 3 adheres to the Jakarta EE 9 namespace standard. This is a core difference with Spring Boot 2 application which uses javax.servlet packages instead.
Next, since we have removed the logback-classic implementation, we need to provide at least a logging configuration for the Root logger. to do that, just add in resources/application.properties the following:
logging.level.root=info
Finally, in order to build and deploy the application on WildFly, we can use the following shell:
$ mvn clean install wildfly:deploy
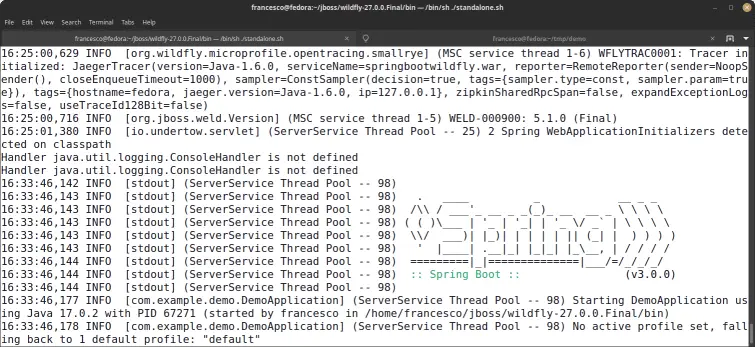
You will notice from the application server logs that Spring Boot 3 starts as soon as the Web application deploys on WildFly:
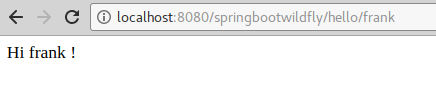
We can test that our application is working as follows:
Note for WildFly 28 users
The removal of the org.jboss.vfs module in WildFy 28 presents a problem for Spring deployments, as Spring Boot uses the resource protocol “vfs” when scanning for configuration resources. To avoid this issue, it is recommended that the org.jboss.vfs module be added as a dependency for deployments, which will enable Spring deployments to function properly without having to add a private module dependency to the deployment.
<jboss-deployment-structure>
  <deployment>
      <dependencies>
         <module name="org.jboss.vfs" />
      </dependencies>
    </deployment>
</jboss-deployment-structure>
How to run Spring Boot 2 on a Jakarta EE 8 Container
In the second part of this article, we will learn which are the steps to deploy a Spring Boot 2 application on top of WildFly application server. Start by creating a Spring Boot 2 project using the Spring Boot Initializr:
From there, choose the Spring Boot starters that you want to be included and artifactId and groupId. Also you can opt for a Maven 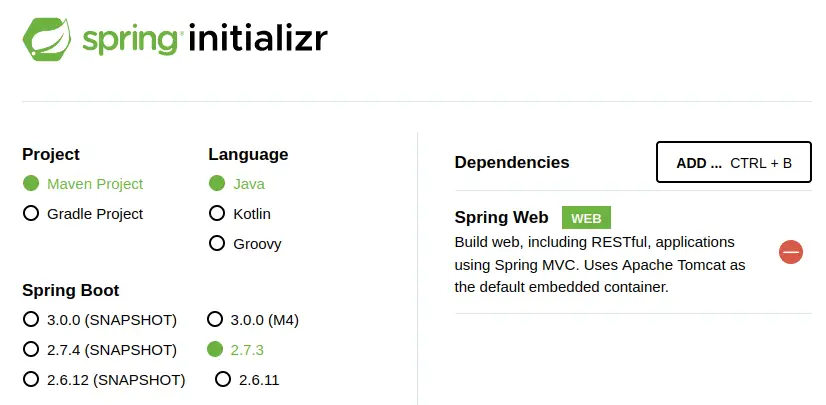 project or a Gradle project.
As you can see, the only dependency we need for our tutorial is Spring Web. That will enable us to create a simple Web application with a REST endpoint.
Next, modify the @SpringBootApplication application Class as discussed in the previous section “How to run Spring Boot on a Jakarta EE 10 Container (WildFly 27)”
Finally, we need to apply some changes in our pom.xml.
- Firstly, we set “war” as packaging unit
- Then, from within the spring-boot-starter-web we exclude logback-classic logging and tomcat dependencies. This is to avoid conflicts with WildFly existing Web server and logging modules
- Finally, we need the Servlet dependency in order compile the SpringBootServletInitializer
Here is the final pom.xml file:
<?xml version="1.0" encoding="UTF-8"?>
<project xmlns="http://maven.apache.org/POM/4.0.0" xmlns:xsi="http://www.w3.org/2001/XMLSchema-instance" xsi:schemaLocation="http://maven.apache.org/POM/4.0.0 http://maven.apache.org/xsd/maven-4.0.0.xsd">
   <modelVersion>4.0.0</modelVersion>
   <parent>
      <groupId>org.springframework.boot</groupId>
      <artifactId>spring-boot-starter-parent</artifactId>
      <version>2.7.3</version>
      <relativePath />
      <!-- lookup parent from repository -->
   </parent>
   <groupId>com.mastertheboss.springboot</groupId>
   <artifactId>springbootwildfly</artifactId>
   <version>0.0.1-SNAPSHOT</version>
   <packaging>war</packaging>
   <name>springbootwildfly</name>
   <description>Demo project for Spring Boot</description>
   <properties>
      <java.version>11</java.version>
   </properties>
   <dependencies>
      <dependency>
         <groupId>org.springframework.boot</groupId>
         <artifactId>spring-boot-starter-web</artifactId>
         <exclusions>
            <exclusion>
               <groupId>ch.qos.logback</groupId>
               <artifactId>logback-classic</artifactId>
            </exclusion>
            <exclusion>
               <groupId>org.springframework.boot</groupId>
               <artifactId>spring-boot-starter-tomcat</artifactId>
            </exclusion>
         </exclusions>
      </dependency>
      <dependency>
         <groupId>javax.servlet</groupId>
         <artifactId>javax.servlet-api</artifactId>
         <version>4.0.1</version>
         <scope>provided</scope>
      </dependency>
      <dependency>
         <groupId>org.springframework.boot</groupId>
         <artifactId>spring-boot-starter-test</artifactId>
         <scope>test</scope>
      </dependency>
      <dependency>
         <groupId>junit</groupId>
         <artifactId>junit</artifactId>
         <version>4.12</version>
         <scope>test</scope>
      </dependency>
   </dependencies>
   <build>
      <finalName>springbootwildfly</finalName>
      <plugins>
         <plugin>
            <groupId>org.springframework.boot</groupId>
            <artifactId>spring-boot-maven-plugin</artifactId>
         </plugin>
         <plugin>
            <groupId>org.wildfly.plugins</groupId>
            <artifactId>wildfly-maven-plugin</artifactId>
            <version>2.0.0.Final</version>
         </plugin>
      </plugins>
   </build>
</project>
As you can see, the main difference when porting an application to a Java EE / Jakarta EE 8 Container is the Java version (11 in this case) and the Servlet dependency, which is the javax.servlet-api.
All other steps, except for the pom.xml remain the same.
Finally, in order to build and deploy the application on WildFly, we can use the following shell:
$ mvn clean install wildfly:deploy
You will notice from the application server logs that Spring Boot 2 starts as soon as the application deploys on WildFly:

We can test that our application is working as follows:
Troubleshooting
A frequent issue when building your Spring Boot to WildFly project is the following error:
java.lang.NoClassDefFoundError: javax/servlet/SessionCookieConfig
This error can happen if you are using a Servlet API dependencies pre 3.x. Update your pom.xml with the 4.0.1 javax.servlet-api !
Another issue you can hit, especially if you are using one of the latest versions of WildFly is:
java.lang.IllegalArgumentException: LoggerFactory is not a Logback LoggerContext but Logback is on the classpath. Either remove Logback or the competing implementation
To solve this issue, make sure that you are excluding the logback-classic from spring-boot-starter-web.
Finally, another frequent issue is;
Handler java.util.logging.ConsoleHandler is not defined
To solve this issue, we need to provide a Root logging level for our Spring Boot application. You can do that in the application.properties file of your Web application:
logging.level.root=info
Source code
The source code for the Spring Boot 3 application (WildFly 27) is available here: https://github.com/fmarchioni/mastertheboss/tree/master/spring/springboot3wildfly
The source code for the Spring Boot 2 application here: https://github.com/fmarchioni/mastertheboss/tree/master/spring/springbootwildfly
Do you want some more Spring stuff ? check Spring Boot Tutorials !
Found the article helpful? if so please follow us on Socials


