Maven is a popular build automation tool used primarily for Java-based projects, one of the most widely used programming languages. When it comes to Java development, Eclipse is a commonly used integrated development environment (IDE).
Basics of Eclipse
Eclipse is a powerful IDE widely used for Java and Android application development. It offers an excellent plugin called M2Eclipse, which seamlessly integrates Maven with Eclipse.
M2Eclipse automatically handles downloading required dependencies from remote Maven repositories. You can view the outputs of Maven commands directly in Eclipse’s console. Additionally, Eclipse allows you to update Maven dependencies within the IDE and launch Maven builds effortlessly.
Demo: Maven Project in Eclipse
Once Eclipse is open, follow these steps as there are no projects created yet:
Go to the “File” option.
Select “New” from the drop-down menu.
Choose the “Project” option and select New Project
In the project selection dialog box, select “Maven Project” and click “Next.”

In the next screen confirm that you will use a Maven archetype and set up the project properties. Next choose an archetype as starting point for your projects such as the maven-archetype-quickstart:

Next, we will specify the Archetype parameters, such as GroupId, ArtifactId, Version and package, as shown by the following picture:

We just created a project that is an Eclipse and Maven project. If you inspect the filesystem,you will find that a valid pom.xml file exists in the project root, which makes it a valid Maven project.
A look at the Maven project
The pom.xml file barely contains a dependency to the JUnit framework, which will be used to unit test your application:
<project xmlns="http://maven.apache.org/POM/4.0.0" xmlns:xsi="http://www.w3.org/2001/XMLSchema-instance"
  xsi:schemaLocation="http://maven.apache.org/POM/4.0.0 http://maven.apache.org/xsd/maven-4.0.0.xsd">
  <modelVersion>4.0.0</modelVersion>

  <groupId>SimpleMaven</groupId>
  <artifactId>SimpleMaven</artifactId>
  <version>0.0.1-SNAPSHOT</version>
  <packaging>jar</packaging>

  <name>SimpleMaven</name>
  <url>http://maven.apache.org</url>

  <properties>
    <project.build.sourceEncoding>UTF-8</project.build.sourceEncoding>
  </properties>

  <dependencies>
    <dependency>
      <groupId>junit</groupId>
      <artifactId>junit</artifactId>
      <version>3.8.1</version>
      <scope>test</scope>
    </dependency>
  </dependencies>
</project>
In addition, you will also find .classpathand .projectfiles and the .settings folder which are Eclipse-specific resources, making it a valid Eclipse project as well.

Now test your program. the shortest way is right-clicking on the pom.xml file which shows the available Maven goals (choose Test which will run the test class).

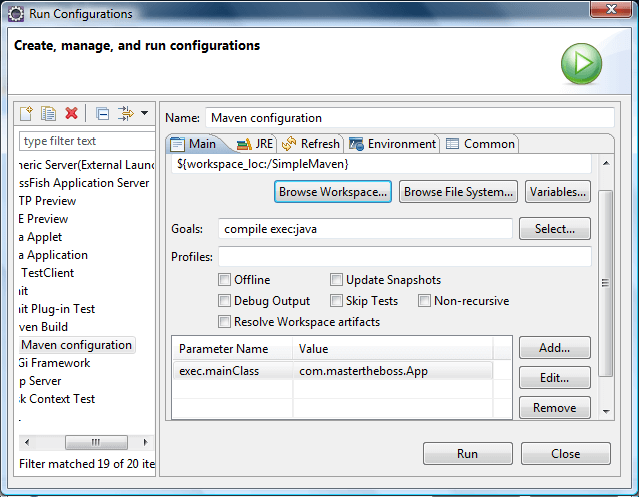
On the other hand, if you want to customize the Maven execution, create a new Runtime configuration for Maven. In this case, we decided to execute a Main class, using the mvn compile exec:java -Dexec.mainClass=com.mastertheboss.SampleMaven.App class
Congratulations! You have successfully created a Maven project using Eclipse. You can now proceed with further configuration and development tasks based on your project requirements.
Feel free to explore the various features and functionalities offered by Maven and Eclipse to enhance your development workflow. Happy coding!