This article introduces you to Activiti BPMN by first showing you how to install the tools to design your processes. It then shows you
how to create a simple standalone application on the top of it.
Activiti is an open-source BPMN platform distributed under the Apache license. It’s written in Java and thus can run in any Java application, on a server, on a cluster or in the cloud. Two deployment options are available for Activiti:
- Activiti Cloud: which is a set of Cloud Native components designed from the ground up to work in distributed environments based on Kubernetes as main deployment infrastructure and Spring Cloud / Spring Boot along with Docker for containerization of these components.
- Activiti Core: which is a set of API reay to run the BPMN 2.0 plarform in a Java standalone application / Spring Boot.
In this tutorial we will learn how to design a simple BPMN 2.0 process and use Activiti Core to run it in a Java application.
Installing the Activiti Process Designer
In order to design the BPMN 2.0 processes we will install the Activiti Eclipse plugin so that we can design our process from a Development IDE.
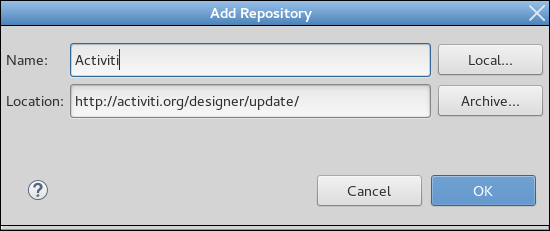
From the Eclipse upper menu, select Help | Install New Software. Choose to add the following Repository: http://activiti.org/designer/update

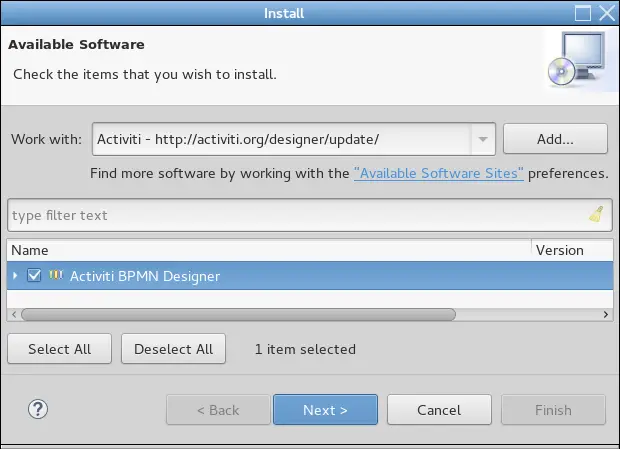
Next, check Activiti BPMN Designer as displayed by the following picture:

Click on Next and Finish the installation. You will need restarting Eclipse at the end of it.
Create a simple Standalone Project
Ok. Now let’s create a standalone application which uses Activiti API to start process instances and generates a Task list. To include the Activiti JAR and its dependent libraries, we advise using Maven as it simplifies dependency management on both our and your side a lot. Hence create a new Maven project at first:
$ mvn archetype:generate -DgroupId=com.mastertheboss.activiti -DartifactId=activitiDemo -DarchetypeArtifactId=maven-archetype-quickstart -DinteractiveMode=false
Now we will need to include Activiti core libraries and some dependencies in the pom.xml file. Here is the list of dependencies we will add:
<properties>
    <activiti-version>7.4.1</activiti-version>
</properties>

<dependencies>
    <dependency>
        <groupId>org.activiti</groupId>
        <artifactId>activiti-engine</artifactId>
        <version>${activiti-version}</version>
    </dependency>
    <dependency>
        <groupId>org.slf4j</groupId>
        <artifactId>slf4j-api</artifactId>
        <version>2.0.0</version>
    </dependency>
    <dependency>
        <groupId>org.slf4j</groupId>
        <artifactId>slf4j-log4j12</artifactId>
        <version>2.0.0</version>
    </dependency>
    <dependency>
        <groupId>com.h2database</groupId>
        <artifactId>h2</artifactId>
        <version>2.1.214</version>
    </dependency>
</dependencies>
Finally, include the Alfresco Repository where you will be able to download the latest versions of Activiti:
<repositories>
    <repository>
    <id>activiti-releases</id>
    <url>https://artifacts.alfresco.com/nexus/content/repositories/activiti-releases</url>
    </repository>
</repositories>
We are done with our project set up. Next, we will create a simple Process using the BPMN Designer.
Create a Process Diagram
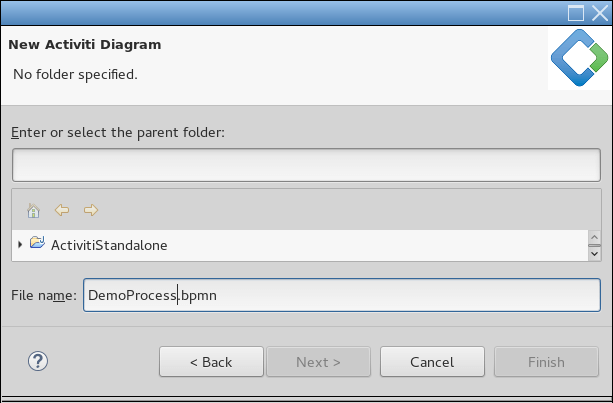
Firstly, add an Activiti Diagram to your process from the menu File | New | Other | Activiti | Activiti Diagram.

Next, create a sample process in the resources folder of your Project. For example, we will name the process MyProcess and save it in resources/DemoProcess.bpmn.
By clicking on it, the visual editor of Eclipse will appear. Then, we will create a simple process definition which contains a ServiceTask, an Exclusive Gateway and two User Tasks. Here’s a picture of our process:
Next, you need to configure each node. Select the Properties tab. We will configure first the ServiceTask which simply recalls a callback method of a Java class implementing the JavaDelegate interface.

The Class we will simulate the choice between a Simple Task and a Complex Task which should be assigned to different actors:
package com.mastertheboss.task;

import org.activiti.engine.delegate.DelegateExecution;

public class JavaService1 implements org.activiti.engine.delegate.JavaDelegate {

	public void execute(DelegateExecution arg0) {

		if (isComplexTask()) {
			System.out.println("This is a complex task!");
			arg0.setVariable("result", "1");
		}
		else  {
			System.out.println("This is a simple task!");
		    arg0.setVariable("result", "0");
	    }

	}

	private boolean isComplexTask() {
		return Math.random() < 0.5;
	}

}
As you can see, this project contains two Tasks: we will assign each of them to a different Actor. Say, we will assign the first one to kermit and the second one to gonzo. Here’s the Properties for the first Task:

And, in turn for the second Task:

Finally, we will configure the exclusiveGateway which can be seen as a Decision node. Depending on the value of “result” it will lead the process definition to two different Tasks. On each sequence flow choose a condition Expression: for example in upper Flow we will set the following condition:

Conversely, the lower Flow will capture the condition where result = 0:

Great, the first Activiti Process is ready. Next, we will create a sample Client to test it.
Write a simple Activiti Client
In order to test our process, we will add a minimal API to start the Process and claim the available Tasks. Firstly, add the Class App to your project:
package com.mastertheboss.activiti.main;

import org.activiti.engine.*;
import org.activiti.engine.impl.cfg.StandaloneProcessEngineConfiguration;
import org.activiti.engine.repository.Deployment;
import org.activiti.engine.repository.ProcessDefinition;
import org.activiti.engine.runtime.ProcessInstance;
import org.activiti.engine.task.Task;

import java.util.List;
import java.util.Map;
import java.util.HashMap;

public class App
{
    public static void main( String[] args ) throws Exception
    {

        ProcessEngineConfiguration cfg = new StandaloneProcessEngineConfiguration()
                .setJdbcUrl("jdbc:h2:mem:activiti;DB_CLOSE_DELAY=1000")
                .setJdbcUsername("sa")
                .setJdbcPassword("")
                .setJdbcDriver("org.h2.Driver")
                .setDatabaseSchemaUpdate(ProcessEngineConfiguration.DB_SCHEMA_UPDATE_TRUE);
        ProcessEngine processEngine = cfg.buildProcessEngine();
        String pName = processEngine.getName();
        String ver = ProcessEngine.VERSION;
        System.out.println("ProcessEngine [" + pName + "] Version: [" + ver + "]");

        RepositoryService repositoryService = processEngine.getRepositoryService();
        Deployment deployment = repositoryService.createDeployment()
                .addClasspathResource("DemoProcess.bpmn").deploy();
        ProcessDefinition processDefinition = repositoryService.createProcessDefinitionQuery()
                .deploymentId(deployment.getId()).singleResult();
        System.out.println(
                "Found process definition ["
                        + processDefinition.getName() + "] with id ["
                        + processDefinition.getId() + "]");

        final Map<String, Object> variables = new HashMap<String, Object>();
        final RuntimeService runtimeService = processEngine.getRuntimeService();

        ProcessInstance id = runtimeService.startProcessInstanceByKey("myProcess", variables);
        System.out.println("Started Process Id: "+id.getId());

        try {
            final TaskService taskService = processEngine.getTaskService();
            final List tasksSenior = taskService.createTaskQuery().taskAssignee("kermit").list();
            final List tasksJunior = taskService.createTaskQuery().taskAssignee("gonzo").list();


            if (tasksSenior.size() > 0) {
                System.out.println("Found task for Senior " +tasksSenior.get(0).getName() );
                taskService.claim(tasksSenior.get(0).getId(), "kermit");

                System.out.println("Task " +tasksSenior.get(0).getName() +" terminated");
            }
            else if (tasksJunior.size() > 0) {
                System.out.println("Found task for Junior " +tasksJunior.get(0).getName() );
                taskService.claim(tasksJunior.get(0).getId(), "gonzo");

                System.out.println("Task " +tasksJunior.get(0).getName() +" terminated");
            }

        } catch (Exception e) {
            System.out.println(e.getMessage());
        } finally {

        }
        processEngine.close();
    }


}
As you can see, the central starting point is the ProcessEngine. From the ProcessEngine, you can obtain the various services that contain the workflow/BPM methods.
Next, start your Class. Firstly, the BPMN engine will create a ProcessInstance. Then, the TaskService API will retrieve the list of Tasks available to the users “kermit” and “gonzo”. Depending on the Random number generated, the Task can be claimed by one of the two users, therefore a typical output of the execution would look like this:
| This is a simple task! Started Process Id: 5 Found task for Junior SimpleTask Task SimpleTask terminated |
Conclusion
This article was a walk though Activiti BPMN core engine, covering the process designer tool and how to code a simple Process.
You can download the source code for this article at: https://github.com/fmarchioni/mastertheboss/tree/master/activiti/standalone/DemoActiviti
Found the article helpful? if so please follow us on Socials