In this updated tutorial we will learn how to create a Web application using jBPM 7. To build your first business application simply go to http://start.jbpm.org and generate the skeleton projects for your Web application.
Once you have downloaded the application, unzip the downloaded archive and go into unzipped directory. You will see the following assets:
- A business-application-kjar project, which holds the process flows, business rules, optimization and other information needed to implement and run in the jBPM runtime engine.
- A business-application-service project, which is the main Spring Boot application with the business logic for the service
- A business application-model project which is a simple java project to be used as an external data model for business processes. The default contains an empty POJO at com.company.model.Model.
Adding a Process to the kjar Project
The first thing we need to do, is adding a BPMN 2.0 process we can interact with. For this purpose we will use the “License Demo” Process Flow discussed in this tutorial: Design jBPM Processes with Eclipse designer plugin
We will therefore add the process in the kjar project which shoud looks like this:
src
└── main
    ├── assembly
    │   └── repository.xml
    └── resources
        ├── LicenseDemo.bpmn2
        └── META-INF
            ├── kie-deployment-descriptor.xml
            └── kmodule.xml
Coding the jBPM Service project
Now let’s code some logic to kickstart our Process and interact with the Task that is part of the process.
Open the Application.java class and edit as follows:
package com.company.service;

import org.jbpm.services.api.ProcessService;
import org.jbpm.services.api.RuntimeDataService;
import org.jbpm.services.api.UserTaskService;
import org.kie.api.task.model.Status;
import org.kie.api.task.model.TaskSummary;
import org.kie.internal.query.QueryFilter;
import org.springframework.beans.factory.annotation.Autowired;
import org.springframework.boot.SpringApplication;
import org.springframework.boot.autoconfigure.SpringBootApplication;
import org.springframework.http.HttpStatus;
import org.springframework.http.ResponseEntity;
import org.springframework.web.bind.annotation.GetMapping;
import org.springframework.web.bind.annotation.RequestParam;
import org.springframework.web.bind.annotation.RestController;

import java.util.HashMap;
import java.util.List;
import java.util.Map;

@SpringBootApplication
@RestController
public class Application  {

    @Autowired
    private ProcessService processService;
    @Autowired
    private RuntimeDataService runtimeDataService;
    @Autowired
    private UserTaskService userTaskService;

    public static void main(String[] args) {
        SpringApplication.run(Application.class, args);
    }

    @GetMapping("/hello")
    public ResponseEntity<String> sayHello(@RequestParam Integer age) throws Exception {

        // Provided as an example. Not actually needed by our process.
        Map<String, Object> vars = new HashMap<>();
        vars.put("processVar1", "Hello");

        Long processInstanceId = processService.startProcess("business-application-kjar-1_0-SNAPSHOT", "com.mastertheboss.LicenseDemo", vars);

        Map<String, Object> params = new HashMap<String, Object>();
        params.put("age", age);

        List<TaskSummary> taskSummaries = runtimeDataService.getTasksAssignedAsPotentialOwner("john", new QueryFilter());

        taskSummaries.forEach(s->{
            Status status = taskSummaries.get(0).getStatus();
            if ( status == Status.Ready )
                userTaskService.claim(s.getId(), "john");
            userTaskService.start(s.getId(), "john");
            userTaskService.complete(s.getId(), "john", params);
        });

        return ResponseEntity.status(HttpStatus.CREATED).body("Task completed!");
    }
}
First off, you should have noticed that the Process is started by referencing the Container Id “business-application-kjar-1_0-SNAPSHOT“. Where is that defined?
If you check the business-application-service.xml file you will see the list of BPM containers that are made available:
 <containers>
    <container>
      <containerId>business-application-kjar-1_0-SNAPSHOT</containerId>
      <releaseId>
        <groupId>com.company</groupId>
        <artifactId>business-application-kjar</artifactId>
        <version>1.0-SNAPSHOT</version>
      </releaseId>
      <status>STARTED</status>
      <scanner>
        <status>STOPPED</status>
      </scanner>
      <configItems>
        <config-item>
          <name>KBase</name>
          <value></value>
          <type>BPM</type>
        </config-item>
        <config-item>
          <name>KSession</name>
          <value></value>
          <type>BPM</type>
        </config-item>
        <config-item>
          <name>MergeMode</name>
          <value>MERGE_COLLECTIONS</value>
          <type>BPM</type>
        </config-item>
        <config-item>
          <name>RuntimeStrategy</name>
          <value>PER_PROCESS_INSTANCE</value>
          <type>BPM</type>
        </config-item>
      </configItems>
      <messages/>
      <containerAlias>business-application-kjar</containerAlias>
    </container>
  </containers>
If you are familiar with KIE API, the code should be fairly trivial as we are collecting the list of TaskSummary, claiming, starting and completing the tasks with user “john”. Depending on the Task variable “age”, the license will be either granted or denied.
In order to build the project, you will get out of the box the Spring Boot starters and dependencies in the pom.xml file:
  <parent>
    <groupId>org.springframework.boot</groupId>
    <artifactId>spring-boot-starter-parent</artifactId>
    <version>2.2.10.RELEASE</version>
  </parent>

  <properties>
    <version.org.kie>7.52.0.Final</version.org.kie>
    <maven.compiler.target>1.8</maven.compiler.target>
    <maven.compiler.source>1.8</maven.compiler.source>
    <project.build.sourceEncoding>UTF-8</project.build.sourceEncoding>
    <project.reporting.outputEncoding>UTF-8</project.reporting.outputEncoding>
    <narayana.version>5.9.0.Final</narayana.version>
    <fabric8.version>3.5.40</fabric8.version>
  </properties>

  <dependencies>

    <dependency>
        <groupId>org.kie</groupId>
        <artifactId>kie-server-spring-boot-starter</artifactId>
        <version>${version.org.kie}</version>
    </dependency>

    <dependency>
      <groupId>org.springframework.boot</groupId>
      <artifactId>spring-boot-starter-test</artifactId>
      <scope>test</scope>
    </dependency>
  </dependencies>
Besides that, a set of profiles have been added to let you run the application using most common databases (mysql, postgres, h2). By default the H2 database will be used.
You can build and run the business-application-service as follows:
$ ./launch.sh clean install
Once started, you can query the Controller as follows:
http://localhost:8090/hello?age=21
You should see in the Console:
Welcome to license check
Enter you age
Thanks
Admitted
Great. You just managed to run a jBPM 7 Web application embedded in Spring Boot. Check out the source code of it here: https://github.com/fmarchioni/mastertheboss/tree/master/jbpm/business-application
Coding a jBPM 6 Web application
In this second tutorial I’ll describe how I have set up my first jBPM 6 application using Eclipse and the jBPM 6 plugin installed on it. The prerequisite to it is that you have correctly installed jBPM 6 using the jbpm-installer. I have described the steps in this tutorial which shows how to shorten the full installation procedure.
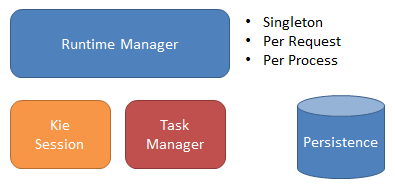
Before starting, let’s see at first what’s new with jBPM 6. jBPM6 introduces several enhancements: one of the most interesting ones is the introduction of the module Runtime Manager which greatly simplify the management of:
- KnowledgeBase (KieBase)
- KnowledgeSession (KieSession)

The Knowledge is a key element of jBPM 6 (KIE = Knowledge is everything) and you can use any of three built-in strategies for handling knowledge sessions and its relation to process instance.
- Singleton – single knowledge session that will execute all process instances
- Per Request – every request (which is in fact call to getRuntimeEngine) will get new knowledge session
- Per Process Instance – every process instance will have its dedicated knowledge session for the entire life time
To make use of the strategy it’s enough to create proper type of RuntimeManager. This can be obtained by means of Context and Dependency Injection which brings the power of jBPM 6 to the next level.
@Inject
@Singleton
private RuntimeManager singletonManager;
So here’s our simple process. This project is engineered as jBPM 6 Maven project. Once that you have created the project, add a jBPM 6 process to it. Here’s a view of the process:

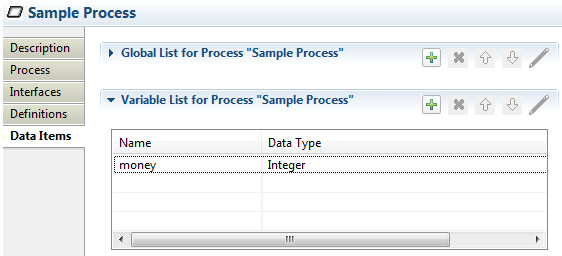
The main process contains a variable named “money” which will be used to direct the flow in one direction or in another.

The only Task (buy ticket) is assigned to user “john”.

We have included in the resources of our project the userinfo.properties which contains a “:” separated list of values for each actor including Name=email:Group:Display Name:
[email protected]:en-UK:john
Moving next, within the Exclusive Gateway, we have set as Mvel condition
Money < 1000 Economy class
Money >= 1000 First class

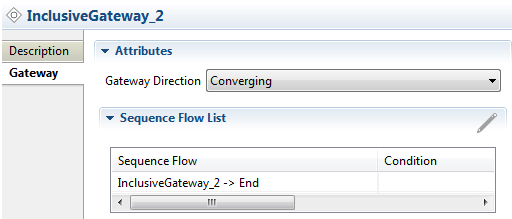
The last part of the process is an Inclusive Gateway which is Converging towards the end

The project is composed of two EJBs and a Servlet Controller. This is the first Singleton EJB named ProcessBean which, as the name suggests, handles the Startup of processes:
@Startup
@javax.ejb.Singleton
public class ProcessBean    {

    @Inject
    @Singleton
    private RuntimeManager singletonManager;

    @PostConstruct
    public void configure() {
        singletonManager.toString();
    }

    public long startProcess(String processName, Map<String, Object> params) throws Exception {

        RuntimeEngine runtime = singletonManager.getRuntimeEngine(EmptyContext.get());
        KieSession ksession = runtime.getKieSession();

        long processInstanceId = -1;


        try {

            ProcessInstance processInstance = ksession.startProcess(processName,params);

            processInstanceId = processInstance.getId();

            System.out.println("Process started ... : processInstanceId = " + processInstanceId);


        } catch (Exception e) {
            e.printStackTrace();

            throw e;
        }

        return processInstanceId;
    }

}
What is most interesting to note is that this EJB gets injected the RuntimeManager that will be used to collect the KieSession; The other EJB named TaskManager handles the Tasks approval and retrieval, getting the TaskService injected as follows:
@Stateless
public class TaskBean  {

    @Inject
    TaskService taskService;

    public List<TaskSummary> retrieveTaskList(String actorId) throws Exception {

        List<TaskSummary> list;

        try {
            list = taskService.getTasksAssignedAsPotentialOwner(actorId, "en-UK");

        } catch (Exception e) {
            e.printStackTrace();
            throw new RuntimeException(e);
        }

        System.out.println("retrieveTaskList by " + actorId);
        for (TaskSummary task : list) {
            System.out.println(" task.getId() = " + task.getId());
        }

        return list;
    }

    public void approveTask(String actorId, long taskId) throws Exception {

        try {
            System.out.println("approveTask (taskId = " + taskId + ") by " + actorId);
            taskService.start(taskId, actorId);

            taskService.complete(taskId, actorId, null);

        } catch (Exception e) {
            e.printStackTrace();
            Throwable cause = e.getCause();

            throw new RuntimeException(e);
        }
    }

}
Among the utility classes of this project, you will find the CustomApplicationScopedProducer which contains a RuntimeEnvironment producer in all three possible variants (Singleton, PerProcess, PerRequest) loading one asset, the travel.bpmn:
    @Produces
    @Singleton
    @PerProcessInstance
    @PerRequest
    public RuntimeEnvironment produceEnvironment(EntityManagerFactory emf) {
        RuntimeEnvironment environment = RuntimeEnvironmentBuilder.Factory.get()
                .newDefaultBuilder()
                .entityManagerFactory(emf)
                .userGroupCallback(usergroupCallback)
                .registerableItemsFactory(factory)
                .addAsset(
                        ResourceFactory
                                .newClassPathResource("travel.bpmn"),
                        ResourceType.BPMN2).get();
        return environment;
    }
Finally, the TaskServlet is a simple Controller which takes care to contect the EJBs for starting the process and for approving the Task. The Servlet is really styled using year’s 2000’s coding 🙂 however it’s done on purpose to keep the web application as simplest as possible and just concentrate on the jBPM 6 stuff.
@WebServlet(name = "task", urlPatterns = { "/task" })
public class TaskServlet extends HttpServlet {

    private static final long serialVersionUID = 1L;

    @EJB
    private ProcessBean processService;
    @EJB
    private TaskBean taskService;

    protected void doPost(HttpServletRequest req, HttpServletResponse res)
            throws ServletException, IOException {
        doGet(req, res);
    }

@Override
    protected void doGet(HttpServletRequest req, HttpServletResponse res)
            throws ServletException, IOException {

        PrintWriter out = res.getWriter();
        res.setContentType("text/html");
        long processInstanceId = -1;
        try {
            String action = req.getParameter("action");

            if (action.equals("create")) {
                Map<String, Object> params = new HashMap<String, Object>();
                params.put("money", 2000);

                processInstanceId = processService.startProcess(
                        "com.sample.bpmn", params);
                out.println("Process started with Id " + processInstanceId);
                out.println("<a href=\"task?action=submit\">Complete Task</a> <br/>");
            } else if (action.equals("submit")) {
                List<TaskSummary> taskListJohn = taskService
                        .retrieveTaskList("john");
                approveAllTasks(taskListJohn, "john");

                out.println("John Appoved ");
                out.println("<a href=\"index.jsp\">Home</a> <br/>");

            }

        } catch (Exception e) {
            throw new ServletException(e);
        }

    }

    private void approveAllTasks(List<TaskSummary> taskList, String actor) {

        try {

            System.out.println("======== TASK LIST ========");
            for (TaskSummary task : taskList) {

                System.out.println(task.getName());
                System.out.println(task.getId());
                System.out.println(task.getProcessInstanceId());

                taskService.approveTask(actor, task.getId());

            }
        } catch (Exception e) {
            throw new RuntimeException(e);
        }

    }
}
The pom.xml of this Maven project contains the JBoss plugin:
  <build>
    <plugins>
      <plugin>
        <groupId>org.jboss.as.plugins</groupId>
        <artifactId>jboss-as-maven-plugin</artifactId>
        <version>7.3.Final</version>
      </plugin>
    </plugins>
  </build>
Therefore in order to compile and deploy simply execute:
mvn clean install jboss-as:deploy
Download the Maven project from here
Found the article helpful? if so please follow us on Socials