Running any Docker image on Openshift
In this tutorial we will learn how to run a Docker image, built from a Dockerfile, on Openshift.
So our starting point will be a simple Dockerfile definition which pulls the default “WildFly” image and adds some customizations to it. In our case, it simply adds a management user:
FROM jboss/wildfly
RUN /opt/jboss/wildfly/bin/add-user.sh admin Password1! --silent
CMD ["/opt/jboss/wildfly/bin/standalone.sh", "-b", "0.0.0.0", "-bmanagement","0.0.0.0"]
Of course you can replace this Dockerfile with any valid Dockerfile definition. Now start your Openshift cluster.
Next thing will be creating a Binary Build that will hold our Image. You can do it through the “oc new-build” command:
$ oc new-build --binary --name=mywildfly -l app=mywildfly
    * A Docker build using binary input will be created
      * The resulting image will be pushed to image stream tag "mywildfly:latest"
      * A binary build was created, use 'start-build --from-dir' to trigger a new build

--> Creating resources with label app=mywildfly ...
    imagestream.image.openshift.io "mywildfly" created
    buildconfig.build.openshift.io "mywildfly" created
--> Success
Great. Now verify that the Binary Build has been correctly added:
$ oc get bc
NAME                TYPE      FROM      LATEST
mywildfly           Docker    Binary    0
As it is, the Binary Build does not contain any reference to a Dockerfile. We can edit its configuration to include, in the dockerfilePath param, the location where our Dockerfile is (in our case, it’s in the current folder):
$ oc patch bc/mywildfly -p '{"spec":{"strategy":{"dockerStrategy":{"dockerfilePath":"Dockerfile"}}}}'
buildconfig.build.openshift.io/mywildfly patched
Now start the Build:
$ oc start-build mywildfly --from-dir=. --follow
Uploading directory "." as binary input for the build ...

Uploading finished
build.build.openshift.io/mywildfly-1 started
Receiving source from STDIN as archive ...
Pulling image jboss/wildfly ...
Pulled 1/5 layers, 21% complete
Pulled 2/5 layers, 62% complete
Pulled 3/5 layers, 71% complete
Pulled 4/5 layers, 88% complete
Pulled 5/5 layers, 100% complete
Extracting
Step 1/5 : FROM jboss/wildfly
 ---> 5de2811bb236
Step 2/5 : RUN /opt/jboss/wildfly/bin/add-user.sh admin Password1! --silent
 ---> Running in 4c17b5d59a26
 ---> 63651cb80af2
Removing intermediate container 4c17b5d59a26
Step 3/5 : CMD /opt/jboss/wildfly/bin/standalone.sh -b 0.0.0.0 -bmanagement 0.0.0.0
 ---> Running in 3f2043e97715
 ---> 2edcf0d3758a
Removing intermediate container 3f2043e97715
Step 4/5 : ENV "OPENSHIFT_BUILD_NAME" "mywildfly-1" "OPENSHIFT_BUILD_NAMESPACE" "myproject"
 ---> Running in 2e1ec757227a
 ---> 24974e156028
Removing intermediate container 2e1ec757227a
Step 5/5 : LABEL "io.openshift.build.name" "mywildfly-1" "io.openshift.build.namespace" "myproject"
 ---> Running in c948609a8a5e
 ---> 57af1ff0bb97
Removing intermediate container c948609a8a5e
Successfully built 57af1ff0bb97
Pushing image 172.30.1.1:5000/myproject/mywildfly:latest ...
Pushed 2/6 layers, 33% complete
Pushed 3/6 layers, 76% complete
Pushed 4/6 layers, 96% complete
Pushed 5/6 layers, 100% complete
Pushed 6/6 layers, 100% complete
Push successful
Well done, the ImageStream has been pushed into the Internal Registry. Check it with:
$ oc get is
NAME                DOCKER REPO                                   TAGS      UPDATED
mywildfly           172.30.1.1:5000/myproject/mywildfly           latest    12 seconds ago
Now that the ImageStream is available, let’s create an application in the current project which uses this ImageStream:
$ oc new-app --image-stream=mywildfly
--> Found image 57af1ff (48 seconds old) in image stream "myproject/mywildfly" under tag "latest" for "mywildfly"

    * This image will be deployed in deployment config "mywildfly"
    * Port 8080/tcp will be load balanced by service "mywildfly"
      * Other containers can access this service through the hostname "mywildfly"

--> Creating resources ...
    deploymentconfig.apps.openshift.io "mywildfly" created
    service "mywildfly" created
--> Success
    Application is not exposed. You can expose services to the outside world by executing one or more of the commands below:
     'oc expose svc/mywildfly'
    Run 'oc status' to view your app.
We are almost done. We only need to expose the Route to external clients:
$ oc expose svc/mywildfly
route.route.openshift.io/mywildfly exposed
And verify the Route URL with:
$ oc get route
NAME                HOST/PORT                                         PATH      SERVICES            PORT       TERMINATION   WILDCARD
mywildfly           mywildfly-myproject.192.168.42.5.nip.io                     mywildfly           8080-tcp                 None
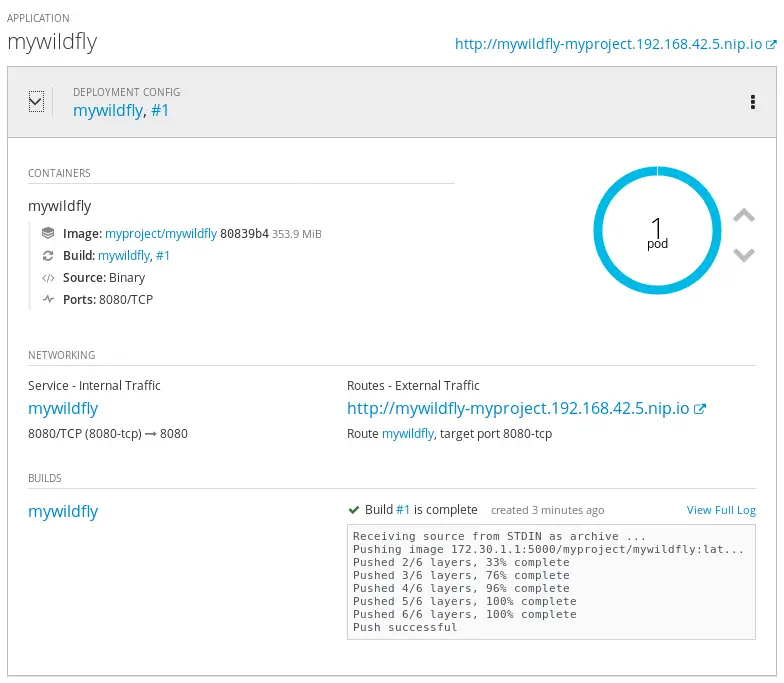
As you can see from the Web Console, the application is available:
As last step, we will verify that we can actually login with the management user that has been incldued in the Image. For this purpose we need to define a PortForward to reach the port 9990 in the Pod where the Application us running. Let’s check the Pod list:
$ oc get pods
NAME                        READY     STATUS      RESTARTS   AGE
mywildfly-1-build           0/1       Completed   0          6m
mywildfly-1-mzkmf           1/1       Running     0          4m
Now we will forward the Port 9990 to the equivalent Port on localhost:
$ oc port-forward mywildfly-1-mzkmf 9990:9990
Forwarding from 127.0.0.1:9990 -> 9990
Forwarding from [::1]:9990 -> 9990
Try connecting from a local installation of WildFly, you will be prompted to enter Username and Password:
$ cd wildfly-16.0.0.Final/bin
$ ./jboss-cli.sh -c
Authenticating against security realm: ManagementRealm
Username: admin
Password:
[standalone@localhost:9990 /]
That’s all. In this tutorial we have learned how to run a Docker image, created from a Dockerfile, in your own OpenShift cluster.