Gradle tutorial for WildFly users
This is an updated tutorial for getting started with Gradle. You will learn how to compile and assemble a Jakarta EE 10 application in a matter of minutes and we will deploy it on WildFly.
Installing gradle
More and more developers are turning to Gradle for creating high performance builds. There are several advantages when moving to Gradle, maybe the most immediate is that out of the box, Gradle handles transitive dependencies that resolve across multiple repository types including Maven, Ivy, flat files. Let’s see an HelloWorld example. At first Download Gradle from: http://gradle.org/gradle-download/ (You will need the binary distribution).
Next unzip Gradle to a location convenient to you.
unzip gradle-6.9.3-bin.zip -d /usr/shareThe only requirement is to include the bin folder (which contains the gradle command) in the user’s PATH:
PATH=$PATH:/usr/share/gradle-6.9.3/binGreat. Now let’s create a basic project with Gradle.
Bootstrapping a gradle project
Firstly, we need to create a simple project structure for our application. You can either create the project structure using plain shell commands as follows:
mkdir -p src/main/java
mkdir -p src/main/resources
mkdir -p src/main/webapp

touch build.gradle
On the other hand, you can also use the gradle-init command to create a basic project structure, with a default configuration file:
gradle init --type java-library
Select build script DSL:
1: Groovy
2: Kotlin
Enter selection (default: Groovy) [1..2] 1
Select test framework:
1: JUnit 4
2: TestNG
3: Spock
4: JUnit Jupiter
Enter selection (default: JUnit 4) [1..4] 4
Project name (default: gradle-demo): gradle-demo-wildfly
Source package (default: gradle.demo.wildfly):
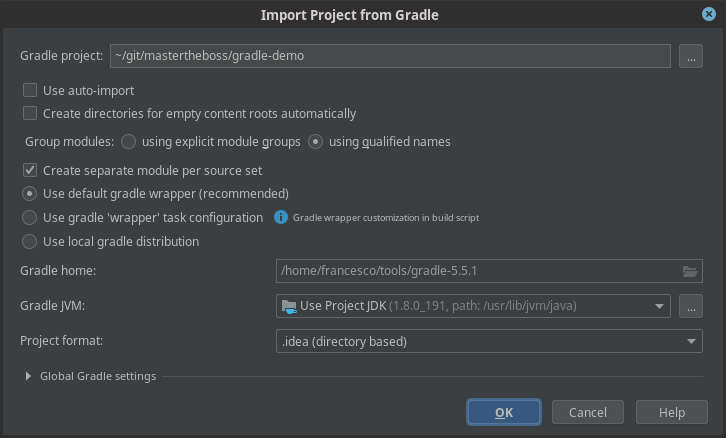
BUILD SUCCESSFUL in 43sOnce done with it, you can just import the Gradle Project in any tool that supports it, like IntelliJ Idea:
Next, we will be adding a Servlet that prints some information from the request:
package gradle.demo.wildfly;

import java.io.IOException;
import java.io.PrintWriter;
import jakarta.servlet.ServletException;
import jakarta.servlet.annotation.WebServlet;
import jakarta.servlet.http.HttpServlet;
import jakarta.servlet.http.HttpServletRequest;
import jakarta.servlet.http.HttpServletResponse;

@WebServlet(name = "HelloServlet", urlPatterns = {"hello"}, loadOnStartup = 1)
public class HelloServlet extends HttpServlet {
    protected void doGet(HttpServletRequest request, HttpServletResponse response)
            throws ServletException, IOException {
        response.getWriter().print("Hello, World!");
    }

    protected void doPost(HttpServletRequest request, HttpServletResponse response)
            throws ServletException, IOException {
        String name = request.getParameter("name");
        if (name == null) name = "World";
        PrintWriter out = response.getWriter();
        out.println("Hello "+name);
    }
}
and then, under the folder src/main/webapp add the following index.html page which triggers our Servlet:
<html>
<head>
    <title>Web Demo</title>
</head>
<body>
<p>Say <a href="hello">Hello</a></p>

<form method="post" action="hello">
    <h2>Name:</h2>
    <input type="text" id="say-hello-text-input" name="name" />
    <input type="submit" id="say-hello-button" value="Say Hello" />
</form>
</body>
</html>
Here is the structure of our project:
$ tree src
src
└── main
    ├── java
    │   └── gradle
    │       └── demo
    │           └── wildfly
    │               └── HelloServlet.java
    └── webapp
        └── index.html
Coding the gradle build script
Now, let’s update the build.gradle so that it can compile our project:
plugins {
   id 'java'
   id 'war'
}

group = 'gradle.demo.wildfly'
version = '1.0'

repositories {
   mavenCentral()
}

dependencies {
   providedCompile 'jakarta.platform:jakarta.jakartaee-api:10.0.0'
}

compileJava {
   targetCompatibility = '11'
   sourceCompatibility = '11'
}

war {
   archiveName 'demoservlet.war'
}
The build.gradle file contains the War plugin which extends the Java plugin to add support for assembling web application WAR files. It disables the default JAR archive generation of the Java plugin and adds a default WAR archive task.
Besides it, the Maven Central repository to find the dependencies.
Finally notice the dependencies section: here the magic of Gradle happens: by specifying the jakarta.platform:jakarta.jakartaee-api:10.0.0, Gradle will be able to trigger transitive dependencies automatically so you have the full Jakarta EE 10 stack available.
[francesco@localhost demogradle]$ gradle warThe first time you will execute the build, the required libraries will be download from the repositories indicated. You will eventually end-up with the following log:
:compileJava UP-TO-DATE
:processResources UP-TO-DATE
:classes UP-TO-DATE
:war UP-TO-DATE
:assemble UP-TO-DATE
:compileTestJava UP-TO-DATE
:processTestResources UP-TO-DATE
:testClasses UP-TO-DATE
:test UP-TO-DATE
:check UP-TO-DATE
:build UP-TO-DATE

BUILD SUCCESSFUL
You can find the packaged war archive in the build/libs folder of your application. Deploy it on WildFly and have fun! In the next tutorial we will see how to create more advanced builds with Gradle and WildFly.
The source code for this tutorial is available at: https://github.com/fmarchioni/mastertheboss/tree/master/gradle-demo