Quarkus includes several options for sending and consuming aysnchronous messages. In this two-parts tutorial we will learn how to send messages using the JMS API, which is well-known to Java Enterprise developers. In the next tutorial we will check out how to use Reactive Messaging to handle messages through the mediation of a Bus.
JMS support for Quarkus has been added through the quarkus-artemis-jms extension:
<dependency>
    <groupId>io.quarkus</groupId>
    <artifactId>quarkus-artemis-jms</artifactId>
</dependency>
By using this extension, you can take advantage of migrating your JMS applications (or creating new ones) and leverage transactions which is available by definition in the JMS API.
Spinning up ArtemisMQ
In order to get started, we will spin up an ArtemisMQ server and produce/consume messages with it.
This tutorial will provide an overview of ArtemisMQ, if you want to use a local set up of Artemis on your machine: Introduction to ActiveMQ Artemis
On the other hand, if you want to get started even more quickly, you can launch ArtemisMQ with Docker as follows:
docker run -it --rm -p 8161:8161 -p 61616:61616 -e ARTEMIS_USERNAME=quarkus -e ARTEMIS_PASSWORD=quarkus vromero/activemq-artemis:2.9.0-alpine
Notice we are using some Environment variables to configure a management user for Artemis. that will be needed in your Quarkus application.
Creating the Quarkus project
Next, create your Quarkus project including the artemismq dependency, plus the jsonb API, we will use to produce/consume and parse messages in JSON format:
mvn io.quarkus:quarkus-maven-plugin:1.2.0.Final:create \
    -DprojectGroupId=com.mastertheboss.quarkus \
    -DprojectArtifactId=jms-demo \
    -Dextensions="artemis-jms,resteasy-jsonb,resteasy"
Our application will just contain a Producer and a JMS Consumer and an Endpoint which will trigger the message Producer. Here is the REST Endpoint:
package com.mastertheboss.quarkus.jms;

import javax.inject.Inject;
import javax.ws.rs.*;
import javax.ws.rs.core.Response;


@Path("/jms")
@Produces("application/json")
@Consumes("application/json")
public class JMSEndpoint {

    @Inject
    JMSProducer producer;

    @POST
    public Response sendMessage(String message) {
        producer.sendMessage(message);
        return Response.status(201).build();

    }

}
Then, the JMSProducer class which will send a JMS message against the “exampleQueue” Destination:
package com.mastertheboss.quarkus.jms;

import javax.enterprise.context.ApplicationScoped;
import javax.inject.Inject;
import javax.jms.ConnectionFactory;
import javax.jms.JMSContext;
import javax.jms.JMSRuntimeException;
import javax.jms.Session;


@ApplicationScoped
public class JMSProducer {

    @Inject
    ConnectionFactory connectionFactory;

    public void sendMessage(String message) {
        try (JMSContext context = connectionFactory.createContext(Session.AUTO_ACKNOWLEDGE)){
            context.createProducer().send(context.createQueue("exampleQueue"), message);
        } catch (JMSRuntimeException ex) {
            // handle exception (details omitted)
        }
    }
}
Then, we have the JMSConsumer class. As we don’t have Message Driven Bean in Quarkus (since Quarkus is not an Application Server with EJB support) we can simulate message consumption using a CDI Bean. The JMSConsumer Bean schedules an event every 5 seconds that will check for incoming messages in our JMS Queue:
package com.mastertheboss.quarkus.jms;

import io.quarkus.runtime.ShutdownEvent;
import io.quarkus.runtime.StartupEvent;

import javax.enterprise.context.ApplicationScoped;
import javax.enterprise.event.Observes;
import javax.inject.Inject;
import javax.jms.*;
import javax.json.Json;
import javax.json.JsonObject;
import javax.json.JsonReader;
import java.io.StringReader;
import java.util.concurrent.Executors;
import java.util.concurrent.ScheduledExecutorService;
import java.util.concurrent.TimeUnit;


@ApplicationScoped
public class JMSConsumer implements Runnable {

    @Inject
    ConnectionFactory connectionFactory;

    private final ScheduledExecutorService scheduler = Executors.newSingleThreadScheduledExecutor();

    void onStart(@Observes StartupEvent ev) {
        scheduler.scheduleWithFixedDelay(this, 0L, 5L, TimeUnit.SECONDS);
    }

    void onStop(@Observes ShutdownEvent ev) {
        scheduler.shutdown();
    }

    @Override
    public void run() {
        try (JMSContext context = connectionFactory.createContext(Session.AUTO_ACKNOWLEDGE)) {
            javax.jms.JMSConsumer consumer = context.createConsumer(context.createQueue("exampleQueue"));
            while (true) {
                Message message = consumer.receive();
                if (message == null) {
                    return;
                }
                JsonReader jsonReader = Json.createReader(new StringReader(message.getBody(String.class)));
                JsonObject object = jsonReader.readObject();
                String msg = object.getString("message");
                System.out.println(msg);
            }
        } catch (JMSException e) {
            throw new RuntimeException(e);
        }
    }


}
The last item is the application.properties file, which contains the URL of the Artemis Server and the login credentials:
quarkus.artemis.url=tcp://localhost:61616
quarkus.artemis.username=quarkus
quarkus.artemis.password=quarkus
Running the example
You can start the example with:
$ mvn install quarkus:dev
Once that Quarkus is started, send a JMS message through an HTTP POST, as in this example:
curl -d '{"message":"Hello!"}' -H "Content-Type: application/json" -X POST http://localhost:8080/jms
You should be able to see the message in your Quarkus Console:
Hello!
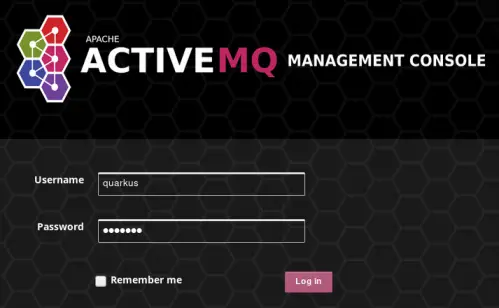
You can check the result also through the ArtemisMQ console, which is available at http://localhost:8161 . Login with “quarkus/quarkus”:
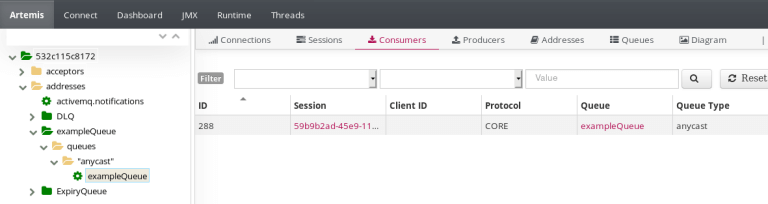
Then, you can verify that the JMS Destination has been created and messages are piling up into it:
That’s all. Check out the next tutorial Messaging with Quarkus part two: Reactive Messaging in order to learn how to use Reactive Messaging to produce and consume messages with Quarkus.
Source code for this tutorial: https://github.com/fmarchioni/mastertheboss/tree/master/quarkus/jms-demo
Found the article helpful? if so please follow us on Socials


