This article shows how to run a Quarkus 3 application using Jakarta REST Service and a Vue.js front-end. The example application will wrap the CRUD method of the endpoint with equivalent Vue.js functions. Let’s get started !
Pre-requisites: You should be familiar with REST Services and VueJS Web interfaces. If you are new to that, we have published a first article that shows how to perform the same set up using WildFly as Runtime environment: Check this article to learn more: JAX-RS CRUD Application using Vue.js and RESTEasy.
Bootstrap the Quarkus application
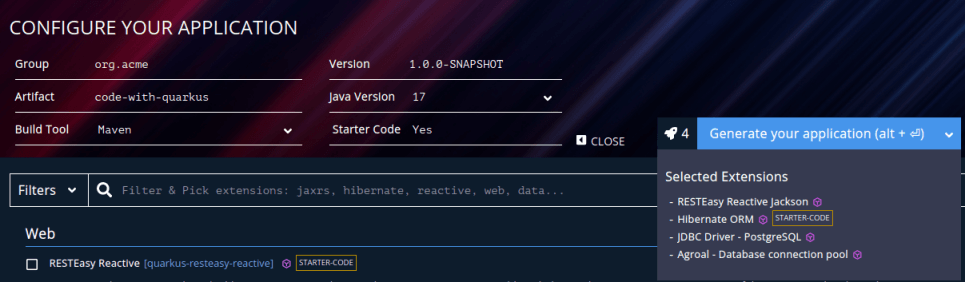
Firstly, we will bootstrap the Quarkus 3 application. At the time of writing, Quarkus 3 is still in Alpha, however we can already have a taste of it! We have a variety of options to create a basic template for our project. We will be using the online Web application which is available at: https://code.quarkus.io/
As you can see, we will need the following extensions:
- RESTEasy Reactive Jackson (REST framework with Jackson JSON Processor)
- Hibernate ORM (Data persistence)
- PostgreSQL (JDBC Driver)
- Agroal (Database Connection pool)
Save your project and import it in your IDE. If you check the pom.xml file, you will notice that the following dependencies are in your project:
<dependency>
      <groupId>io.quarkus</groupId>
      <artifactId>quarkus-resteasy-reactive-jackson</artifactId>
</dependency>
<dependency>
      <groupId>io.quarkus</groupId>
      <artifactId>quarkus-hibernate-orm</artifactId>
</dependency>
<dependency>
      <groupId>io.quarkus</groupId>
      <artifactId>quarkus-jdbc-postgresql</artifactId>
</dependency>
<dependency>
      <groupId>io.quarkus</groupId>
      <artifactId>quarkus-agroal</artifactId>
</dependency>
<dependency>
      <groupId>io.quarkus</groupId>
      <artifactId>quarkus-arc</artifactId>
</dependency>
    <dependency>
      <groupId>io.quarkus</groupId>
      <artifactId>quarkus-resteasy-reactive</artifactId>
</dependency>
Coding the Project Classes
Firstly, we will add the Model Class. This is the Customer Entity which uses a @SequenceGenerator as @Id and two fields: name and surname:
@Entity
@NamedQuery(name = "Customers.findAll",
        query = "SELECT c FROM Customer c ORDER BY c.id")
public class Customer {
    @Id
    @SequenceGenerator(
            name = "customerSequence",
            sequenceName = "customerId_seq",
            allocationSize = 1,
            initialValue = 1)
    @GeneratedValue(strategy = GenerationType.SEQUENCE, generator = "customerSequence")
    private Long id;
    @Column(length = 40)
    private String name;
    @Column(length = 40)
    private String surname;

    public Long getId() {
        return id;
    }

    public void setId(Long id) {
        this.id = id;
    }

    public String getName() {
        return name;
    }

    public void setName(String name) {
        this.name = name;
    }

    public String getSurname() {
        return surname;
    }

    public void setSurname(String surname) {
        this.surname = surname;
    }

}
Then we go to the CustomerRepository class that performs the @Transactional operations and the finder operations with the Entity:
@ApplicationScoped
public class CustomerRepository {

    @Inject
    EntityManager entityManager;

    public List<Customer> findAll() {
        return entityManager.createNamedQuery("Customers.findAll", Customer.class)
                .getResultList();
    }

    public Customer findCustomerById(Long id) {

        Customer customer = entityManager.find(Customer.class, id);

        if (customer == null) {
            throw new WebApplicationException("Customer with id of " + id + " does not exist.", 404);
        }
        return customer;
    }
    @Transactional
    public void updateCustomer(Long id, String name, String surname) {

        Customer customerToUpdate = findCustomerById(id);
        customerToUpdate.setName(name);
        customerToUpdate.setSurname(surname);
    }
    @Transactional
    public void createCustomer(Customer customer) {

        entityManager.persist(customer);

    }
    @Transactional
    public void deleteCustomer(Long customerId) {

        Customer c = findCustomerById(customerId);
        entityManager.remove(c);
    }


}
Here we can see a first subtle difference with Jakarta EE. In Quarkus we can @Inject direclty the EntityManager object which, as the class says, manages directly Entities. In Jakarta EE we need the mediation of the PersistenceContext to make our Entity available:
@PersistenceContext
private EntityManager entityManager;
That being said, in the Jakarta EE world you can still @Inject the EntityManager in your Beans, but you have to create a Producer for it.
Let’s move to the Endpoint class, which contains one method for each HTTP Operation:
@Path("customers")
@ApplicationScoped
@Produces("application/json")
@Consumes("application/json")
public class CustomerEndpoint {

    @Inject CustomerRepository customerRepository;

    @GET
    public List<Customer> getAll() {
        return customerRepository.findAll();
    }

    @POST
    public Response create(Customer customer) {
        customerRepository.createCustomer(customer);
        return Response.status(201).build();
    }

    @PUT
    public Response update(@QueryParam("id") Long id, @QueryParam("name") String name, @QueryParam("surname") String surname) {
        customerRepository.updateCustomer(id,name,surname);
        return Response.status(204).build();
    }
    @DELETE
    public Response delete(@QueryParam("id") Long customerId) {
        customerRepository.deleteCustomer(customerId);
        return Response.status(204).build();
    }

}
One more different with the Jakarta EE application is that we don’t need a JAX-RS Activator class in Quarkus. We already get by default our REST Services exposed under the Root Web Context (“/”).
Adding the Database
Our application will target a PostgreSQL database, therefore we need one DB available. The simplest way to start one is by means of a Docker Container:
docker run --ulimit memlock=-1:-1 -it --rm=true --memory-swappiness=0 --name quarkus_test -e POSTGRES_USER=quarkus -e POSTGRES_PASSWORD=quarkus -e POSTGRES_DB=quarkusdb -p 5432:5432 postgres:13
Then, to configure the connectivity with PostgreSQL, we will add the following configuration in our application.properties file:
quarkus.datasource.db-kind=postgresql
quarkus.datasource.username=quarkus
quarkus.datasource.password=quarkus
quarkus.datasource.jdbc.url=jdbc:postgresql://localhost/quarkusdb
quarkus.datasource.jdbc.max-size=8
quarkus.datasource.jdbc.min-size=2

quarkus.hibernate-orm.database.generation=drop-and-create
quarkus.hibernate-orm.log.sql=true
quarkus.hibernate-orm.sql-load-script=import.sql
Finally, as you can see, we are defining an import.sql script to load some initial data. This file
INSERT INTO customer (id, name, surname) VALUES ( nextval('customerId_seq'), 'Homer','Simpson');
INSERT INTO customer (id, name, surname) VALUES ( nextval('customerId_seq'), 'Bart','Simpson');
Adding the Vue.js Web layer
Vue.js is a JavaScript framework for building user interfaces. It is a progressive framework, meaning that it can be integrated into a small part of an existing website or used to build a full-fledged single-page application. Vue.js allows developers to build reusable components and manage the state and behavior of the user interface using a data-driven approach.
Vue.js uses a template syntax that allows you to declaratively render dynamic data into the DOM. It uses directives, which are special attributes with the v- prefix, to bind the data to the DOM. Vue.js also provides a powerful set of directives and event listeners that allows to handle events, create dynamic bindings, and perform other operations on the data.
We can split the single index.html page in two main parts:
- The template, which contains the HTML form
- The set of functions, which connects to the REST Endpoint
Coding the Template
Here is the first part of the page which contains the Page template:
<h3>JAX-RS Demo (Quarkus) with VueJS</h3>
<div id="app">

    <table class="blueTable">
        <thead >
        <tr>
            <th>#</th>
            <th>Name</th>
            <th>Surname</th>
            <th>Delete</th>
            <th>Update</th>
        </tr>
        </thead>
        <tbody>
        <tr v-for="user in users" :key="user.id">
            <td>{{user.id}}</td>
            <td>{{user.name}}</td>
            <td>{{user.surname}}</td>
            <td>  <button class="button"  @click="deleteUser(user.id)">Delete</button></td>
            <td>  <button class="button"  @click="updateUser(user.id)">Update</button></td>
        </tr>
        </tbody>
    </table>
    <br/>
    <div>
        <form name="form" >
            <input type="text" placeholder="Name" v-model="name" size="60"/><br/>
            <input type="text" placeholder="Surname" v-model="surname" size="60"/><br/>
            <input type="button" value="Save" @click="createUser"/>
        </form>
    </div>
</div>
The v-for directive loops through the users array and renders a row for each user in the table. Each row is bound to the user’s data using double curly braces {{ }} to interpolate the values of user.id, user.name, and user.surname.
The v-model directive binds the value of the input fields to the data properties name and surname. This means that when the user types into the input fields, the corresponding data properties will be updated with the new values.
The @click event listener calls the respective methods when you click the buttons on the table, passing in the user’s “id” as an argument. This allows the user to delete and update the users.
Additionally, the form allows to create a new user, when the user clicks on the “Save” button, via the createUser() method.
Coding the VueJS functions
The other part of our application includes a set of functions that are performing the CRUD Operations against the REST Endpoint:
<script src="https://cdnjs.cloudflare.com/ajax/libs/vue/2.5.17/vue.js"></script>
<script src="https://cdnjs.cloudflare.com/ajax/libs/axios/0.19.0/axios.min.js"></script>
<script>

new Vue({
    el: "#app",
   data() {
    return {
        name: '',
        surname: '',
        users: []
    }
},
    methods: {

        updateUser: function(id) {

                axios.put("/customers?id="+id+"&name="+this.name+"&surname="+this.surname)
                .then(response => {
                    this.listUsers()
                })
                this.name='';
                this.surname='';
        },

        deleteUser: function(id) {

                axios.delete("/customers?id="+id)
                .then(response => {
                    this.listUsers()
                })
        },

        createUser: function() {

          var user = {
                // name and surname should exist in [data] or [computed] section
                name: this.name,
                surname: this.surname
              };


         axios.post("/customers", JSON.stringify(user), {headers: {'Content-Type': 'application/json'}})
    .then(response => {
        this.listUsers();
    })
    .catch(error => {
        console.log(error);
    });


        },
        listUsers: function() {
            axios.get("/customers")
                .then(response => {
                    this.users = response.data
                })
        }
    },
    mounted: function() {

       this.listUsers()
    }


})

</script>
In this code, we are creating new Vue instance using the new Vue() function. Within it, we are setting the el property to “#app”, which specifies the root DOM element for the Vue instance. This means that this Vue instance manages any element with the id “app”.
The data() function defines the data properties of the Vue instance. In this example, the properties are name, surname, and users. These properties store the values that are displayed and modified by the table and form elements in the HTML.
The methods property define four methods: updateUser(), deleteUser(), createUser() and listUsers(). These methods perform CRUD operations on the user data, and use the axios library to make HTTP requests to a RESTful API.
Finally, the mounted function is a lifecycle hook that is called after the Vue instance is available in the DOM. In this example, the listUsers() function is called when the component is mounted, which retrieves the list of users from the API and updates the users property.
Running the Quarkus application
We are now ready to run the application. Before that, check that your project contains the right files in the correct location:
src
├── main
│   ├── docker
│   │
│   │
│   ├── java
│   │   └── com
│   │       └── mastertheboss
│   │           └── jaxrs
│   │               ├── CustomerEndpoint.java
│   │               ├── CustomerException.java
│   │               ├── Customer.java
│   │               ├── CustomerRepository.java
│   │
│   └── resources
│       ├── application.properties
│       ├── import.sql
│       └── META-INF
│           └── resources
│               └── index.html
Then, run it as follows:
mvn install quarkus:dev
And here is the application in action:

Summing up
In conclusion, Quarkus and Vue.js are two powerful technologies that you can combine to build efficient and scalable web applications. Quarkus allows for fast and efficient backend development, while Vue.js provides a simple, flexible and powerful way to build dynamic user interfaces. Additionally, Quarkus’s native integration with GraalVM allows for a smaller and faster production binary, which can be particularly useful when deploying to cloud environments.
Source code: https://github.com/fmarchioni/mastertheboss/tree/master/quarkus/vuejs-demo
Found the article helpful? if so please follow us on Socials


