This tutorial explores how you can deploy Quarkus applications in containers and, more specifically, on OpenShift Paas Cloud platforms There are different approaches to deploy Quarkus applications on OpenShift. In this tutorial we will discuss them in detail.
Start by checking out this example, which is an example of JAX-RS application which uses Hibernate ORM API to persist data on a PostgreSQL database:
https://github.com/fmarchioni/mastertheboss/tree/master/quarkus/hibernate-advanced
If you have a look at the directory folder of the example, you will see that it contains the standard structure of all Quarkus applications, which includes a folder src/main/docker with four Dockerfile. We will focus on the Dockerfile.jvm to deliver Java applications and Dockerfile.native to deploy native applications:
src
├── main
│   ├── docker
│   │   ├── Dockerfile.jvm
│   │   ├── Dockerfile.legacy-jar
│   │   ├── Dockerfile.native
│   │   └── Dockerfile.native-distroless
│   ├── java
│   │   └── com
│   │       └── mastertheboss
│   │           ├── CustomerEndpoint.java
│   │           ├── CustomerException.java
│   │           ├── Customer.java
│   │           ├── CustomerRepository.java
│   │           ├── OrderEndpoint.java
│   │           ├── OrderRepository.java
│   │           └── Orders.java
│   └── resources
│       ├── application.properties
│       ├── import.sql
│       └── META-INF
│           └── resources
│               ├── index.html
│               ├── order.html
│               └── stylesheet.css
└── test
    └── java
        └── com
            └── mastertheboss
                ├── GreetingResourceTest.java
                └── NativeGreetingResourceIT.java
To have a quick run of this example on OpenShift, we recommend using Red Hat Code Ready Containers, which are introduced in this tutorial: Getting started with Code Ready Containers
Setting up OpenShift
Before you start CRC, it is required to increase the amount of memory assigned to the CRC process to 16GB, otherwise you won’t be able to run the S2I builder process which is quite memory and CPU intensive:
$ crc config set memory 16384
Now start CRC with:
$ crc start
When your OpenShift cluster is ready, check that you are able to connect, using the credentials which have been printed on the Console:
$ oc login -u kubeadmin -p kKdPx-pjmWe-b3kuu-jeZm3 https://api.crc.testing:6443
You should be now logged into the default project. Let’s create a new project for our application:
$ oc new-project quarkus
The first application we need to add to our project, is PostgreSQL database. We will create it using the ‘oc’ command line as follows, which allows setting the username/password/database attributes in one line:
oc new-app -e POSTGRESQL_USER=quarkus -e POSTGRESQL_PASSWORD=quarkus -e POSTGRESQL_DATABASE=quarkusdb postgresql
The postgresql image will be pulled from the default repository and in a minute or so you should be able to check:
oc get pods
NAME                      READY   STATUS
postgresql-1-xdlwt        1/1     Running
Ok so now we need to plug into the Quarkus application. We can do it in several ways:
- Creating a Binary build of your application and uploading content in it from the local folder
- Using JKube Maven plugin to generate the Docker image, Kubernetes manifest and deploy to OpenShift.
Let’s check them in detail.
Deploying Quarkus applications on OpenShift
To deploy a Quarkus application on OpenShift, the simplest way to go is to install the OpenShift extension:
mvn quarkus:add-extension -Dextensions="openshift"
Then, let’s review our application configuration in application.properties:
%prod.quarkus.datasource.db-kind=postgresql
%prod.quarkus.datasource.username=quarkus
%prod.quarkus.datasource.password=quarkus
%prod.quarkus.datasource.jdbc.url=jdbc:postgresql://postgresql/quarkusdb
%prod.quarkus.datasource.jdbc.max-size=8
%prod.quarkus.datasource.jdbc.min-size=2

quarkus.hibernate-orm.database.generation=drop-and-create
quarkus.hibernate-orm.log.sql=true
quarkus.hibernate-orm.sql-load-script=import.sql

quarkus.openshift.expose=true
As you can see, our application has a datasource configuration that will be used for the “prod” Profile (used on OpenShift). When running in “dev” mode, the DevServices option will set up for us the Database Container we have in our extensions:
    <dependency>
      <groupId>io.quarkus</groupId>
      <artifactId>quarkus-jdbc-postgresql</artifactId>
    </dependency>
Now it’s time to deploy your application. To deploy a Java based application, run the following command:
$ mvn clean package -Dquarkus.kubernetes.deploy=true
On the other hand, to deploy a native container image, add the “native” profile in it:
$ mvn clean package -Pnative -Dquarkus.kubernetes.deploy=true
Note, make sure you have set up correctly GRAALVM_HOME and JAVA_HOME in order to complete the above step. In a few minutes your application will be deployed :
$ oc get pods
NAME                          READY   STATUS      RESTARTS   AGE
hibernate-advanced-1-build    0/1     Completed   0          21m
hibernate-advanced-1-deploy   0/1     Completed   0          24m
hibernate-advanced-3-deploy   0/1     Completed   0          20m
hibernate-advanced-3-zd8k6    1/1     Running     0          20m
postgresql-7677796b66-86ps7   1/1     Running     0          27m
Check which is the application route:
$ oc get routes
NAME             HOST/PORT                                 PATH   SERVICES         PORT       TERMINATION   WILDCARD
hibernate-demo   hibernate-demo-quarkus.apps-crc.testing          hibernate-demo   8080-tcp                 None
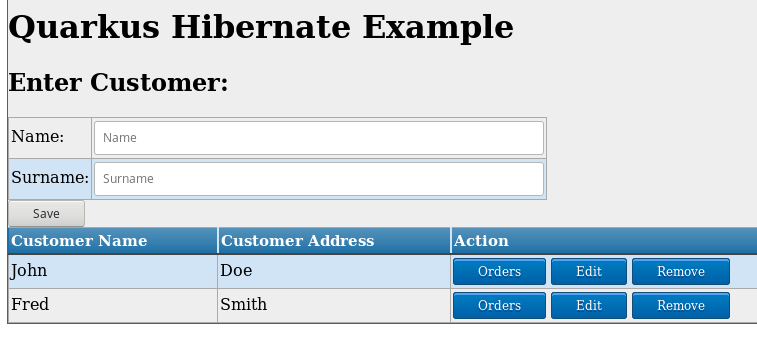
You can reach that route from the browser and verify that the application is running:
Let’s see now how to use the JKube Maven plugin to deploy our application on OpenShift.
Deploying Quarkus on OpenShift using JKube Maven plugin
JKube Maven plugin is the successor of the dedprecated fabric8 Maven plugin and can be used for building container images using Docker, JIB or S2I build strategies. Eclipse JKube generates and deploys Kubernetes/OpenShift manifests at compile time too.
Using this plugin is straightforward: we recommend adding a profile for deploying applications to openshift:
<profile>
    <id>openshift</id>
    <properties>
        <jkube.generator.quarkus.nativeImage>
            true
        </jkube.generator.quarkus.nativeImage>
    </properties>
    <build>
        <pluginManagement>
            <plugins>
                <plugin>
                    <groupId>org.eclipse.jkube</groupId>
                    <artifactId>openshift-maven-plugin</artifactId>
                    <version>${jkube.version}</version>
                    <executions>
                        <execution>
                            <goals>
                                <goal>resource</goal>
                                <goal>build</goal>
                            </goals>
                        </execution>
                    </executions>
                    <configuration>
                        <enricher>
                            <config>
                                <jkube-service>
                                    <type>NodePort</type>
                                </jkube-service>
                            </config>
                        </enricher>
                    </configuration>
                </plugin>
            </plugins>
        </pluginManagement>
    </build>
</profile>
This profile includes the openshift-maven-plugin, which can be enriched adding extra services such as NodePort for remote access of the service.
To deploy the native application on OpenShift, make sure you have built the native image:
mvn package -Pnative -Dnative-image.docker-build=true -DskipTests=true
Now you can build the Docker image, generate the Kubernetes Manifests and apply then to Cluster as follows:
mvn oc:build oc:resource oc:apply
You will see from your Console logs that the application has been deployed:
[INFO] oc: OpenShift platform detected
[INFO] oc: Using project: quarkus
[INFO] oc: Creating a Service from openshift.yml namespace quarkus name hibernate-advanced
[INFO] oc: Created Service: target/jkube/applyJson/quarkus/service-hibernate-advanced.json
[INFO] oc: Creating a DeploymentConfig from openshift.yml namespace quarkus name hibernate-advanced
[INFO] oc: Created DeploymentConfig: target/jkube/applyJson/quarkus/deploymentconfig-hibernate-advanced.json
[INFO] oc: Creating Route quarkus:hibernate-advanced host: null
[INFO] oc: HINT: Use the command `oc get pods -w` to watch your pods start up
[INFO] ------------------------------------------------------------------------
[INFO] BUILD SUCCESS
[INFO] ------------------------------------------------------------------------
Check tat Pods are available:
$ oc get pods
NAME                             READY   STATUS      RESTARTS   AGE
hibernate-advanced-1-9bwjt       1/1     Running     0          15m
hibernate-advanced-1-deploy      0/1     Completed   0          15m
hibernate-advanced-s2i-1-build   0/1     Completed   0          16m
postgresql-1-4hs7z               1/1     Running     3          22m
postgresql-1-deploy              0/1     Completed   0          22m
From the Pod log you can verify that the native application is up and running:
oc logs hibernate-advanced-1-9bwjt

QUARKUS_OPTS environment variable was not set, using default values of -Xmx24M -Xms16M -Xmn24M
__  ____  __  _____   ___  __ ____  ______
 --/ __ \/ / / / _ | / _ \/ //_/ / / / __/
 -/ /_/ / /_/ / __ |/ , _/ ,< / /_/ /\ \
--\___\_\____/_/ |_/_/|_/_/|_|\____/___/
2021-01-03 09:27:56,101 INFO  [io.agr.pool] (main) Datasource '<default>': Initial size smaller than min. Connections will be created when necessary
   . . . . .
Hibernate:
    INSERT INTO customer (id, name, surname) VALUES ( nextval('customerId_seq'), 'John','Doe')
Hibernate:
    INSERT INTO customer (id, name, surname) VALUES ( nextval('customerId_seq'), 'Fred','Smith')
2021-01-03 09:27:56,180 INFO  [io.quarkus] (main) hibernate-advanced 1.0-SNAPSHOT native (powered by Quarkus 1.10.5.Final) started in 0.097s. Listening on: http://0.0.0.0:8080
2021-01-03 09:27:56,181 INFO  [io.quarkus] (main) Profile prod activated.
2021-01-03 09:27:56,181 INFO  [io.quarkus] (main) Installed features: [agroal, cdi, hibernate-orm, jdbc-postgresql, mutiny, narayana-jta, resteasy, resteasy-jsonb, smallrye-context-propagation]
And finally, gather the Route so that you can access the application:
oc get routes
NAME             HOST/PORT                                      PATH   SERVICES         PORT   TERMINATION   WILDCARD
hibernate-demo   hibernate-demo-quarkus.apps-crc.testing          hibernate-demo   8080                 None
Found the article helpful? if so please follow us on Socials


