In this tutorial we will learn how to create a quickstart Java EE application secured with Keycloak using its command line interface (kcadm).
The requirements to run this tutorial are:
- A Keycloak server
- A WildFly Application Server with Keycloak plugin installed
You can check this tutorial for more details about the set up of Keycloak on WildFly: Introduction to Keycloak
What we will learn now is how to use kcadm shell which is available in the bin folder of the Keycloak installation.
First of all, we need to login using the Admin credentials of Keycloak. If your username and password are both “admin”, then you can log in with:
$ ./kcadm.sh config credentials --server http://localhost:8180/auth --realm master --user admin --password admin
Now let’s create a Realm named “wildfly-realm”:
$ ./kcadm.sh create realms -s realm=wildfly-realm -s enabled=true -o
Then we add one user for this realm:
$ ./kcadm.sh create users -r wildfly-realm -s username=customer-admin -s enabled=true

$ ./kcadm.sh set-password -r wildfly-realm --username customer-admin --new-password admin
We add one Client, which will use a Public Login/Password challenge, redirecting to our application Web Context (“helloworld”):
$ ./kcadm.sh create clients -r wildfly-realm -s clientId=customer-manager-client -s publicClient="true" -s "redirectUris=[\"http://localhost:8080/helloworld/*\"]" -s enabled=true
Finally, we add a role for our user, that will match with the Role in the Java EE App:
$ ./kcadm.sh create roles -r wildfly-realm -s name=customer-manager

$ ./kcadm.sh add-roles --uusername customer-admin --rolename customer-manager -r wildfly-realm
That’s all. We will now connect an example application to our Keycloak module.
Within our applicaton, we will add the keycloak.json file, which can be retrieved from the Client Tab:
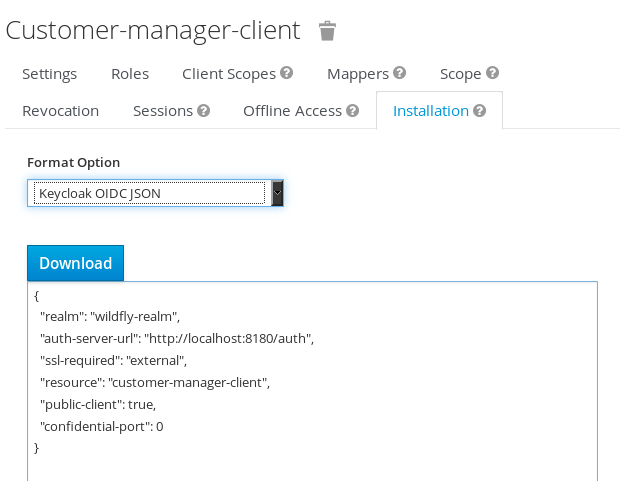
Here is it:
{
  "realm": "wildfly-realm",
  "auth-server-url": "http://localhost:8180/auth",
  "ssl-required": "external",
  "resource": "customer-manager-client",
  "public-client": true,
  "confidential-port": 0
}
Then, we specify in the web.xml descriptor that we are using KEYCLOAK as auth-method and we are restricting all pages to the Role “customer-manager”:
<web-app xmlns="http://java.sun.com/xml/ns/javaee"
         xmlns:xsi="http://www.w3.org/2001/XMLSchema-instance"
         xsi:schemaLocation="http://java.sun.com/xml/ns/javaee http://java.sun.com/xml/ns/javaee/web-app_3_0.xsd"
         version="3.0">

    <security-constraint>
        <web-resource-collection>
            <url-pattern>/*</url-pattern>
        </web-resource-collection>
        <auth-constraint>
            <role-name>customer-manager</role-name>
        </auth-constraint>
    </security-constraint>

    <login-config>
        <auth-method>KEYCLOAK</auth-method>
        <realm-name>wildfly-realm</realm-name>
    </login-config>

    <security-role>
        <role-name>customer-manager</role-name>
    </security-role>

</web-app>
That’s all. Our minimalist Web application will expose just a REST Service which produces some text:
@Path("/hello")
public class HelloService {
	@GET
	@Path("/text")
	public String getHello ()
	{
		return "hello world!";
	}
	@GET
	@Path("/json")
	@Produces(MediaType.APPLICATION_JSON)
	public SimpleProperty getPropertyJSON ()
	{
        SimpleProperty p = new SimpleProperty("key","value");
		return p;
	}
	@GET
	@Path("/xml")
	@Produces(MediaType.APPLICATION_XML)
	public SimpleProperty getPropertyXML ()
	{
        SimpleProperty p = new SimpleProperty("key","value");
		return p;
	}
}
You can check for the full source code of this application here:
https://github.com/fmarchioni/mastertheboss/tree/master/keycloak/helloworld
Build and deploy the application, then check one available endpoint. For example: http://localhost:8080/helloworld/rest/hello/text
A login challenge will be sent:

Enter the username/password for the user we have just created (customer-admin/admin). You will be redirected by Keycloak to the endpoint selected.
That’s all. Enjoy WildFly and Keycloak!
Found the article helpful? if so please follow us on Socials


