In this tutorial we will learn how to configure an Elytron JDBC Realm on WildFly 11 using both the Web console of the application server and the Command Line Interface (CLI).
Prerequisites
- MySQL Database
- WildFly 11 or newer
The first thing we will do is creating a Datasource which will connect to an existing MySQL Database
If you don’t have an available MySQL Database, you can easily complete this tutorial by starting MySQL as Docker container:
$ docker run -d --name mysql -e MYSQL_USER=mysql -e MYSQL_PASSWORD=mysql -e MYSQL_DATABASE=demodb -e MYSQL_ROOT_PASSWORD=secret mysql
Now move to the WildFly Web Console and Create a new Datasource using the DataSource wizard as in the following example.
Choose the Database:

Enter the DataSource Attributes:

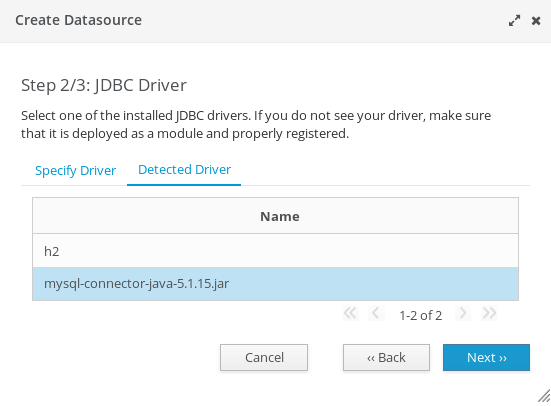
Pickup the Driver to be used (in our example we have deployed the MySQL Driver)
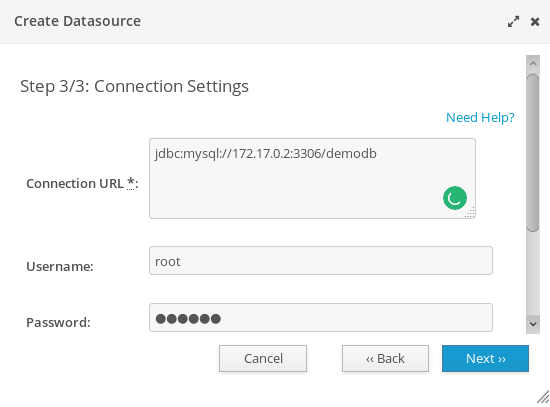
Finally, complete the Datasource configuration entering the Connection Settings
Configuring Elytron JDBC Realm
Next step will be configuring the JDBC Realm for Elytron.
A JDBCSecurity realm is a security realm implementation backed by a database based whose implementation is the class org.wildfly.security.auth.realm.jdbc.JdbcSecurityRealm
Move in the Configuration > Subsystems > Security – Elytron window:

Click on the Add button. You will need to define a JDBC Realm as in the following picture. The JDBC Realm needs to be bound against the MySQLDS Datasource we have created.
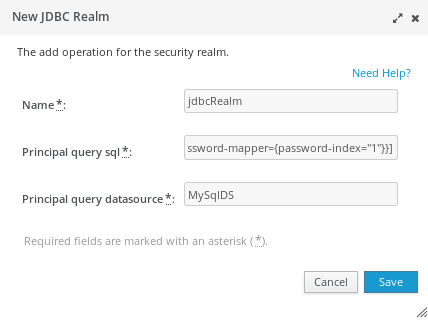
WildFly Web console is able to autocomplete the text field which reference another element of the configuration. For example, just click Arrow-Down key on the Principal Query Datasource and you will be able to browse across the available Datasources
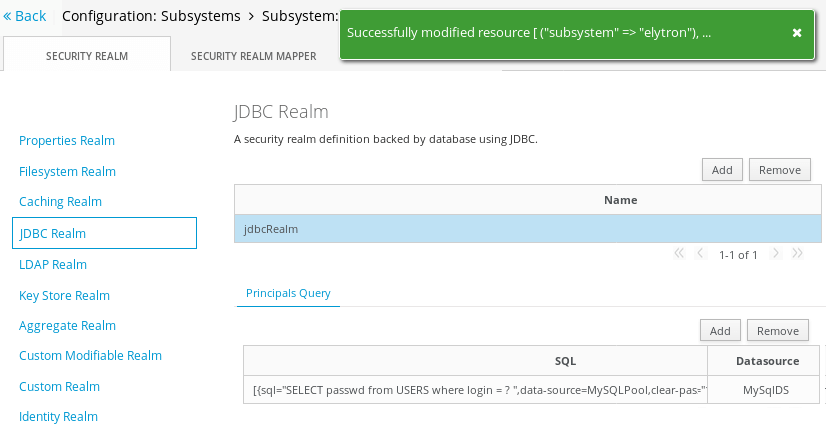
As a result, you should have now a JDBC Realm available in your configuration:
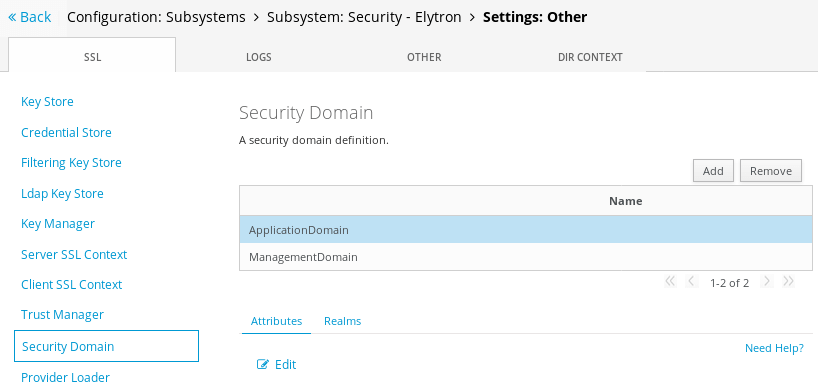
Now we need adding an Elytron Security Domain to reference our JDBC Realm. Move into the Configuration > Subsystems > Security – Elytron > Settings: Other window:
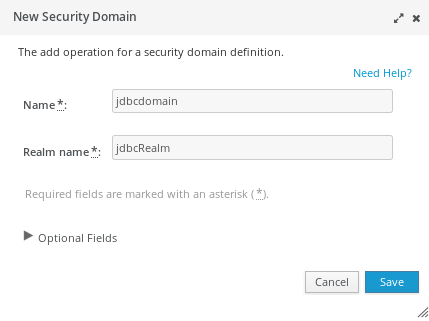
Click on Add and complete the Security Domain UI with the Name and Realm name:
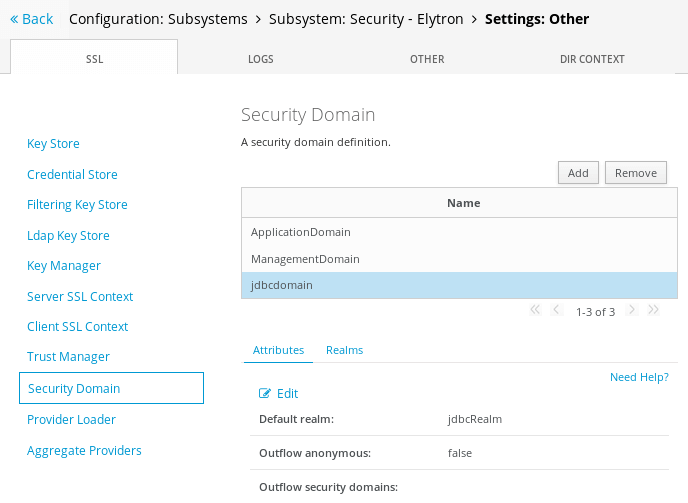
As a result, you should be able to see the “jdbcdomain” in your SecurityDomain window:
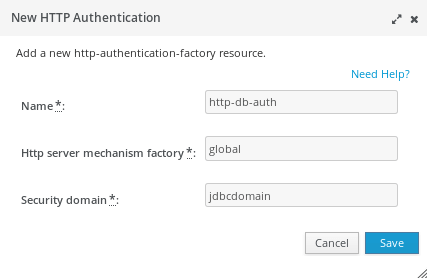
Now we will need to add a new HTTP Server authentication mechanism in your Elytron configuration. Move into the Configuration > Subsystems > Security – Elytron > Settings: Factory/Transformer window:

Click on Add and define a new HTTP Authentication based on the “global” HTTP server mechanism factory and the “jdbcdomain”:
Now the last step will be registering the Security Domain into Undertow web server. Move into the Configuration > Subsystems > Web/HTTP – Undertow > HTTP window and select the Application security Tab:
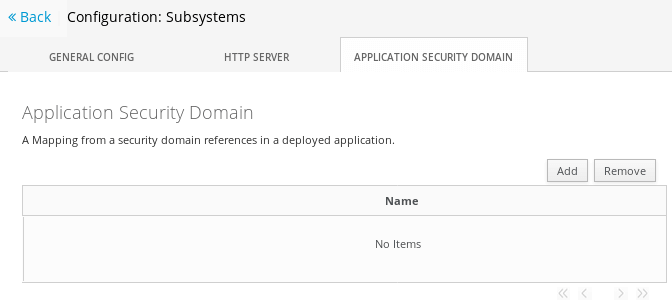
Click on Add. Bind the Security Domain the the Http autentication Factory we have created on the Elytron subsystem:
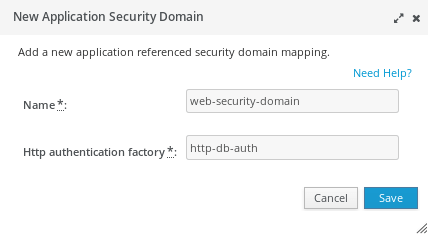
Now if you try to deploy an application bound to the “web-security-domain” security domain:
<jboss-web>
    <security-domain>web-security</security-domain>
</jboss-web>
As a result, you will receive a BASIC HTTP Authentication challenge:

Creating a JDBC Security realm with the CLI
We will show here how to configure the Elytron JDBC Security Realm using the Command Line Interface (CLI).
Start the server as follows:
$ ./standalone.sh
The prerequisite is that you have already configured a MySQLPool Datasource which in turn references a MySQL database where user names and password are stored in the USERS table
Start by creating a new JDBC realm that refers our MySQLPool. For the sake of simplicity, we will be using a clear text password strategy.
/subsystem=elytron/jdbc-realm=jdbcRealm:add(principal-query=[{sql="SELECT passwd from USERS where login = ? ",data-source=MySQLPool,clear-password-mapper={password-index="1"}}])

/subsystem=elytron/security-domain=jdbcdomain:add(default-realm=jdbcRealm,realms=[{realm="jdbcRealm"}])
Next, since this security domain will use HTTP Basic authentication, we will define a new HTTP Server Authentication policy based on the jdbcdomain security domain and named http-db-auth:
/subsystem=elytron/http-authentication-factory=http-db-auth:add(security-domain=jdbcdomain,mechanism-configurations=[{mechanism-name=BASIC,mechanism-realm-configurations=[realm-name="Secured by Elytron"]}],http-server-mechanism-factory=global)
In order to propagate the HTTP Authentication policy with Undertow, which governs your web applications, a component named HTTP Authenticating factory is needed. This will eventually trigger the HttpServerAuthenticationMechanism from within the Undertow web server. Here is the command needed to create an HTTP Authenticating factory:
/subsystem=undertow/application-security-domain=web-security-domain:add(http-authentication-factory=http-db-auth)
Reload your server configuration for the changes to take effect. In terms of configuration, the following XML section will be included in your elytron subsystem:
<subsystem xmlns="urn:wildfly:elytron:1.0">
    <security-domains>
        <security-domain name="ApplicationDomain" default-realm="ApplicationRealm" permission-mapper="login-permission-mapper">
            <realm name="ApplicationRealm" role-decoder="groups-to-roles"/>
        </security-domain>
        <security-domain name="ManagementDomain" default-realm="ManagementRealm" permission-mapper="login-permission-mapper">
            <realm name="ManagementRealm" role-decoder="groups-to-roles"/>
        </security-domain>
        <security-domain name="jdbcdomain" default-realm="jdbcRealm">
            <realm name="jdbcRealm"/>
        </security-domain>
    </security-domains>
    <security-realms>
        <jdbc-realm name="jdbcRealm">
            <principal-query sql="SELECT passwd from USERS where login = ? " data-source="MySQLPool">
                <clear-password-mapper password-index="1"/>
            </principal-query>
        </jdbc-realm>
        <properties-realm name="ApplicationRealm">
            <users-properties path="application-users.properties" relative-to="jboss.server.config.dir"/>
            <groups-properties path="application-roles.properties" relative-to="jboss.server.config.dir"/>
        </properties-realm>
        <properties-realm name="ManagementRealm">
            <users-properties path="mgmt-users.properties" relative-to="jboss.server.config.dir"/>
            <groups-properties path="mgmt-groups.properties" relative-to="jboss.server.config.dir"/>
        </properties-realm>
    </security-realms>
    <mappers>
        <constant-permission-mapper name="login-permission-mapper">
            <permission class-name="org.wildfly.security.auth.permission.LoginPermission"/>
        </constant-permission-mapper>
        <simple-role-decoder name="groups-to-roles" attribute="groups"/>
    </mappers>
    <http>
        <http-authentication-factory name="management-http-authentication" http-server-mechanism-factory="global" security-domain="ManagementDomain">
            <mechanism-configuration>
                <mechanism mechanism-name="BASIC">
                    <mechanism-realm realm-name="Management Realm"/>
                </mechanism>
            </mechanism-configuration>
        </http-authentication-factory>
        <http-authentication-factory name="application-http-authentication" http-server-mechanism-factory="global" security-domain="ApplicationDomain">
            <mechanism-configuration>
                <mechanism mechanism-name="BASIC">
                    <mechanism-realm realm-name="Application Realm"/>
                </mechanism>
                <mechanism mechanism-name="FORM"/>
            </mechanism-configuration>
        </http-authentication-factory>
        <http-authentication-factory name="http-db-auth" http-server-mechanism-factory="global" security-domain="jdbcdomain">
            <mechanism-configuration>
                <mechanism mechanism-name="BASIC">
                    <mechanism-realm realm-name="Secured by Elytron"/>
                </mechanism>
            </mechanism-configuration>
        </http-authentication-factory>
        <provider-http-server-mechanism-factory name="global"/>
    </http>
    <sasl>
        <sasl-authentication-factory name="management-sasl-authentication" sasl-server-factory="global" security-domain="ManagementDomain"/>
        <sasl-authentication-factory name="application-sasl-authentication" sasl-server-factory="global" security-domain="ApplicationDomain"/>
        <provider-sasl-server-factory name="global"/>
    </sasl>
</subsystem>
On the other hand, the Undertow configuration will include the following application-security-domains definition:
<subsystem xmlns="urn:jboss:domain:undertow:4.0">
    <buffer-cache name="default"/>
    <server name="default-server">
        <http-listener name="default" socket-binding="http" redirect-socket="https" enable-http2="true"/>
        <https-listener name="https" socket-binding="https" security-realm="ApplicationRealm" enable-http2="true"/>
        <host name="default-host" alias="localhost">
            <location name="/" handler="welcome-content"/>
            <filter-ref name="server-header"/>
            <filter-ref name="x-powered-by-header"/>
        </host>
    </server>
    <servlet-container name="default">
        <jsp-config/>
        <websockets/>
    </servlet-container>
    <handlers>
        <file name="welcome-content" path="${jboss.home.dir}/welcome-content"/>
    </handlers>
    <filters>
        <response-header name="server-header" header-name="Server" header-value="WildFly/10"/>
        <response-header name="x-powered-by-header" header-name="X-Powered-By" header-value="Undertow/1"/>
    </filters>
    <application-security-domains>
        <application-security-domain name="other" http-authentication-factory="application-http-authentication"/>
        <application-security-domain name="web-security-domain" http-authentication-factory="http-db-auth"/>
    </application-security-domains>
</subsystem>
As we did for the previous example, include in your jboss-web.xml file a reference to the “web-security-domain” security domain:
<jboss-web>
   <security-domain>web-security</security-domain>
</jboss-web>
Found the article helpful? if so please follow us on Socials


