Are you an Eclipse IDE user looking to boost your productivity? Eclipse is a powerful integrated development environment with a wide range of features and functionalities that can enhance your coding experience. In this article, we will explore 15 Eclipse tips and tricks that can help you work more efficiently, navigate through your codebase effortlessly, and make the most of this popular Java IDE.
#1 How to list all eclipse shortcuts
How to display a list of all the keyboard shortcut combinations: Ctrl+Shift+L
#2 How to run multiple JVMs in Eclipse.
If you launch multiple JVMs you’ll have the “Display Selected Console” (2) activated. When you choose this option you can select from any of your running applications. Just select the tab, select which application you want it to watch, and repeat for the other tab.
Hint use the Pin Console button (1) to ensure that the current console remains on top of all other consoles.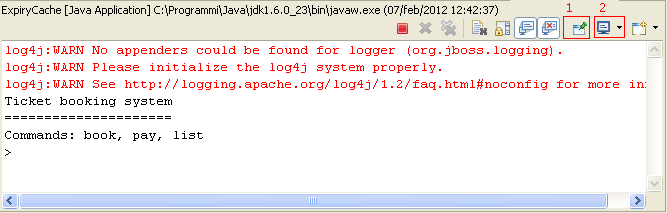
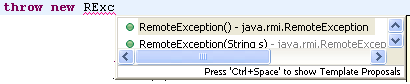
#3 How to turn a String into a System.out
Highlight (or select) a Text. Press Ctrl+Space. Hit End+Enter. the “sysout” snippet is triggered which wraps the selection around as its parameter.
eg. “hello world!” becomes System.out.println(“hello world!”);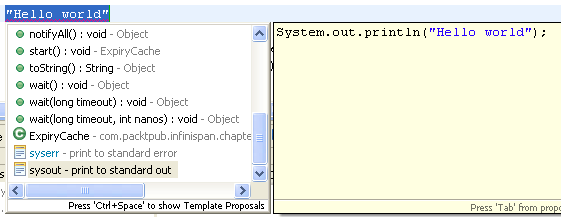
Also if you type ‘syso‘ then press Ctrl+Space to expand it to:
System.out.println()
#4 How to assign a variable/field quickly
Instead of typing:
MyClass c = new |
(| is cursor location):
just type
new MyClass()|
and press Ctrl-2 L, which results in:
MyClass c = new MyClass()|
This really speeds things up. (Ctrl-2 F does the same, but assigns to a new field rather than a new variable.)
#5 How to find the Class hierarchy for a method
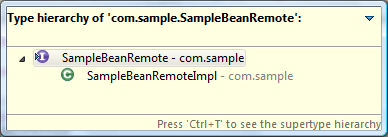
Click on a class or method name and press Ctrl+T.
You get a quick type hierarchy. For a class name you see the entire class hierarchy. For a method name you get the hierarchy showing superclasses and subclasses, with implementations of that method distinguished from abstract mentions, or classes that don’t mention the method.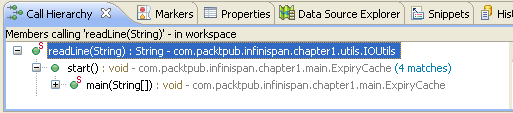
This is huge when you are at an abstract method declaration and quickly want to see where it is implemented.
#6 How to wrap long String literals
You can have String literals wrapped when you edit them. For example, if you have code like this:
String message= "INTO USR_USERS_WO_NOTES_STATUS(STATUS_ID, NAME, DESCRIPTION) VALUES (100, 'PUBLISHED', 'Pubblicata');";
position your caret whereever you like in the String and press Enter. The code will be automatically changed to:
String message= "INTO USR_USERS_WO_NOTES_STATUS" +
                "(STATUS_ID, NAME, DESCRIPTION) VALUES " +
                "(100, 'PUBLISHED', 'Pubblicata');";
This behavior can be customized in the Opens the typing preference page Java > Editor > Typing preference page.
#7 Exception breakpoints
One of the very cool things many people don’t know about Eclipse is that it will let you set breakpoints based on where an Exception occurs. This is going to be a huge timesaver! You access the option via the “j!” icon in the debugging window.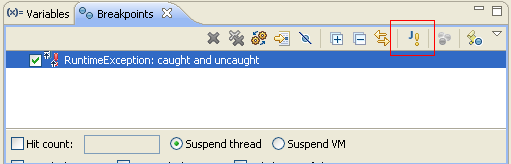
In the resulting dialog:
In the Choose an Exception field, type a string that is contained in the name of the exception you want to add. You can use wildcards as needed (“* ” for any string and “? ” for any character).
In the Matching types list , select the exception you want to add.
Select Caught and Uncaught as needed to indicate on which exception type you want to suspend the program.
#8 Use content assist
You can use content assist to speed up the creation of fields, method parameters and local variables. With the cursor positioned after the type name of the declaration, press Ctrl+Space.
Ex. List [Control / Space ] will add:
List list;
You can exclude certain types from appearing in content assist, use the type filter feature configured on the Opens the type filter preference page Java > Appearance > Type Filters preference page. Types matching one of these filter patterns will not appear in the Open Type dialog and will not be available to content assist, quick fix and organize imports. These filter patterns do not affect the Package Explorer and Hierarchy views.
For example, it’s quite annoying if you are developing server based applications and you have several List class availables. You can filter out classes like java.awt.List which will not be suggested anymore.
#9 Eclipse is Camel case aware!
Eclipse IDE is aware of CamelCase. You can type class names faster by only typing the upper-case letters:
 This also works for method names – very convenient for getter and setter methods.
#10 Tweaks to eclipse.ini
I’ve had a noticeable improvement in startup time and overall response times on my Eclipse installation by adding the following to eclipse.ini, at the bottom:
-Xincgc
-XX:-DontCompileHugeMethods
-XX:MaxInlineSize=1024
-XX:FreqInlineSize=1024
Also, tweak the Xms (initial heap size) and Xmx (maximum heap size) to higher values, depending on your RAM and the number of other running applications.
#11 How to search in a specific Eclipse project
If you have lots of open projects in your workspace then you would like to search in a specific project.
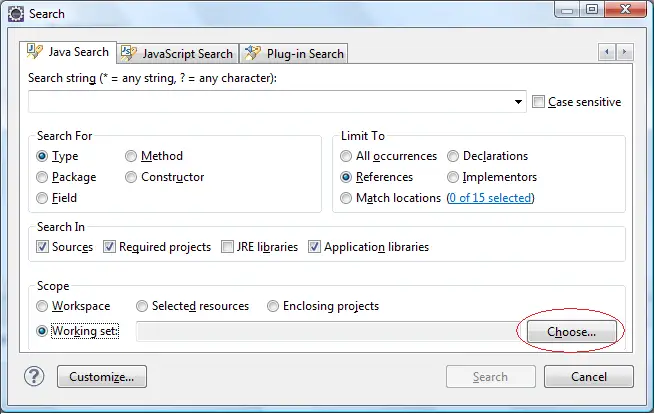
Solution: Create a working set . Working sets group elements for display in views or for operations on a set of elements.
Open the Search Menu and click on the “Choose” button to create a new Working Set:
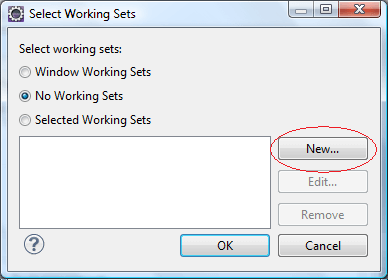
Next, choose New to create a new Working Set :
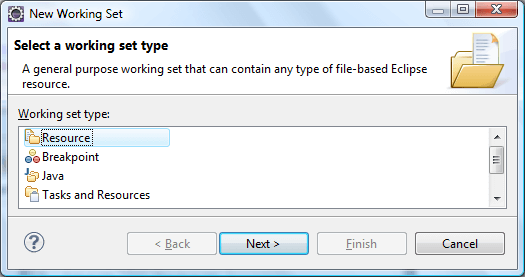
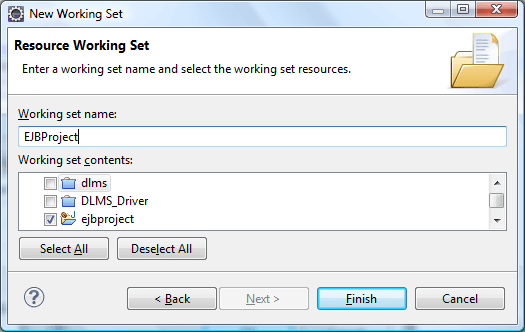
In the next screen, select “Resource”:
Pickup one or more projects from your Workspace which will be part of your Working Set:
Now you can use the New Working set in your Searches:

#12 How to search for a class/package in a set of JAR files?
Provided that you are using the JAR files in a project as a library, then you can use the powerful Java search. Here’s for example how to find where the org.apache.cxf.Bus class is contained :

Depending on what is searched for, the search string should describe the element:
Type: the type name (may be qualified or not).
Example: org.apache.cxf.Bus
Method: the defining type name (may be qualified or not as for Type search, optional), the method selector and its parameters
Example: org.eclipse.jdt.internal.core.JavaElement.getHandleFromMemento(MementoTokenizer, WorkingCopyOwner)
Package: the package name for a package (e.g. org.eclipse.jdt.internal.core
Constructor: the defining type name (may be qualified or not as for Type search, optional) and the constructor parameters
Example: org.eclipse.jdt.internal.core.JavaElement(JavaElement, String)
#13 How to find all classes that extend interface
Simply use Ctrl-T to get the descendants and then Ctrl-T again if super interfaces/classes are wanted:
#14 How to replace a String in all files in Eclipse
Not everybody is aware that you can perform safe Search and Replace string patterns across a set of files. I mentioned “safe” because you are allowed to preview changes before executing the replace.
- Go to the Menu “Search”->”File”
- Enter text, file pattern and projects
- Click “Replace”
- Enter new text

15 #How to export/save Search Results
Out of the box there is no Save search functionality, however you can use the “Show Previous Searches” button at the top of the search console. It has a flashlight with a list above it. You can toggle between searches and Eclipse has already done all the heavy work.

Conclusion
In this article, we’ve explored 15 Eclipse tips and tricks that can significantly enhance your productivity and coding experience. By leveraging keyboard shortcuts, customizing perspectives, utilizing content assist, mastering code navigation, and other powerful features of Eclipse, you can streamline your development workflow and accomplish more in less time.
Found the article helpful? if so please follow us on Socials


