This is the second tutorial about messaging with Quarkus. In the first one Messaging with Quarkus , we have covered how to use the standard JMS protocol in a Quarkus application. In this one we will explore how to use Reactive Messaging using the SmallRye Reactive Messaging API.
SmallRye Reactive Messaging is an implementation of the upcoming Eclipse MicroProfile Reactive Messaging specification. It provides a way to implement reactive data streaming application using a CDI development model.
In a nutshell MicroProfile Reactive Messaging is based around 3 main concepts:
Message: A Message (defined by org.eclipse.microprofile.reactive.messaging.Message) is an envelope around a payload.
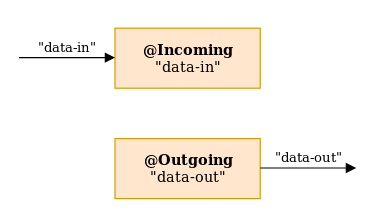
Incoming is an annotation indicating that the method consumes a stream. The name of the stream contains as attribute such as in:
@Incoming("data-in")
public void consume(Message<String> s) {
  // ...
}
Outgoing is an annotation indicating that the method feeds a stream. The name of the stream is given as attribute:
@Outgoing("data-out")
public Message<String> produce() {
  // ...
}
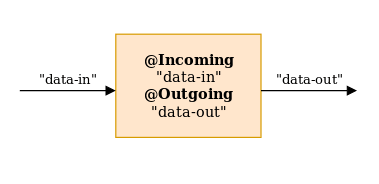
Of course, methods can also use both annotations to transform the incoming messages:
@Incoming("data-in")
@Outgoing("data-out")
public String toUpperCase(String input) {
  return input.toUpperCase();
}
SmallRye Reactive Messaging automatically binds matching @Outgoing to @Incoming to form a chain:
SmallRye Reactive Messaging supports various transport protocols. In the next section we will learn how to use AMQP to connect with ArtemisMQ broker from a Quarkus application.
Reactive Messaging with Quarkus and AMQ
Apache ActiveMQ Artemis supports the AMQP 1.0 specification. By default there are acceptor elements configured to accept AMQP connections on ports 61616 and 5672.
There are multiple options to start an ArtemisMQ server. This tutorial will give you an introduction to how to start it locally on your machine: Introduction to ActiveMQ Artemis . On the other hand, if you prefer, you can simply start it as Docker image, or with the docker-compose tool. Here you can find details on how to install the docker-compose tool: https://docs.docker.com/compose/install/
Next, create the following docker-compose.yaml file on your machine:
version: '2'

services:

  artemis:
    image: quay.io/artemiscloud/activemq-artemis-broker:1.0.0
    ports:
      - "8161:8161"
      - "61616:61616"
      - "5672:5672"
    environment:
      AMQ_USER: quarkus
      AMQ_PASSWORD: quarkus
This yaml file contains the definition of the activemq-artemis-broker image and the environment variables that we need to connect to. You can launch it with:
$ docker-compose up
Check on your console that Artemis MQ is up and running:

Coding the Quarkus application
Firstly, create a new Quarkus project:
$ quarkus create app amqp-demo
Next, in order to work with SmallRye Reactive Messaging you need to add the quarkus-smallrye-reactive-messaging-amqp extension;
quarkus extension add smallrye-reactive-messaging-amqp
Designing the Flow
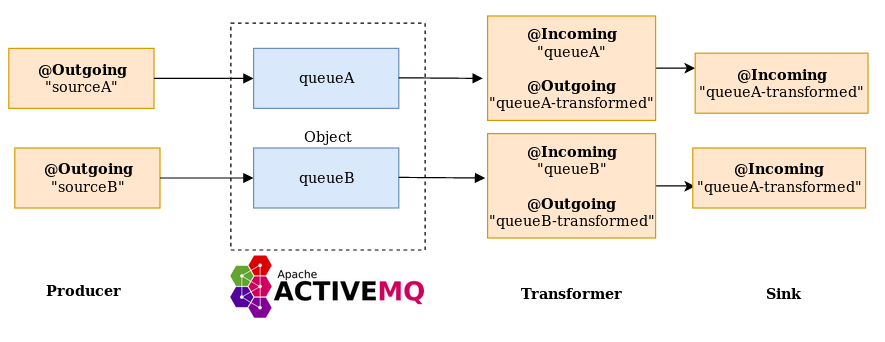
Now let’s design our flow of messages. At high level, we will need a MessageProducer class which creates messages. The messages need to be persisted on the ArtemisMQ server, so that in case of failure of the consumer, they can be delivered later. Here is the flow:
- Outgoing messages from sourceA and sourceB end up in the queueA and queueB.
- From there, the broker moves them to a MessageTransformer class.
- The Transformer retrieves messages from queueA and queueB and produces queueA-transformed and queueB-transformed messages.
- Finally, messages end up in a MessageConsumer class which receives the messages.
The following picture shows this basic architecture:
Coding Producers and Consumers
Next, let’s go for the implementation. Here is the MessageProducer class:
@ApplicationScoped
public class MessageProducer {

    @Outgoing("sourceA")
    public Multi<Long> generate() {
        return Multi.createFrom().iterable(Arrays.asList(1l, 2l, 3l, 4l, 5l));
    }

    @Outgoing("sourceB")
    public PublisherBuilder<String> source() {
        return ReactiveStreams.of("hello", "from", "quarkus");
    }

}
The method createLong will produce a stream of 5 messages.
The method createString, will simply produce three String messages.
These messages will be dispatched to ArtemisMQ. In a moment we will check the configuration needed to do that. Next, the MessageTransformer class, which will consume the messages from ArtemisMQ and apply some transformations:
package com.mastertheboss.amq;

import org.eclipse.microprofile.reactive.messaging.Incoming;
import org.eclipse.microprofile.reactive.messaging.Outgoing;
import org.eclipse.microprofile.reactive.streams.operators.PublisherBuilder;
import javax.enterprise.context.ApplicationScoped;


@ApplicationScoped
public class MessageTransformer {

    @Incoming("queueA")
    @Outgoing("queueA-transformed")
    public PublisherBuilder<Long> filter(PublisherBuilder<Long> input) {
        System.out.println("Filtering message with "+input);
        return input.filter(item -> item.longValue() > 3);
    }

    @Incoming("queueB")
    @Outgoing("queueB-transformed")
    public String toUpperCase(String payload) {
        System.out.println("Message received: "+payload);
        return payload.toUpperCase();
    }

}
The code is pretty simple.
- The messages with a Long number in the range 1-3 will be filtered out.
- On the other hand, we will apply Uppercase on String messages.
The transformer then publishes messages to the channels queueA-transformed and queueB-transformed, which are consumed by the last class, the MessageConsumer:
package com.mastertheboss.amq;

import org.eclipse.microprofile.reactive.messaging.Incoming;
import javax.enterprise.context.ApplicationScoped;

@ApplicationScoped
public class MessageConsumer {

    @Incoming("queueA-transformed")
    public void sinkA(Long msg) {
        System.out.println("Message from Transformer: "+msg);;
    }
    @Incoming("queueB-transformed")
    public void sinkB(String msg) {
        System.out.println("Message from Transformer: "+msg);

    }


}
This class acts as a sink where all messages end up. It merely prints the message after the transformation.
Now, in order to get it working, we need to specify in the application.properties file, the destination for sourceA and sourceB messages, and the consumer for queueA and queueB. We also need to set the Connector to use, which could be Apache Kafka or AMQ. In our case it’s smallrye-amqp. Finally, we have set the username and password to connect to ArtemisMQ:
amqp-username=quarkus
amqp-password=quarkus


# Configure the JMS destination for sourceA messages
mp.messaging.outgoing.sourceA.connector=smallrye-amqp
mp.messaging.outgoing.sourceA.address=queueA
mp.messaging.outgoing.sourceA.durable=true

# Configure the JMS destination for sourceN messages
mp.messaging.outgoing.sourceB.connector=smallrye-amqp
mp.messaging.outgoing.sourceB.address=queueB
mp.messaging.outgoing.sourceB.durable=true

# Configure the AMQP connector to read from the `queueA` queue
mp.messaging.incoming.queueA.connector=smallrye-amqp
mp.messaging.incoming.queueA.durable=true

# Configure the AMQP connector to read from the `queueB` queue
mp.messaging.incoming.queueB.connector=smallrye-amqp
mp.messaging.incoming.queueB.durable=true
If you run the example with:
mvn install quarkus:dev
Then you should check in your log the flow of messages:
Message received: hello
Message from Transformer: HELLO
Message received: from
Message from Transformer: FROM
Message received: quarkus
Message from Transformer: QUARKUS
Message from Transformer: 4
Message from Transformer: 5
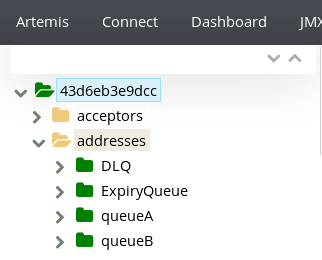
Furthermore, if you log into the AMQ console (localhost:8161/console), you should also acknowledge the message routing for the queueA and queueB:
Using Artemis core API from Quarkus
Just like we have learned for JMS messages, it is possible to use directly the artemis core API to send and receive messages. You can do that through the org.apache.activemq.artemis.api.core.client.ServerLocator class. This class allows to create a SessionFactory that is capable of producing JMS messages from a ClientSession object. Here is an example of it:
package com.mastertheboss.amq;

import org.apache.activemq.artemis.api.core.client.*;

import javax.annotation.PostConstruct;
import javax.enterprise.context.ApplicationScoped;
import javax.inject.Inject;

@ApplicationScoped
public class ArtemisConsumerManager {

    @Inject
    ServerLocator serverLocator;

    private ClientSessionFactory factory;

    @PostConstruct
    public void init() throws Exception {

        factory = serverLocator.createSessionFactory();

        ClientSession session = factory.createSession();

        // A producer is associated with an address ...

        ClientProducer producer = session.createProducer("myqueue");
        ClientMessage message = session.createMessage(true);
        message.getBodyBuffer().writeString("Hello");

        // We need a queue attached to the address ...

        session.createQueue("myqueue", "myqueue", true);

        // And a consumer attached to the queue ...

        ClientConsumer consumer = session.createConsumer("myqueue");

        // Once we have a queue, we can send the message ...

        producer.send(message);

        // We need to start the session before we can -receive- messages ...

        session.start();
        ClientMessage msgReceived = consumer.receive();

        System.out.println("message = " + msgReceived.getBodyBuffer().readString());

        session.close();


    }
}
Next, in order to compile your project, you will need an additional dependency in your pom.xml:
    <dependency>
      <groupId>io.quarkus</groupId>
      <artifactId>quarkus-artemis-core</artifactId>
    </dependency>
Finally, it’s required to specify in your application.properties the URL of the ArtemisMQ server and the credentials to access it:
quarkus.artemis.url=tcp://localhost:61616
quarkus.artemis.username=quarkus
quarkus.artemis.password=quarkus
Conclusion
This was a whirlwind tour over messaging with Quarkus. In the first tutorial (Messaging with Quarkus – part one) we have covered how to use JMS messaging to develop a loosely coupled application in Quarkus. In this tutorial we have learned how to use Reactive Messaging to produce and consume messages using the AMQP protocol, backed by ArtemisMQ server.
Source code: https://github.com/fmarchioni/mastertheboss/tree/master/quarkus/amqp-demo
Master quickly the capabilities of Quarkus with:


