This article is a walk through Quarkus REST Client API using MicroProfile REST Client. We will develop a basic REST Endpoint and then we will set up a simple Client project with a Service interface for our REST Service.
When developing REST Client API, Quarkus offers two options:
- JAX-RS Web Client: This is the standard Java EE way of communicating with RESTful service (Learn more in this article: JAX-RS client API tutorial )
- MicroProfile REST Client: This is the new way of communicating with RESTful services when using MicroProfile applications.
In this article we will learn how develop a Quarkus REST Client using Microprofile REST Client.
Getting started with MicroProfile REST Client
The MicroProfile REST Client provides a type-safe approach to map REST Endpoints in a similar way to JAX-RS 2.0 spec. The MicroProfile REST client, however, is defined as a Java interface, which makes it type-safe. In addition, it is possible to decouple the Client/Server connection from the code and define it entirely in the configuration.
Let’s start. We will build at first a basic Server Endpoint and then we will create the Client project to access it.
Building the Server project
Firstly, bootstrap a Quarkus project which includes resteasy and resteasy-jackson extensions to allow producing/consuming JSON Rest resources:
mvn io.quarkus.platform:quarkus-maven-plugin:2.6.2.Final:create \
    -DprojectGroupId=com.mastertheboss \
    -DprojectArtifactId=rest-server \
    -Dpath="/api" \
    -Dextensions="resteasy,resteasy-jackson"
Next, let’s code a minimal Endpoint which can return a simple text and a JSON Media type with some random data:
@Path("/api")
public class SimpleRESTService {
    @GET
    @Path("/text")
    public String getHello ()
    {
        return "hello world!";
    }
    @GET
    @Path("/json")
    @Produces(MediaType.APPLICATION_JSON)
    public SimpleProperty getPropertyJSON ()
    {
        SimpleProperty p = new SimpleProperty(UUID.randomUUID().toString(), UUID.randomUUID().toString());
        return p;
    }

}
Finish by adding the SimpleProperty POJO:
public class SimpleProperty {
	public SimpleProperty() {}

	private String key;
	private String value;
      // Getters/Setters omitted for brevity
}
The Server project is ready. To test it, just include the following QuarkusTest Class in it:
@QuarkusTest
public class SimpleRESTServiceTest {

    @Test
    public void testHelloEndpoint() {
        given()
          .when().get("/api/text")
          .then()
             .statusCode(200)
             .body(is("hello world!"));
    }

}
Then, start the server project on the default Quarkus Port (8080):
mvn install quarkus:dev
Building the REST Client project
To bootstrap our Client project, we will need the resteasy and resteasy-jackson stack and some additional Client extensions, such as rest-client and rest-client-jackson
mvn io.quarkus.platform:quarkus-maven-plugin:2.6.2.Final:create \
    -DprojectGroupId=com.mastertheboss \
    -DprojectArtifactId=rest-client \
    -Dpath="/proxy" \
    -Dextensions="resteasy,resteasy-jackson,rest-client,rest-client-jackson"
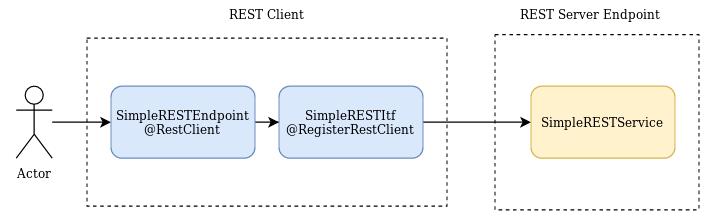
Within our Client project, we will add two resources:
- A REST Endpoint (SimpleRESTEndpoint) which is available externally and contains the definition of the @RestClient
- A Service Interface (SimpleRESTServiceItf) which is registered as REST Client with the annotation @RegisterRestClient
Let’s start from the Service Interface:
@RegisterRestClient
@Path("/api")
public interface SimpleRESTServiceItf {
    @GET
    @Path("/text")
    public String getHello();

    @GET
    @Path("/json")
    @Produces(MediaType.APPLICATION_JSON)
    public SimpleProperty getPropertyJSON();


}
Next, our REST Client Endpoint, which declares the Service Interface as org.eclipse.microprofile.rest.client.inject.RestClient :
@Path("/proxy")
@ApplicationScoped
public class SimpleRESTEndpoint {

    @Inject
    @RestClient
    SimpleRESTServiceItf service;

    @GET
    @Path("/text")
    public String getHello() {
        return service.getHello();
    }

    @GET
    @Path("/json")
    @Produces(MediaType.APPLICATION_JSON)
    public SimpleProperty getPropertyJSON(){
        return service.getPropertyJSON();
    }

}
Include as well the SimpleProperty POJO in the Client project. To Test our REST Client, we will include the following simple Test Class:
@QuarkusTest
public class SimpleRESTServiceItfTest {

    @Test
    public void testHelloEndpoint() {
        given()
          .when().get("/proxy/text")
          .then()
             .statusCode(200)
             .body(is("hello world!"));
    }

}
Configuring the Client/Server connection
Our Client project still needs to know about the Remote REST Endpoint. There are two ways to configure Client/Server connectivity:
- Using MicroProfile standard notation
- Using Quarkus notation
Firstly, we will use the standard Microprofile notation for REST Clients. Open the application.properties and add the following configuration:
com.mastertheboss.SimpleRESTServiceItf/mp-rest/url=http://localhost:8080
com.mastertheboss.SimpleRESTServiceItf/mp-rest/scope=javax.inject.Singleton
As you can see from the first line, all requests to the REST Client Interface will result in a call to the Remote Endpoint Base URL, which is qualified using using this expression:
<Fully Qualified REST Client Interface>/mp-rest/url=<Remote REST base URL>
Also, the default scope of the REST Client Interface is set to Singleton which instructs Quarkus to instantiate the singleton once, passing its reference to other objects during the injection. Other supported scope values are @Dependent,
@ApplicationScoped and @RequestScoped, (default one).
Testing the REST Client
Your Client Project is ready for testing! Start it as well in development mode, switching to another HTTP Port to avoid clashing with the server:
mvn clean install quarkus:dev -Dquarkus.http.port=9080
Your Test Class will run and you should see the following successful execution :
[INFO] -------------------------------------------------------
[INFO]  T E S T S
[INFO] -------------------------------------------------------
[INFO] Running com.mastertheboss.SimpleRESTServiceItfTest
2022-01-17 11:41:07,013 INFO  [io.quarkus] (main) Quarkus 2.6.2.Final on JVM started in 2.395s. Listening on: http://localhost:8081
2022-01-17 11:41:07,015 INFO  [io.quarkus] (main) Profile test activated.
2022-01-17 11:41:07,015 INFO  [io.quarkus] (main) Installed features: [cdi, rest-client, rest-client-jackson, resteasy, resteasy-jackson, smallrye-context-propagation, vertx]
[INFO] Tests run: 1, Failures: 0, Errors: 0, Skipped: 0, Time elapsed: 6.777 s - in com.mastertheboss.SimpleRESTServiceItfTest
2022-01-17 11:41:09,036 INFO  [io.quarkus] (main) Quarkus stopped in 0.059s
[INFO]
[INFO] Results:
[INFO]
[INFO] Tests run: 1, Failures: 0, Errors: 0, Skipped: 0
Additionally, you can also run tests from the Command Line:
curl http://localhost:9080/proxy/json
{"key":"dbfa5152-f6cc-42c0-b3d6-bf4e21b3ffec","value":"c2dffab7-553c-4e23-a318-4964aa51faf6"}
Using Quarkus notation to configure Client/Server connectivity
The other option you can use to map the REST Client with the remote Endpoint is via the Quarkus notation. The advantage of this approach is that you can completely decouple the FQ Class name of your Interface from your configuration.
Proceed as follows: add the configKey attribute to your @RegisterRestClient annotation:
@RegisterRestClient(configKey="hello-service")
@Path("/api")
public interface SimpleRESTServiceItf {
   //

}
Now the Interface is known to Quarkus as “hello-service”. You can then change the application.properties to use the configKey to map the Remote Rest Endpoint:
quarkus.rest-client.hello-service.url=http://localhost:8080
Conclusion
In this article we have gone through MicroProfile REST API to learn how to create a type-safe Interface for remote REST Endpoints. If you want to learn how to configure and run the same example on WildFly, check this article: A simple example of MicroProfile REST Client API
The source code for this article is available here: https://github.com/fmarchioni/mastertheboss/tree/master/quarkus/microprofile-rest-client
Found the article helpful? if so please follow us on Socials


