In modern microservices architectures, services have dynamically assigned locations. Therefore, it’s essential to integrate Service Discovery as part of the picture. In this article you will learn how to leverage Service Discovery using Smallrye Stork framework on top of a Quarkus reactive application.
Service discovery in a nutshell
Before we dig into this tutorial, we need to define some terms, which will help you to understand the context, especially if you are new to this technology.
- Service Discovery: it is a mechanism to register and find the services in a way that a microservice is able to locate dynamically all the available services.
- SmallRye Stork is a Service Discovery and client-side load-balancing framework that can work either as standalone Java application or integrated with Quarkus
- Consul: it is a service networking solution that enables a set of services across any cloud or runtime environment (automate network configurations, discover services, secure connectivity)
Let’s see with a practical example how you can discover an external service which is registered on a Consul netowork server using Smallrye Stork and a Quarkus REST Client interface.

Coding the remote services
Firstly, we will define two remote services. You can use any HTTP Server for this purpose. In this article, we will do that with a cool JBang application named httpd that fires off an HTTP Server in just one line. ( To learn more about JBang project, visit the home page or read this intro article: JBang: Create Java scripts like a pro ).
Before starting the application, create an home page for both services under the folders “service1” and “service2”:
mkdir service1
mkdir service2

echo "Hello Service 1" > service1/index.html
echo "Hello Service 2" > service1/index.html
Our Web server is ready to go! Launch JBang httpd application passing as argument the port (8090) and the Root folder for service1:
$ jbang httpd@jbangdev -p 8090 -d service1

Serving HTTP on 0.0.0.0 port 8090 (http://0.0.0.0:8090/) from /home/quarkus/stork-demo/service1 ...
Next, repeat the same step for service2:
$ jbang httpd@jbangdev -p 8091 -d service2

Serving HTTP on 0.0.0.0 port 8091 (http://0.0.0.0:8091/) from /home/quarkus/stork-demo/service2 ...
Your two Web servers are running. Cool isn’t it? Now let’s move to our Quarkus application.
Coding the Quarkus application
To bootstrap Quarkus application, we will be using the Quarkus CLI. Let’s create the application stork-demo:
quarkus create app stork-demo
Our application requires both libraries from quarkus.io Project and from Smallrye Project. Start by adding Quarkus dependencies:
quarkus ext add resteasy-reactive resteasy-reactive-qute rest-client-reactive
Next, include the Smallrye dependencies plus some extra dependencies to test with TestContainer.
Here is how your dependencies in the pom.xml should look like:
<dependencies>
	<dependency>
		<groupId>io.quarkus</groupId>
		<artifactId>quarkus-resteasy-reactive-qute</artifactId>
	</dependency>
	<dependency>
		<groupId>io.quarkus</groupId>
		<artifactId>quarkus-rest-client-reactive</artifactId>
	</dependency>
	<dependency>
		<groupId>io.quarkus</groupId>
		<artifactId>quarkus-smallrye-stork</artifactId>
	</dependency>
	<dependency>
		<groupId>io.smallrye.stork</groupId>
		<artifactId>stork-service-discovery-consul</artifactId>
	</dependency>
	<dependency>
		<groupId>io.smallrye.reactive</groupId>
		<artifactId>smallrye-mutiny-vertx-consul-client</artifactId>
	</dependency>
	<dependency>
		<groupId>io.quarkus</groupId>
		<artifactId>quarkus-arc</artifactId>
	</dependency>
	<dependency>
		<groupId>io.quarkus</groupId>
		<artifactId>quarkus-resteasy-reactive</artifactId>
	</dependency>
<!-- Test dependencies -->
	<dependency>
		<groupId>io.quarkus</groupId>
		<artifactId>quarkus-junit5</artifactId>
		<scope>test</scope>
	</dependency>
	<dependency>
		<groupId>io.rest-assured</groupId>
		<artifactId>rest-assured</artifactId>
		<scope>test</scope>
	</dependency>
	<dependency>
		<groupId>org.testcontainers</groupId>
		<artifactId>testcontainers</artifactId>
		<scope>test</scope>
	</dependency>
</dependencies>
The first thing we will code, is a Bean which will register our application on the Consul networking service. Therefore, we will define a service name which can dynamically resolve to a set of services, each one with an unique id. According to our existing HTTP Servers configuration, will use the following settings:
- Service name: http-service with the following Service instances:
- service1: running on port 8090
- service2: running on port 8091
To instantiate the service eagerly, we will add the registration within a CDI Bean. In this example, the service is registered on the Consul registry during start-up to service the observer method invocation.
@ApplicationScoped
public class Registration {

    @ConfigProperty(name = "consul.host") String host;
    @ConfigProperty(name = "consul.port") int port;

    @ConfigProperty(name = "service1", defaultValue = "8090") int portService1;
    @ConfigProperty(name = "service2", defaultValue = "8091") int portService2;


    public void init(@Observes StartupEvent ev, Vertx vertx) {
        ConsulClient client = ConsulClient.create(vertx, new ConsulClientOptions().setHost(host).setPort(port));

        client.registerServiceAndAwait(
                new ServiceOptions().setPort(portService2).setAddress("localhost").setName("http-service").setId("service1"));
        client.registerServiceAndAwait(
                new ServiceOptions().setPort(portService1).setAddress("localhost").setName("http-service").setId("service2"));

    }
}
We will define the Consul Host and Port in the application.properties file:
consul.host=localhost
consul.port=8500

stork.http-service.service-discovery=consul
stork.http-service.service-discovery.consul-host=localhost
stork.http-service.service-discovery.consul-port=8500
stork.http-service.load-balancer=round-robin
As you can see, in the second part of the configuration we define service-specific properties. For example, we can override the Service Discovery Host, Port and type. Also, we will be using the default load balancing mechanism (round-robin).
The Rest Client Façade
To make our Service accessible to external client, we will add REST Client interface which exposes a single method. The purpose of this method is to return the service’s output:
@RegisterRestClient(baseUri = "stork://http-service")
public interface GreetingService {

    @GET
    @Produces(MediaType.TEXT_PLAIN)
    String get();
}
Notice the baseUri. It uses stork:// as URL scheme indicating that the called service uses Stork to locate and select the service instance.
The last piece of the puzzle is the Front-end API Class which is what your Client will actually invoke:
@Path("/api")
public class FrontendApi {

    @RestClient GreetingService service;

    @Inject
    Template api;

    @GET
    @Produces(MediaType.TEXT_HTML)
    public TemplateInstance invoke() {
    	 return api.data("greeting",service.get());

    }

}
The invoke method will call our GreetingService, which in turn will go through the Stork API to discover the remote service. In this example, we are returning a Qute Template so that you can see the service output in a plain HTML page. (Learn more about Qute Templates here: Qute: a template for Quarkus Web applications ).
Plain REST Services?
Note: If your REST application needs to return the plain an simple service output (i.e. without HTML Template), you can simply rewrite the GET method as follows (and skip the following api.html page as well):
@GET
@Produces(MediaType.TEXT_PLAIN)
public String invoke() {
        return service.get();
}
Finally, the api.html page will print the value available in the key “greeting” which is the output from the service:
<!DOCTYPE html>
<html>
<head>
<meta charset="UTF-8">
</head>
<body>
<h2>Quarkus Stork demo</h2>

    <p>Greeting from Service:  {greeting}</p>

</body>
</html>
Here’s the project tree:
src
├── main
│   ├── java
│   │   └── org
│   │       └── acme
│   │           ├── FrontendApi.java
│   │           ├── GreetingService.java
│   │           └── services
│   │               └── Registration.java
│   └── resources
│       ├── application.properties
│       ├── META-INF
│       │   └── resources
│       │       └── index.html
│       └── templates
│           └── api.html
└── test
Running the application
In order to connect to our remote undertow services, we need first to start Consul server. You can download it and install it or, more simply, start if as docker service:
docker run \
    -d \
    -p 8500:8500 \
    -p 8600:8600/udp \
    consul agent -server -ui -node=server-1 -bootstrap-expect=1 -client=0.0.0.0
Then, start as well the Quarkus application:
mvn quarkus:dev
If you connect to Consul Web Console (http://localhost:8500) you should be able see that the http-services has attached two service instances:
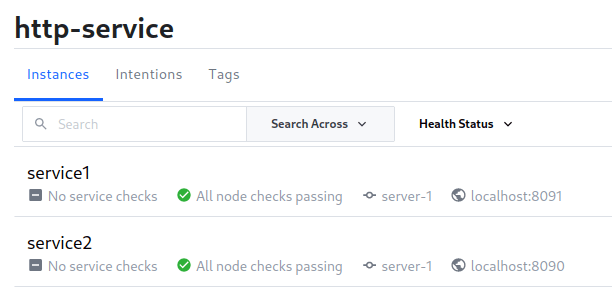
Next, connect to the REST /api Service:
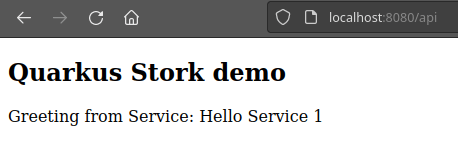
If you try to request again the /api service, Stork will load balance the call to service 2:

Source code:
You can find the source code for this tutorial at: https://github.com/fmarchioni/mastertheboss/tree/master/quarkus/stork-demo
Found the article helpful? if so please follow us on Socials


