This tutorial will introduce you to QuarkusIO, the latest framework for building supersonic Java applications. In this tutorial we will have first a short introduction to what is Quarkus . Then, we will cover the basic installation steps. Finally, we will build a minimal Quarkus application.
What is Quarkus ?
In a nutshell, Quarkus is a cloud-native, container-first framework for writing Java applications that can run natively or within a JVM. Quarkus applications are easy to develop, and provide fast startup times and low memory footprint. and is particularly well-suited for use in microservices architectures. More in detail, Quarkus applications are:
- Container First: This means that Quarkus applications are easy to package and deploy in container environments. They are also optimized for the constraints and requirements of running in containers. Additionally, you don’t need complex tools to deploy Quarkus applications in a container.
- Cloud Native: Quarkus applications embrace the 12 factor architecture. This means, that Quarkus applications are typically designed to be scalable, resilient, and highly available in Kubernetes environments.
- Microservice First: Brings lightning fast startup time and code turn around to Java apps
Here is a bird’s eye view of the Quarkus Core Project:
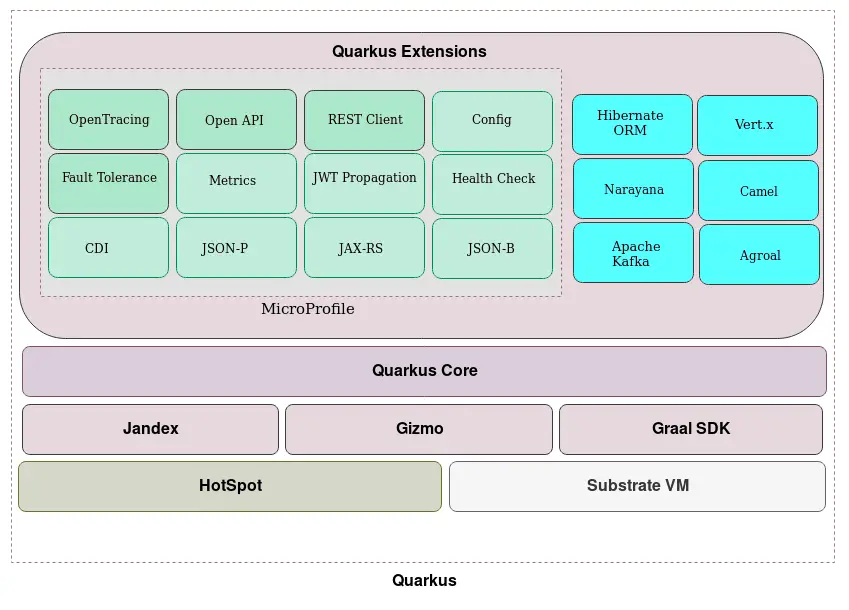
As you can see, one of the most interesting aspect of quarkus is that you can build native executables using GraalVM. That makes Quarkus applications ideal for containers and serverless workloads. In this first tutorial we will learn how to build a Quarkus REST application using the Maven tooling available and add a minimal of complexity to it. There are two main major versions for Quarkus applications and each one has different requirements. Let’s start from the latest version.
Which is the latest version of Quarkus?
The latest stable version of Quarkus is 3.10.0.CR1 which requires the following BOM:
<dependencyManagement>
   <dependencies>
      <dependency>
         <groupId>io.quarkus</groupId>
         <artifactId>quarkus-bom</artifactId>
         <version>3.10.0.CR1</version>
         <type>pom</type>
         <scope>import</scope>
      </dependency>
   </dependencies>
</dependencyManagement>
Building your first Quarkus 2.x application
JDK 11 is the minimal version to use Quarkus 2.0. Quarkus 2.0 applications can be bootstrapped either using Quarkus CLI or its Maven plugin. Running Quarkus with Maven plugin is covered in the next paragraph.
You can install Quarkus CLI on Linux, macOS, and Windows (using a tool like like cygwin or mingw) as follows:
curl -Ls https://sh.jbang.dev | bash -s - app install --fresh --force quarkus@quarkusio
Once installed, the tool “quarkus” will be in your PATH.
Next, let’s use it to create one named “demo” application which uses the Maven GAV com.sample:demo:1.0:
$ quarkus create app com.sample:demo:1.0
applying codestarts...
📚  java
🔨  maven
📦  quarkus
📝  config-properties
🔧  dockerfiles
🔧  maven-wrapper
🚀  resteasy-codestart[SUCCESS] ✅  quarkus project has been successfully generated in:
--> /home/quarkus/demo
Fine, let’s see what we have got:
src
├── main
│   ├── docker
│   │   ├── Dockerfile.jvm
│   │   ├── Dockerfile.legacy-jar
│   │   ├── Dockerfile.native
│   │   └── Dockerfile.native-micro
│   ├── java
│   │   └── com
│   │       └── sample
│   │           └── GreetingResource.java
│   └── resources
│       ├── application.properties
│       └── META-INF
│           └── resources
│               └── index.html
└── test
    └── java
        └── com
            └── sample
                ├── GreetingResourceTest.java
                └── NativeGreetingResourceIT.java
The most interesting items are:
- The GreetingResource.java containing the Hello REST Endpoint
- Several Dockerfile : In particular, the Dockerfile.jvm for building a Java Container Image of your application. And the Dockerfile.native to build a native image of the application.
- An index.html file to remind you that you can add static files (HTML, images, Javascript) in that folder
- Two Test classes added under the folder “test” to test the application with Java or as native executable.
- A file named application.properties which is the main configuration file in Quarkus
Next, let’s have a look at the Controller app:
package com.sample;

import javax.ws.rs.GET;
import javax.ws.rs.Path;
import javax.ws.rs.Produces;
import javax.ws.rs.core.MediaType;

@Path("/hello")
public class GreetingResource {

    @GET
    @Produces(MediaType.TEXT_PLAIN)
    public String hello() {
        return "Hello RESTEasy";
    }
}
Next, build your application with the “build” command:
$ quarkus build
Quarkus CLI can also run applications using the “dev” command:
$ quarkus dev

[INFO] Scanning for projects...
[INFO]
[INFO] --------------------------< com.sample:demo >---------------------------
[INFO] Building demo 1.0
[INFO] --------------------------------[ jar ]---------------------------------
[INFO]
[INFO] --- quarkus-maven-plugin:2.0.0.Final:dev (default-cli) @ demo ---
[INFO] Using 'UTF-8' encoding to copy filtered resources.
[INFO] Copying 2 resources
[INFO] Changes detected - recompiling the module!
[INFO] Compiling 1 source file to /home/francesco/quarkus/demo/target/classes
[INFO] Using 'UTF-8' encoding to copy filtered resources.
[INFO] skip non existing resourceDirectory /home/francesco/quarkus/demo/src/test/resources
[INFO] Changes detected - recompiling the module!
[INFO] Compiling 2 source files to /home/francesco/quarkus/demo/target/test-classes
Listening for transport dt_socket at address: 5005
__  ____  __  _____   ___  __ ____  ______
 --/ __ \/ / / / _ | / _ \/ //_/ / / / __/
 -/ /_/ / /_/ / __ |/ , _/ ,< / /_/ /\ \
--\___\_\____/_/ |_/_/|_/_/|_|\____/___/
2021-07-04 12:35:09,464 INFO  [io.quarkus] (Quarkus Main Thread) demo 1.0 on JVM (powered by Quarkus 2.0.0.Final) started in 1.535s. Listening on: http://localhost:8080
2021-07-04 12:35:09,479 INFO  [io.quarkus] (Quarkus Main Thread) Profile dev activated. Live Coding activated.
2021-07-04 12:35:09,479 INFO  [io.quarkus] (Quarkus Main Thread) Installed features: [cdi, resteasy, smallrye-context-propagation]
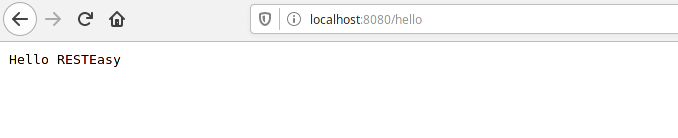
The only REST Endpoint is available through the “/hello” Path:
When running in development mode, you can leverage live coding. For example, if you change the content of your REST Controller as follows:
@GET
@Produces(MediaType.TEXT_PLAIN)
public String hello() {
        return "Live coding rocks!";
}
Then, if you request again the endpoint, the application will be automatically reloaded, without the need to restart Quarkus:
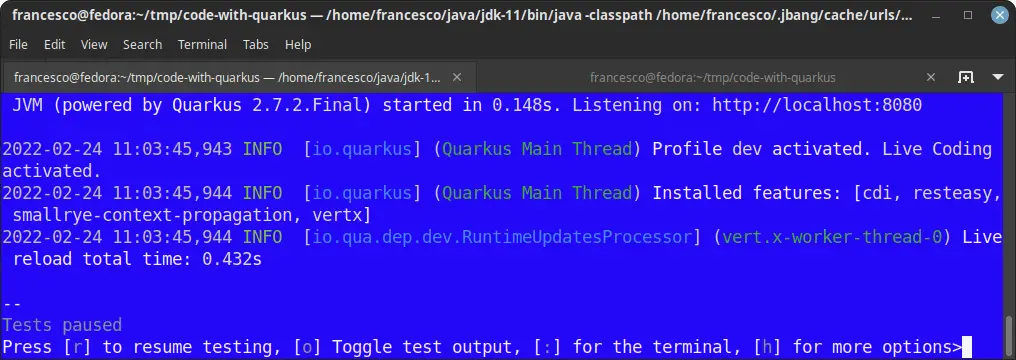
Besides that, you can check at the bottom of the Quarkus log, the following log emitted by Continuous Testing:
--
Tests paused, press [r] to resume, [h] for more options>
Therefore, you can, at any time, execute a round of tests on your services. For example, press “r” to run tests:
All 1 tests are passing (0 skipped), 1 tests were run in 2191ms. Tests completed at 12:35:34.
Press [r] to re-run, [v] to view full results, [p] to pause, [h] for more options>
How to run Quarkus in Production mode
To start Quarkus using the production profile, start by packaging the project to generate the Quarkus runner Jar file:
$ mvn package
You can then run the quarkus-run.jar which is now available under the target/quarkus-app folder:
$ java -jar target/quarkus-app/quarkus-run.jar
Be aware, the default format of quarkus-run.jar is not an uber jar. To distribute the Quarkus application you need to include the whole quarkus-app directory:
$ ls target/quarkus-app
app  lib  quarkus  quarkus-app-dependencies.txt  quarkus-run.jar
To build an uber-jar (which includes all the libraries you need to run the application), include in your application.properties the following:
quarkus.package.type=uber-jar
Now, when you run ‘mvn package’ you will see that the Uber Jar has been built in the target folder:
[INFO] [io.quarkus.deployment.pkg.steps.JarResultBuildStep] Building uber jar: /home/quarkus/demo/target/demo-1.0-runner.jar
Building a native executable of your application
Finally, to build a native executable of your application, the simplest way is to use the Docker Image of GraalVM. This way, you won’t need installing locally on your machine.
The default container runtime is Docker, therefore we will start it first:
service docker start
Next, build a native executable of your application with:
quarkus build --native -Dquarkus.native.container-build=true
The, run the native application as follows:
$ target/code-with-quarkus-1.0.0-SNAPSHOT-runner
__  ____  __  _____   ___  __ ____  ______
 --/ __ \/ / / / _ | / _ \/ //_/ / / / __/
 -/ /_/ / /_/ / __ |/ , _/ ,< / /_/ /\ \
--\___\_\____/_/ |_/_/|_/_/|_|\____/___/
2022-02-24 11:15:15,045 INFO  [io.quarkus] (main) code-with-quarkus 1.0.0-SNAPSHOT native (powered by Quarkus 2.7.2.Final) started in 0.012s. Listening on: http://0.0.0.0:8080
2022-02-24 11:15:15,045 INFO  [io.quarkus] (main) Profile prod activated.
2022-02-24 11:15:15,045 INFO  [io.quarkus] (main) Installed features: [cdi, resteasy, smallrye-context-propagation, vertx]
To learn ore about building native executables with Quarkus, check this article: Building Container-ready native applications with Quarkus
Found the article helpful? if so please follow us on Socials


