Here is our second tutorial about QuarkusIO. Today we will learn how to create native executable applications with amazingly fast start up time. Next we will create a Container image of it and deploy it on a Cloud Platform (Openshift)
In our first tutorial – Getting started with Quarkus – we have learnt that Quarkus Maven plugin creates for you a native profile which you can use to build native applications:
<profiles>
    <profile>
      <id>native</id>
      <activation>
        <property>
          <name>native</name>
        </property>
      </activation>
      <properties>
        <skipITs>false</skipITs>
        <quarkus.package.type>native</quarkus.package.type>
      </properties>
    </profile>
</profiles>
On the other hand, you can use the default profile to build a standard Java application.
Let’s see how to wrap both kinds of applications (Java and Native) in a Container image to be run with Docker and eventually how to deploy this application on OpenShift.
You can build Quarkus native executables in two ways:
- Use a Container Image of GraalVM. This option does not require installing GraalVM locally
- Install GraalVM locally and use it to build a native executable
Let’s see both options.
1) Building a Native executable with Quarkus – the easy way
This is the fastest option to build a Quarkus native executable. The default Container runtime is Docker, therefore we will start it:
service docker start
Next, you can build the native executable as follows:
quarkus build --native -Dquarkus.native.container-build=true
At the end of the build, you can run the native executable as follows;
target/code-with-quarkus-1.0.0-SNAPSHOT-runner
2) Building a Native executable with GRAALVM
In the second option, we will need to install GraalVM, which is a high-performance, embeddable, polyglot virtual machine for running applications written in JavaScript, Python, Ruby, R, JVM-based languages like Java, Scala, Kotlin, and LLVM-based languages such as C and C++.
GraalVM releases are available at: https://github.com/graalvm/graalvm-ce-builds/releases
With the latest version of Quarkus 3.10.0.CR1 you need JDK 17.
Download the appropriate archive from https://github.com/graalvm/mandrel/releases or https://github.com/graalvm/graalvm-ce-builds/releases
Within the GraalVM package you will find:
- A JVM
- A JavaScript engine & node.js runtime
- A LLVM engine
Then, export the GRAALVM_HOME with the path where you have installed GraalVM:
export GRAALVM_HOME=/path/to/graal
Next, we need the native-image tool which allows you to ahead-of-time compile Java code to a standalone executable. You can install the native-image tool as follows:
${GRAALVM_HOME}/bin/gu install native-image
Building the native application
We will now build the HelloWorld Quarkus application discussed in the first tutorial Getting started with Quarkus. Move to the root folder and build the native executable use the ‘mvn verify -Pnative‘ command:
$ mvn verify -PnativeYou should see at the end of the process the following output:
__  ____  __  _____   ___  __ ____  ______
 --/ __ \/ / / / _ | / _ \/ //_/ / / / __/
 -/ /_/ / /_/ / __ |/ , _/ ,< / /_/ /\ \
--\___\_\____/_/ |_/_/|_/_/|_|\____/___/
2021-07-05 10:07:14,688 INFO  [io.quarkus] (main) demo 1.0 native (powered by Quarkus 2.0.0.Final) started in 0.018s. Listening on: http://0.0.0.0:8081
2021-07-05 10:07:14,688 INFO  [io.quarkus] (main) Profile prod activated.
2021-07-05 10:07:14,688 INFO  [io.quarkus] (main) Installed features: [cdi, kubernetes, resteasy, smallrye-context-propagation]
[INFO] Tests run: 1, Failures: 0, Errors: 0, Skipped: 0, Time elapsed: 4.423 s - in com.sample.NativeGreetingResourceIT
Note: if you are getting this error “Basic header file missing ()” then it means that headers are not available on your system. You can install them with the following command:
sudo apt-get install libz-dev
If you are using a Fedora/RHEL system, use instead:
sudo dnf install zlib-devel
Once that the native generation has been completed, check the target folder:
$ ls -al target
drwxrwxr-x.  4 francesco francesco     4096 Jul  4 17:38 classes
-rw-rw-r--.  1 francesco francesco     4722 Jul  5 10:05 demo-1.0.jar
drwxrwxr-x.  3 francesco francesco     4096 Jul  5 10:07 demo-1.0-native-image-source-jar
-rwxrwxr-x.  1 francesco francesco 42900768 Jul  5 10:07 demo-1.0-runner
drwxrwxr-x.  2 francesco francesco     4096 Jul  5 10:07 failsafe-reports
drwxrwxr-x.  3 francesco francesco     4096 Jul  4 17:38 generated-sources
drwxrwxr-x.  3 francesco francesco     4096 Jul  4 17:38 generated-test-sources
drwxrwxr-x.  2 francesco francesco     4096 Jul  5 10:07 kubernetes
drwxrwxr-x.  2 francesco francesco     4096 Jul  4 17:38 maven-archiver
drwxrwxr-x.  3 francesco francesco     4096 Jul  4 17:38 maven-status
drwxrwxr-x.  3 francesco francesco     4096 Jul  4 17:38 quarkus
drwxrwxr-x.  5 francesco francesco     4096 Jul  5 10:05 quarkus-app
-rw-rw-r--.  1 francesco francesco      272 Jul  5 10:07 quarkus-artifact.properties
-rw-rw-r--.  1 francesco francesco      624 Jul  5 10:07 quarkus.log
drwxrwxr-x.  2 francesco francesco     4096 Jul  4 17:38 surefire-reports
drwxrwxr-x.  3 francesco francesco     4096 Jul  5 10:07 test-classes
The native executable demo-1.0-runner . Let’s run it:
$ target/demo-1.0-runner
__  ____  __  _____   ___  __ ____  ______
 --/ __ \/ / / / _ | / _ \/ //_/ / / / __/
 -/ /_/ / /_/ / __ |/ , _/ ,< / /_/ /\ \
--\___\_\____/_/ |_/_/|_/_/|_|\____/___/
2021-07-05 10:10:09,541 INFO  [io.quarkus] (main) demo 1.0 native (powered by Quarkus 2.0.0.Final) started in 0.035s. Listening on: http://0.0.0.0:8080
2021-07-05 10:10:09,542 INFO  [io.quarkus] (main) Profile prod activated.
2021-07-05 10:10:09,542 INFO  [io.quarkus] (main) Installed features: [cdi, kubernetes, resteasy, smallrye-context-propagation]
As you can see, in a few milliseconds the application will boot. Test it with:
$ curl http://localhost:8080/hello
Building Docker images for Quarkus applications
It is amazing how simple is to build a Docker image out of your native executable application. Quarkus’s Maven plugin already arranged for you two Dockerfile in the project folder src/main/docker:
src
├── main
│   ├── docker
│   │   ├── Dockerfile.jvm
│   │   ├── Dockerfile.legacy-jar
│   │   ├── Dockerfile.native
│   │   └── Dockerfile.native-distroless
- The file Dockerfile.jvm builds a Container image of Quarkus Java application based on the FastJar option which bundles all required libraries under the quarkus-app directory.
- The file Dockerfile.native builds a native Container image of Quarkus application.
- Then, the file Dockerfile.legacy-jar builds a Container image of Quarkus Java application using the legacy approach (application libraries under the target folder).
- Finally, the file Dockerfile.native-distroless creates a distroless container that runs the Quarkus application in native (no JVM) mode
Aside from the Dockerfile.native-distroless, all Dockerfiles are built from the following base Image:
FROM registry.access.redhat.com/ubi8/ubi-minimal
On the top of that, the Dockerfile.jvm will install the JAR file containing the Java application, while the Dockerfile.native will add the native executable.
Building the JVM Docker image for a Quarkus application
In order to build a container image of a Quarkus application, first build the application as follows:
mvn package
Then build the Container image from the Dockerfile.jvm:
docker build -f src/main/docker/Dockerfile.jvm -t quarkus/hello-quarkus .
Finally, run the application as follows:
docker run -i --rm -p 8080:8080 quarkus/hello-quarkus
Building the native Docker image for a Quarkus application
In order to build the Quarkus native container image, you will need to use the native profile, when packaging your application:
mvn package -Pnative -Dquarkus.native.container-build=true
Then, build the Quarkus Docker image “quarkus/hello-quarkus” as follows:
docker build -f src/main/docker/Dockerfile.native -t quarkus/hello-quarkus .
Now check that the image is available:
$ docker images
REPOSITORY                                  TAG                 IMAGE ID            CREATED             SIZE
quarkus/hello-quarkus                       latest              761947bb9d9d        25 seconds ago      125 MB
It’s time to run it, with:
docker run -i --rm -p 8080:8080 quarkus/hello-quarkus
__  ____  __  _____   ___  __ ____  ______
 --/ __ \/ / / / _ | / _ \/ //_/ / / / __/
 -/ /_/ / /_/ / __ |/ , _/ ,< / /_/ /\ \
--\___\_\____/_/ |_/_/|_/_/|_|\____/___/
2021-07-05 08:52:54,640 INFO  [io.quarkus] (main) demo 1.0 native (powered by Quarkus 2.0.0.Final) started in 0.015s. Listening on: http://0.0.0.0:8080
2021-07-05 08:52:54,640 INFO  [io.quarkus] (main) Profile prod activated.
2021-07-05 08:52:54,640 INFO  [io.quarkus] (main) Installed features: [cdi, kubernetes, resteasy, smallrye-context-propagation]
You can test the Quarkus Docker image with:
$ curl http://localhost:8080/hello
Deploying Quarkus applications on Openshift
Once that you have the Container image of your application, it’s very simple to deploy it on Openshift or Kubernetes. To keep it as simple as possible, we will use Code Ready Container as Openshift cluster.
Check the following tutorial to learn how to install Code Ready Containers on your laptop: Getting started with Code Ready Containers
Start crc with:
$ crc start
Create a sample project named “quarkus”:
$ oc new-project quarkus
Now using project "quarkus" on server "https://192.168.42.204:8443".
In order to deploy your Quarkus application on OpenShift, the easiest way to go is to leverage the openshift extension which needs to be added to your project:
$ mvnw quarkus:add-extension -Dextensions="openshift"
To create automatically an OpenShift route, add the following line to the application.properties file:
quarkus.openshift.expose=true
Now it’s time to deploy your application. To deploy a Java based application, run the following command:
$ ./mvnw clean package -Dquarkus.kubernetes.deploy=true
On the other hand, to deploy a native container image, add the “native” profile in it:
$ ./mvnw clean package -Pnative -Dquarkus.kubernetes.deploy=true
Note, make sure you have set up correctly GRAALVM_HOME and JAVA_HOME in order to complete the above step.
In a few minutes your application will be deployed :
oc get pods
NAME            READY   STATUS      RESTARTS   AGE
demo-1-5p4rb    1/1     Running     0          4m57s
demo-1-build    0/1     Completed   0          5m42s
demo-1-deploy   0/1     Completed   0          5m
If you haven’t set to expose the Route in the application.properties file, it’s time to do it now:
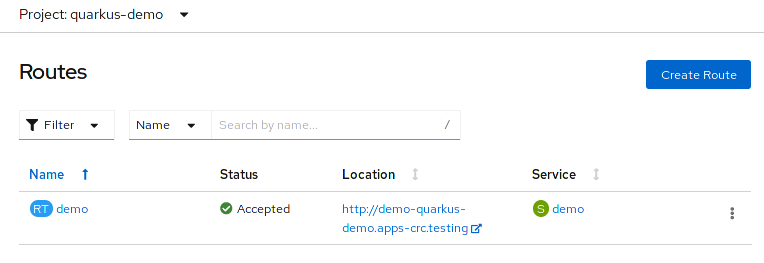
$ oc expose svc/demo
route.route.openshift.io/demo exposed
The Route is now available, and you can use it to test your application:
If you want to learn how to use Mandrel distribution to build native executables, then check this tutorial: Building Quarkus native applications with Mandrel
Conclusion
At the end of this brief journey through Quarkus applications, we have discovered how to build a simple application which can be compiled easily into native code. One major feature of Quarkus is the ability to create instantly Container images of your applications which can be deployed on Openshift or Kubernates.
Found the article helpful? if so please follow us on Socials


