This tutorial will teach how to use Blue-Green deployments on Openshift Paas in order to create a parallel environment for your applications which can be replaced just by setting a property in your router configuration
Blue-green deployments are a proven approach to reduce the downtime caused when you are typically upgrading an environment. This is done by creating a parallel environment on which the new deployment can be installed while keeping your earlier version still running. If a problem is detected, and after the new deployment is verified, traffic can be switched over with the option to rollback.
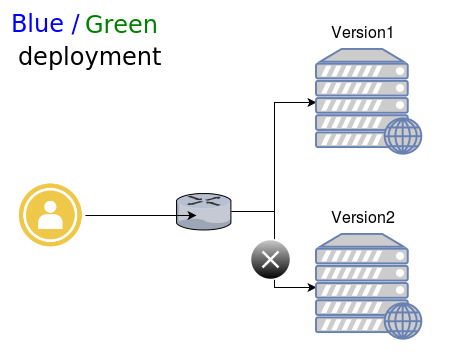
Let’s see in concrete a simple demo application running on WildFly 10, which is made up of two versions: the master branch and a new branch, named version2, which will be triggered.
From any available project execute the following command to create the first app named bluedeploy:
oc new-app wildfly~https://github.com/fmarchioni/ocpdemos#master --context-dir=wildfly-basic --name=bluedeploy
Now let’s create the second app based on the version2
$ oc new-app wildfly~https://github.com/fmarchioni/ocpdemos#version2 --context-dir=wildfly-basic --name=greendeploy
Let’s check that our Pods are done:
$ oc get pods
NAME                   READY     STATUS      RESTARTS   AGE
bluedeploy-1-build     0/1       Completed   0          1h
bluedeploy-1-kcp53     1/1       Running     0          1h
greendeploy-1-build    0/1       Completed   0          1h
greendeploy-1-lr88n    1/1       Running     0          1h
Ok now we will expose on the router the first service, named “bluedeploy” which is related to the application running on the master branch:
$ oc expose service bluedeploy --name=bluegreen
The following route will be created:
oc get routes
NAME        HOST/PORT                                 PATH      SERVICES       PORT       TERMINATION
bluegreen   bluegreen-myproject.192.168.1.66.xip.io             bluedeploy     8080-tcp
Now let’s try to invoke our application which is running in the “demo” Web context:
$ curl http://bluegreen-myproject.192.168.1.66.xip.io/demo/index.jsp


<html>
    <body>
        <h1>Hello World from WildFly on Openshift</h1>
    </body>
</html>
So the index.jsp returned the landing page for the application in the master branch. Now you can use the “oc patch” command to vary the settings of your router so that it will switch to the “greendeploy” app:
$ oc patch route/bluegreen -p '{"spec":{"to":{"name":"greendeploy"}}}'
You should expect the route to be changed accordingly:
$ oc get routes
NAME        HOST/PORT                                 PATH      SERVICES       PORT       TERMINATION
bluegreen   bluegreen-myproject.192.168.1.66.xip.io             greendeploy    8080-tcp
Let’s check that we are serving the application in the other branch:
$ curl http://bluegreen-myproject.192.168.1.66.xip.io/demo/index.jsp


<html>
    <body>
        <h1>Hello World from WildFly on Openshift</h1>

        <h2>Version 2 Running!!!</h2>
    </body>
</html>
Great. So with little work we were able to handle a replacement between applications without an interruption of the service. In the next tutorial How to configure AB Deployments on Openshift we will learn another approach called AB deployments that can be used to spread the traffic between two applications.
Found the article helpful? if so please follow us on Socials


