WildFly 25 enables you to secure deployments using OpenID Connect (OIDC) without installing a Keycloak client adapter. This tutorial will show a proof of concept example of it.
Keycloak with Quarkus
The latest version of Keycloak is based on Quarkus Runtime. If you are still running the old Keycloak engine, we recommend checking this article first: Getting started with Keycloak powered by Quarkus
OpenID Connect is a simple identity layer on top of the OAuth 2.0 protocol which allows Clients to verify the identity of the End-User based on the authentication performed by an Authorization Server. You can also use OIDC to obtain basic profile information about the End-User using access tokens.
So far, the only option to secure deployments using OIDC was to install the Keycloak adapter on your WildFly server. See this article: Installing Keycloak Client adapters on WildFly
Since WIldFly 25, you have native support for OIDC in Elytron. This greatly simplifies the set up of the security layer either if you use WildFly 25 or a Bootable JAR based on WildFly 25.
The new elytron-oidc-client subsystem
Within WildFly 25, you will find the following additional extension:
<extension module="org.wildfly.extension.elytron-oidc-client"/>
In addition, the configuration includes the following subsystem:
<subsystem xmlns="urn:wildfly:elytron-oidc-client:1.0"/>
The schema of this subsystem is similar to the keycloak-adapter-subsystem. The new subsystem will install a DeploymentUnitProcessor which will detect if OIDC is required for a deployment.
Web applications that require to use OIDC for Authentication/Authorization need to include the following auth-method in the web.xml deployment descriptors:
<web-app version="2.5" xmlns="http://java.sun.com/xml/ns/javaee"
   xmlns:xsi="http://www.w3.org/2001/XMLSchema-instance"
   xsi:schemaLocation="http://java.sun.com/xml/ns/javaee http://java.sun.com/xml/ns/javaee/web-app_2_5.xsd"
   metadata-complete="false">

    <login-config>
        <auth-method>OIDC</auth-method>
    </login-config>

</web-app>
You also need to provide the OIDC configuration. You can add it in the elytron-oidc-client subsystem or in a file named WEB-INF/oidc.json . In any case you need to include a reference to the OIDC Provider URL and the Client Id. We will show a sample configuration in the next section, along with a complete example.
Once a deployment has been processed, if its auth-method is OIDC, the OIDC integration will be activated. As a result, the HTTP mechanism implementation will be able to make use of a session token store and a cookie token store to store account info (i.e., access tokens, ID tokens, and refresh tokens).
Using OIDC Clients with a Bootable JAR
If you are running your WildFly applications as Bootable JARs you only have to include the Galleon layer “elytron-oidc-client” and set as WildFly version 25 or above. Here is a sample configuration to include in your Maven’s build section to generate a Bootable JAR which uses elytron OIDC clients:
<build>
    <finalName>keycloak-demo</finalName>
    <plugins>
        <plugin>
            <groupId>org.wildfly.plugins</groupId>
            <artifactId>wildfly-jar-maven-plugin</artifactId>
            <configuration>
                <feature-packs>
                    <feature-pack>
                        <location>wildfly@maven(org.jboss.universe:community-universe)#${version.wildfly}</location>
                    </feature-pack>
                </feature-packs>
                <layers>
                    <layer>web-server</layer>
                    <layer>elytron-oidc-client</layer>
                </layers>
                <context-root>false</context-root>
            </configuration>
            <executions>
                <execution>
                    <goals>
                        <goal>package</goal>
                    </goals>
                </execution>
            </executions>
        </plugin>
    </plugins>
</build>
We will now create a sample application as proof of concept. Before that, we need a Keycloak server which defines an User with a Role and a Client resource.
Setting up Keycloak
To get up to speed with Keycloak, we recommend to check this tutorial: Keycloak quickstart example using CLI
To configure Keycloak, we will use the same list of User/Roles from the above tutorial.
- Firstly, download Keycloak from https://www.keycloak.org/downloads
- Then, unzip it in a folder and start is as follows:
/kc.sh start-dev
- On the other hand, if you are running an older Keycloak (WildFly based) version, you can start it with:
$ ./standalone.sh -Djboss.socket.binding.port-offset=100
- Next, add an admin user with credentials admin/admin
- Finally, Execute the following script with Keycloak’s kcadm.sh Command Line:
./kcadm.sh config credentials --server http://localhost:8180/auth --realm master --user admin --password admin

./kcadm.sh create realms -s realm=wildfly-realm -s enabled=true -o

./kcadm.sh create users -r wildfly-realm -s username=customer-admin -s enabled=true

./kcadm.sh set-password -r wildfly-realm --username customer-admin --new-password admin

./kcadm.sh create clients -r wildfly-realm -s clientId=customer-manager-client -s publicClient="true"  -s "redirectUris=[\"http://localhost:8080/*\"]" -s enabled=true

./kcadm.sh create roles -r wildfly-realm -s name=customer-manager

./kcadm.sh add-roles --uusername customer-admin --rolename customer-manager -r wildfly-realm
- The following Client named “customer-manager” will be added in a Realm named “wildfly-realm”:

Getting the OIDC Client Adapter
In order to be able to authenticate our application, we will download the OIDC Client Adapter. Follow these steps:
From your Client UI, right click on the Action Combo and select “Download Adapter Config”:

Next, choose the Format for the Client Adapter. In our example, choose Keycloak OIDC JSON and click Download:

Create an OIDC secured application
Creating a secured simply requires to include a Web resource which specifies the list of roles permitted to access method(s) in an application. For example, we can create a Servlet which includes the @HttpMethodContraints annotation in it:
@WebServlet("/secure")
@ServletSecurity(httpMethodConstraints = { @HttpMethodConstraint(value = "GET", rolesAllowed = { "customer-manager" }) })
public class SecuredServlet extends HttpServlet {

    @Override
    protected void doGet(HttpServletRequest req, HttpServletResponse resp) throws ServletException, IOException {
        try (PrintWriter writer = resp.getWriter()) {
            writer.println("<html>");
            writer.println("  <body>");
            writer.println("    <h1>Keycloak OIDC Secured Servlet</h1>");
            writer.println("    <p>");
            writer.print(" Current Principal '");
            Principal user = req.getUserPrincipal();
            writer.print(user != null ? user.getName() : "NONE");
            writer.print("'");
            writer.println("    </p>");
            writer.println("  </body>");
            writer.println("</html>");
        }
    }

}
Next, add the Keycloak OIDC Adapter into the WEB-INF folder as oidc.json:
{
  "realm": "wildfly-realm",
  "auth-server-url": "http://localhost:8180/",
  "ssl-required": "external",
  "resource": "customer-manager-client",
  "public-client": true,
  "confidential-port": 0
}
That’s all. Deploy the application on WildFly 25 or, if you are using a Bootable JAR, build it and run the application:
java -jar target/keycloak-demo-bootable.jar
Next, reach the application at: http://localhost:8080/keycloak-demo
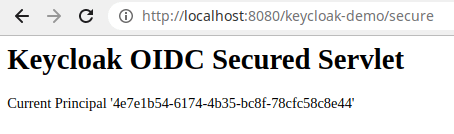
Then, login with the user credentials (“customer-admin” / “admin”). You will be able to access the Secured Servlet:
Support for Bearer-only mode
Bearer Token Authorization is the process of authorizing HTTP requests through a valid Bearer Token. This token provides valuable information to determine the subject of the call as well as whether the subject can access the HTTP resource.
Support for Bearer-only mode with the elytron-oidc-client subsystem is available since WildFly 26.1.2.
As an alternative, it’s also possible to use Elytron’s BEARER_TOKEN mechanism instead. More details can be found in the documentation here: https://docs.wildfly.org/26/WildFly_Elytron_Security.html#Bearer_Token_Authorization
Conclusion
We have covered some basics about OpenID Connect and how the new elytron-oidc-client enables native support for it on WildFly
The source code (forked and adapted from https://github.com/wildfly-extras/wildfly-jar-maven-plugin/tree/master/examples/elytron-oidc-client ) is available here:
https://github.com/fmarchioni/mastertheboss/tree/master/bootable-jar/elytron-oidc-client
Found the article helpful? if so please follow us on Socials


