This tutorial describes how you can configure the ActiveMQ 5 resource adapter on WildFly with a few simple steps.
[Please note, if you want to integrate ActiveMQ Artemis, then check this tutorial: How to connect WildFly to a remote ActiveMQ Artemis server?]
A Resource adapter is a Java EE component that implements the Connector architecture (JCA) for a specific EIS. In our case, it defines a contract between a JEE application server and external resources such as a messaging middleware
The first thing you need is downloading ActiveMQ resource adapter which is available through the Maven repository )
There are two ways to use a Resource adapter from within WildFly:
- You can install it as a module (This is well documented at the following link)
- You can deploy it just like you would do it for an application
We will show you the second approach which is also the simplest.
Step 1# Deploy the resource adapter on WildFly
cp activemq-rar-5.10.0.rar /usr/share/wildfly-8.2.0.Final/standalone/deployments
Step 2# Configure the Resource adapter in the JCA subsystem along with a set of Administered Objects (Connection Factory and Queues/Topics)
<subsystem xmlns="urn:jboss:domain:resource-adapters:2.0">
	<resource-adapters>
		<resource-adapter id="activemq">
			<archive>
				activemq-rar-5.10.0.rar
			</archive>

			<transaction-support>XATransaction</transaction-support>

			<config-property name="UseInboundSession">
				false
			</config-property>

			<config-property name="Password">
				defaultPassword
			</config-property>

			<config-property name="UserName">
				defaultUser
			</config-property>

			<config-property name="ServerUrl">
				tcp://localhost:61616
			</config-property>

			<connection-definitions>
				<connection-definition class-name="org.apache.activemq.ra.ActiveMQManagedConnectionFactory" jndi-name="java:/ConnectionFactory" enabled="true" pool-name="ConnectionFactory">

					<xa-pool>
						<min-pool-size>1</min-pool-size>
						<max-pool-size>20</max-pool-size>
						<prefill>false</prefill>
						<is-same-rm-override>false</is-same-rm-override>
					</xa-pool>

				</connection-definition>
			</connection-definitions>

			<admin-objects>
				<admin-object class-name="org.apache.activemq.command.ActiveMQQueue" jndi-name="java:jboss/activemq/queue/TestQueue" use-java-context="true" pool-name="TestQueue">

					<config-property name="PhysicalName">
						activemq/queue/TestQueue
					</config-property>

				</admin-object>

				<admin-object class-name="org.apache.activemq.command.ActiveMQTopic" jndi-name="java:jboss/activemq/topic/TestTopic" use-java-context="true" pool-name="TestTopic">

					<config-property name="PhysicalName">
						activemq/topic/TestTopic
					</config-property>

				</admin-object>
			</admin-objects>
		</resource-adapter>
	</resource-adapters>
</subsystem>
The above excerpt defines a resouce adapter named “activemq” which relies on the default Connection settings. The Connection Factory configuration exposes the ActiveMQ ConnectionFactory through the JNDI mapping “java:/ConnectionFactory“. Finally we have defined two Administered objects: a JMS Queue bound at “java:jboss/activemq/queue/TestQueue” and a JMS Topic Bound at “java:jboss/activemq/topic/TestTopic”
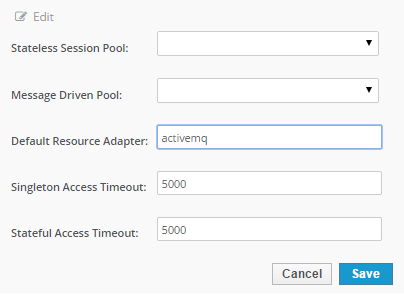
Step 3# Configure your EJB3 container to use ActiveMQ resource adapter.
From the EJB3 Container configuration choose as resource adapter “activemq” instead of hornetq:
Step 4# Now start your ActiveMQ server:
C:\apache-activemq-5.10.0\bin\win64> activemq.bat

jvm 1    |  INFO | Listening for connections at: tcp://francesco-PC:61616?maximumConnections=1000&wireFormat.maxFrameSize=104857600
jvm 1    |  INFO | Connector openwire started
jvm 1    |  INFO | Listening for connections at: amqp://francesco-PC:5672?maximumConnections=1000&wireFormat.maxFrameSize=104857600
jvm 1    |  INFO | Connector ws started
jvm 1    |  INFO | Apache ActiveMQ 5.10.0 (localhost, ID:francesco-PC-49297-1417
422956894-0:1) started
jvm 1    |  INFO | For help or more information please see: http://activemq.apache.org
jvm 1    |  INFO | ActiveMQ WebConsole available at http://0.0.0.0:8161/
Step 5# Start as well WildFly application server:
09:41:39,245 INFO  [org.jboss.as.server] (ServerService Thread Pool -- 28) JBAS018559: Deployed "activemq-rar-5.10.0.rar" (runtime-name : "activemq-rar-5.10.0.rar")
09:41:39,401 INFO  [org.jboss.as.connector.deployment] (MSC service thread 1-6)
JBAS010405: Registered admin object at java:jboss/activemq/queue/TestQueue
09:41:39,417 INFO  [org.jboss.as.connector.deployment] (MSC service thread 1-6)
JBAS010405: Registered admin object at java:jboss/activemq/topic/TestTopic
09:41:39,834 INFO  [org.apache.activemq.ra.ActiveMQEndpointWorker] (default-threads - 2) Establishing connection to broker [tcp://localhost:61616]
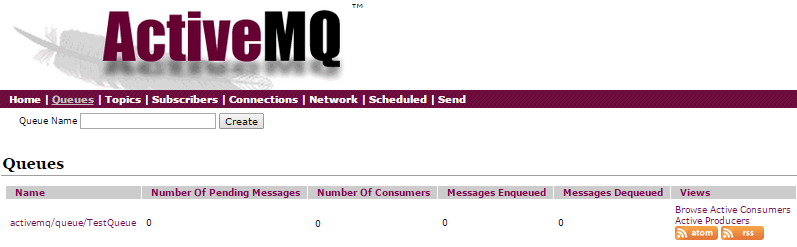
So the connection to ActiveMQ started successfully, let’s check on ActiveMQ console that the destination has been created (for example, here is how to check for Queues: http://localhost:8161/admin/queues.jsp . The default username and password for ActiveMq console is “admin/admin” )
Step 6# Deploy a proof of concept application on WildFly
Ok, so the objects have been created by the Resource Adapter so we can deploy a minimal JMS applications which sends a message and consume it. For this purpose we will use JMS 1.1 API as ActiveMQ is still not ready for JMS 2.0
Here is a simple MDB which is bound to the activemq/queue/TestQueue:
import javax.ejb.*;
import javax.jms.*;

@MessageDriven(activationConfig = {

		@ActivationConfigProperty(propertyName = "destinationType", propertyValue = "javax.jms.Queue"),

		@ActivationConfigProperty(propertyName = "destination", propertyValue = "activemq/queue/TestQueue") })

public class ActiveMQMDB implements MessageListener {

	@Override
	public void onMessage(Message message) {

		try {

			if (message instanceof TextMessage) {

				System.out.println("Got Message "

						+ ((TextMessage) message).getText());

			}

		} catch (JMSException e) {

			e.printStackTrace();

		}

	}

}
And here is a good old fashioned JMS Servlet client which sends a message to the Queue:
package com.sample;

import java.io.IOException;
import java.io.PrintWriter;
import javax.annotation.Resource;
import javax.jms.*;
import javax.naming.Context;
import javax.servlet.ServletException;
import javax.servlet.annotation.WebServlet;
import javax.servlet.http.*;


@WebServlet("/jms")
public class TestJMS extends HttpServlet {

	@Resource(lookup = "java:/ConnectionFactory")
	ConnectionFactory cf;

	@Resource(lookup = "java:jboss/activemq/queue/TestQueue")
	private Queue queue;

	protected void doGet(HttpServletRequest request, HttpServletResponse response) throws ServletException, IOException {

		try {
			example();
			PrintWriter out = response.getWriter();
			out.println("Message sent!");

		} catch (Exception e) {
			e.printStackTrace();
		}

	}

	public void example() throws Exception     {

	        Connection connection =  null;
	        try {
	            connection = cf.createConnection();
	            Session session = connection.createSession(false, Session.AUTO_ACKNOWLEDGE);
	            MessageProducer publisher = session.createProducer(queue);

	            connection.start();

	            TextMessage message = session.createTextMessage("Hello!");
	            publisher.send(message);
	        }

	        finally
	        {
	            if(ic != null)
	            {
	                try  {
	                    ic.close();
	                }
	                catch(Exception e) {
	                    throw e;
	                }

	            }
	            closeConnection(connection);
	        }

	    }
	private void closeConnection(Connection con) 		    {
            try  {

	          if (con != null) {
		      con.close();
		  }

            }

	    catch(JMSException jmse) {

		            System.out.println("Could not close connection " + con +" exception was " + jmse);

            }

	}

}
Now deploy the application and trigger the test Servlet. You should be able to acknowledge the message on WildFly console:
10:05:50,082 INFO [stdout] (default-threads - 2) Got Message Hello!
And as well on ActiveMQ Console:

That’s all! By the way, did you notice the application works as well also on the default (standalone.xml) configuration ? that’s of course because we bypass the “messaging” subsystem available in the “full” profiles and we use a resource Adapter for sending JMS messages.
In the following tutorial we will learn how to connect to ActiveMQ broker by installing the RAR as a module; WildFly – ActiveMQ integration part 2: module installation
Found the article helpful? if so please follow us on Socials


