In this article we will learn how to run a Struts 2 application on WildFly application server. You will also find, at the end of it, the first article we wrote about JBoss and Struts which is related to Struts 1.
Running Struts 2 on WildFly
To get started quickly with Struts 2 on WildFly we recommend to start with a Maven project. Also, if you want some built-in resources, you can use the struts maven archetype. Example:
mvn archetype:generate -B \
                       -DgroupId=com.sample \
                       -DartifactId=hello-struts \
                       -DarchetypeGroupId=org.apache.struts \
                       -DarchetypeArtifactId=struts2-archetype-blank
To build our Struts 2 example, we need to add the following components:
- A model class to store our message
- A view that displays our message
- An Action class to act as the controller
- A configuration that ties everything together
Let’s start from the Model class, which contains a simple Java Bean with a property that we will output in our view:
package com.sample.model;

public class MessageStore {
    private String message;

    public MessageStore() {
        message = "Hello Struts User";
    }

    public String getMessage() {
        return message;
    }
}
Now let’s code the Action class which works as a Controller:
package com.sample.action;


import com.opensymphony.xwork2.ActionSupport;
import com.sample.model.MessageStore;

public class HelloWorldAction extends ActionSupport {
    private MessageStore messageStore;

    public String execute() {
        messageStore = new MessageStore() ;

        return SUCCESS;
    }

    public MessageStore getMessageStore() {
        return messageStore;
    }
}
Please note that Struts2’s action classes are more flexible than Struts 1. We can create them by implementing the Action interface, extending ActionSupport class, or just by having executed() method.
As for the view, we will add two JSP pages. The first one is the landing page, index.jsp:
<!DOCTYPE html>
<%@ page language="java" contentType="text/html; charset=UTF-8" pageEncoding="UTF-8" %>
<%@ taglib prefix="s" uri="/struts-tags" %>
<html>
    <head>
        <meta http-equiv="Content-Type" content="text/html; charset=UTF-8">
        <title>Basic Struts 2 Application - Welcome</title>
    </head>
    <body>
        <h1>Welcome To Struts 2!</h1>
        <p><a href="<s:url action='hello'/>">Hello World</a></p>
    </body>
</html>
This page contains a link to an Action named ‘hello’. We will see in a minute how this action links to the target page. Right now, let’s add also the HelloWorld.jsp page:
<!DOCTYPE html>
<%@ page language="java" contentType="text/html; charset=UTF-8" pageEncoding="UTF-8" %>
<%@ taglib prefix="s" uri="/struts-tags" %>
<html>
  <head>
    <meta http-equiv="Content-Type" content="text/html; charset=UTF-8">
    <title>Hello World!</title>
  </head>
  <body>
    <h2><s:property value="messageStore.message" /></h2>
  </body>
</html>
Finally, what binds the actions to the views is the struts.xml file which we will place in the resources folder of our project:
<?xml version="1.0" encoding="UTF-8"?>
<!DOCTYPE struts PUBLIC
        "-//Apache Software Foundation//DTD Struts Configuration 2.5//EN"
        "http://struts.apache.org/dtds/struts-2.5.dtd">
<struts>
    <constant name="struts.devMode" value="true" />

    <package name="basicstruts2" extends="struts-default">
        <action name="index">
            <result>/index.jsp</result>
        </action>

        <action name="hello" class="com.sample.action.HelloWorldAction" method="execute">
            <result name="success">/HelloWorld.jsp</result>
        </action>
    </package>
</struts>
Next, To enable the Struts 2 framework to work with your web application you need to add a Servlet filter class and filter mapping to web.xml. Below is how the web.xml may look after adding the filter and filter-mapping nodes.
<?xml version="1.0" encoding="UTF-8"?>
<web-app id="WebApp_ID" version="2.4"
    xmlns="http://java.sun.com/xml/ns/j2ee"
    xmlns:xsi="http://www.w3.org/2001/XMLSchema-instance"
    xsi:schemaLocation="http://java.sun.com/xml/ns/j2ee http://java.sun.com/xml/ns/j2ee/web-app_2_4.xsd">
    <display-name>Basic Struts2</display-name>
    <welcome-file-list>
        <welcome-file>index</welcome-file>
    </welcome-file-list>

    <filter>
        <filter-name>struts2</filter-name>
        <filter-class>org.apache.struts2.dispatcher.filter.StrutsPrepareAndExecuteFilter</filter-class>
    </filter>

    <filter-mapping>
        <filter-name>struts2</filter-name>
        <url-pattern>/*</url-pattern>
    </filter-mapping>

</web-app>
Here’s how our project tree looks like:
src
└── main
    ├── java
    │   └── com
    │       └── sample
    │           ├── action
    │           │   └── HelloWorldAction.java
    │           └── model
    │               └── MessageStore.java
    ├── resources
    │   └── struts.xml
    └── webapp
        ├── HelloWorld.jsp
        ├── index.jsp
        ├── META-INF
        │   └── MANIFEST.MF
        └── WEB-INF
            └── web.xml
Finally we are done with the project. Let’s configure dependencies so that the project can be built and deployed. We will add the Jakarta EE umbrella dependency and struts2-core:
<dependencies>
    <dependency>
        <groupId>jakarta.platform</groupId>
        <artifactId>jakarta.jakartaee-api</artifactId>
        <version>8.0.0</version>
        <scope>provided</scope>
    </dependency>

    <dependency>
        <groupId>org.apache.struts</groupId>
        <artifactId>struts2-core</artifactId>
        <version>2.5.26</version>
    </dependency>
</dependencies>
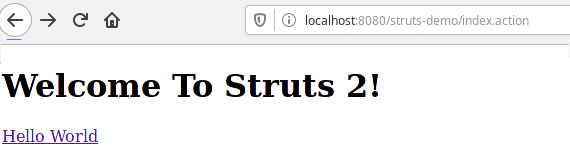
Build and deploy the application on WildFly. Then reach out the main action page: http://localhost:8080/struts-demo/index.action
Here’s our first Struts 2 application in action:
Source code for this tutorial: https://github.com/fmarchioni/mastertheboss/tree/master/web/struts-demo
Running Struts on JBoss application Server
This article explains how you can setup quickly an application based on Struts on JBoss 5 application server.
Install JBoss Struts plugin on Eclipse
For our example we have installed Eclipse IDE for Java Developers (Ganymede) which is the Enterprise Version of Eclipse foundation: check it here:
http://www.eclipse.org/downloads/
Once you have extracted Eclipse you need to update your plugins: from the Help Menu, select “Software Updates”. In the “Available Software” Click on “Add site” and add JBoss plugins site:
http://download.jboss.org/jbosstools/updates/nightly/trunk/
Here there’s a whole lot of plugins, however what you need is basically JBoss AS plugin and Struts plugin. Once installed you have to restart Eclipse.
Create the Web project
Create a new Dynamic Web Project from Menu : File | New | Other | Web | Dynamic Web project.
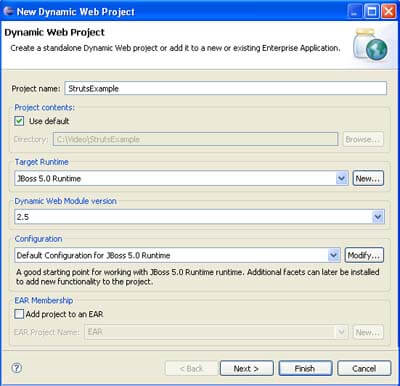
Set the Web module version to 2.5 and choose as Runtime your jBoss Runtime environment.
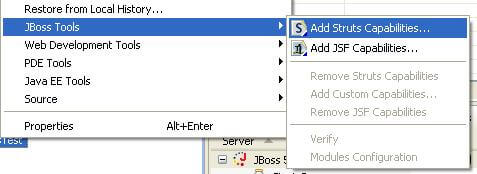
Now Add Struts capabilities to your project. Right click on it and select:
The Struts wizard will start. The first gui will ask where you have your web.xml file. You can leave the default value.
Next GUI, Project Modules, will add Struts Support to your Project. Click on the Button and select the Struts version and configuation files.
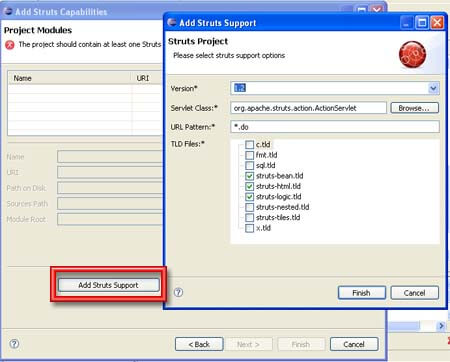
Now your project Modules should be compiled with the correct configuration. Click next.
In the last applet you will basically select the classes/lib path Servlet and Struts version. Select Servlet version 2.5 , Struts 1.2 and leave unchecked the “Add libraries“.
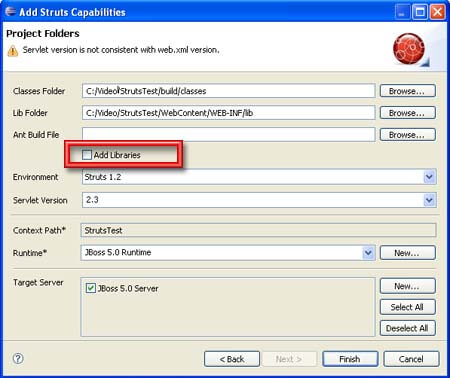
Unfortunately I found some incompatibilities with the libraries provided by the Tool so we have to donwload the libraries from Jakarta site.
Download Struts libraries
Download Struts 1.3 libraries from jakarta site:
http://apache.fastbull.org/struts/library/struts-1.3.10-lib.zip
Unzip the libraries in a folder, such as StrutsLibs
Configure the Project to use Struts libraries
Configuring your project to use Struts libraries by right-clicking on the Project and selecting “Properties”. Configure the build-path by adding all libraries except commons-logging.jar which is already loaded by JBoss.
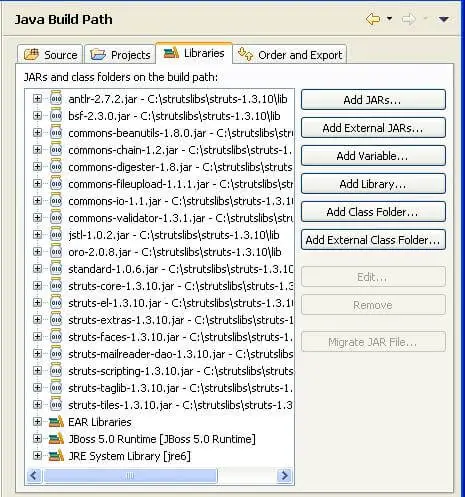
The libraries you have selected needs to be added also in the WEB-INF/lib folder. You can do this by selecting again Project properties | Java EE Module Dependancies.
Check all Struts libraries and Click Ok.
Add Struts Components
Following is a sample Struts application which we have used to test Struts on JBoss.
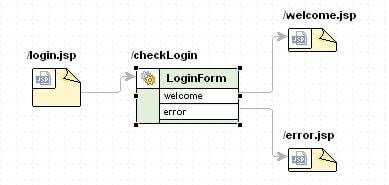
The configuration file struts-config.xml contains basically one Action named com.sample.LoginAction , one FormBean named com.sample.LoginFormBean and three jsp: login.jsp, welcome.jsp and error.jsp.
<?xml version="1.0" encoding="UTF-8"?>
<!DOCTYPE struts-config PUBLIC "-//Apache Software Foundation//DTD Struts Configuration 1.2//EN"
                               "http://struts.apache.org/dtds/struts-config_1_2.dtd">
<struts-config>
 <data-sources/>
 <form-beans>
  <form-bean name="LoginForm" type="com.sample.LoginFormBean"/>
 </form-beans>
 <global-exceptions/>
 <global-forwards/>
 <action-mappings>
  <action input="/login.jsp" name="LoginForm" path="/checkLogin"
   scope="request" type="com.sample.LoginAction">
   <forward name="welcome" path="/welcome.jsp"/>
   <forward name="error" path="/error.jsp"/>
  </action>
 </action-mappings>
 <controller/>
 <message-resources parameter="com.sample.ApplicationResources"/>
</struts-config>
This is how our configuration looks like from the Diagram view:
This is our login.jsp page:
<%@ taglib uri="/WEB-INF/struts-html" prefix="html"%>

<html:html>

<body>
<html:form action="/checkLogin">
    <html:errors />

    <table>
        <tr>
            <td align="center" colspan="2"><font size="4">Please
            Login</font>
        </tr>
        <tr>
            <td align="right">Username</td>
            <td align="left"><html:text property="username" size="30"
                maxlength="30" /></td>
        </tr>
        <tr>
            <td align="right">Password</td>
            <td align="left"><html:text property="password" size="30"
                maxlength="30" /></td>
        </tr>

        <tr>
            <td align="right"><html:submit>Login</html:submit></td>
            <td align="left"><html:cancel>Cancel</html:cancel></td>
        </tr>
    </table>
</html:form>


</body>
</html:html>
The login.jsp is backed by a LoginFormBean which contains the mapping for the corresponding fields:
package com.sample;

import javax.servlet.http.HttpServletRequest;

import org.apache.struts.action.ActionErrors;
import org.apache.struts.action.ActionMapping;
import org.apache.struts.action.ActionMessage;

public class LoginFormBean extends org.apache.struts.action.ActionForm {

    String username;
    String password;

    public String getUsername() {
        return username;
    }

    public void setUsername(String username) {
        this.username = username;
    }

    public String getPassword() {
        return password;
    }

    public void setPassword(String password) {
        this.password = password;
    }

    public LoginFormBean () {
    }

    public void reset(ActionMapping actionMapping, HttpServletRequest request) {
        // TODO: Write method body
        this.username = null;
        this.password = null;
    }

    public ActionErrors validate(ActionMapping actionMapping, HttpServletRequest request) {
        ActionErrors errors = new ActionErrors();

        if( getUsername() == null || getUsername().length() < 1 ) {
            errors.add("username",new ActionMessage("username.error"));
          }
          if( getPassword() == null || getPassword().length() < 1 ) {
            errors.add("password",new ActionMessage("password.error"));
        }
          return errors;

    }


}
Notice this class uses a Validator to check the validity of the fields. You have to add a file named ApplicationResources.properties in the folder com.sample
username.error=username cannot be null
password.error=Password cannot be null
Last piece of code is the LogicAction which demandates the logic for logging in to an external DAO class….(which you have to implement)
package com.sample;

import javax.servlet.http.HttpServletRequest;
import javax.servlet.http.HttpServletResponse;

import org.apache.struts.action.ActionForm;
import org.apache.struts.action.ActionForward;
import org.apache.struts.action.ActionMapping;


import com.sample.LoginDAO;
import com.sample.LoginFormBean;

public class LoginAction extends org.apache.struts.action.Action {

    public LoginAction() {
    }

    public ActionForward execute(ActionMapping mapping, ActionForm form, HttpServletRequest request, HttpServletResponse response) throws Exception {
        LoginFormBean loginForm = (LoginFormBean)form;
        boolean validLogin = LoginDAO.login(loginForm.getUsername(),
                                            loginForm.getPassword());

        if (validLogin) {
            return mapping.findForward("welcome");
        }
        else {
            return mapping.findForward("error");
        }
    }

}
That’s all. Add two landing pages welcome.jsp and error.jsp and deploy your application. If you have deployed your application as StrutsExample.war then you can access to it with: http://localhost:8080/StrutsExample/login.jsp
Have fun with JBoss and Struts !
Click here to download the code


