This article is a whirlwind tour of AtlasMap Data transformation API and User Interface. We will learn how to use its editor to define mapping rules and how to use them in a sample Java Integration project.
Data transformation is the process of converting data from one format or structure into another format or structure. There are plenty of approaches to perform data transformation: you can manually transform Java types using basic libraries such as Jackson.
For complex integration projects, Apache Camel is the de facto standard Java framework that integrates different apps by using multiple protocols and technologies.
On the other hand, mapping different data structures can be complex and error-prone. That’s where AtlasMap fits in.
AtlasMap is a data mapping solution and an interactive Web UI that simplifies configuring integrations between different file formats. For example, Java, XML, CSV and JSON data sources. You can design your data mapping with AtlasMap UI canvas, and export your mapping in a Binary file (atlas-mapping.adm) that you can use at runtime.
Without further ado, let’s get started!
Starting AtlasMap UI
Firstly, we will download the AtlasMap UI Web application. This is available in the Maven repository. For example, to download the current version:
wget https://repo1.maven.org/maven2/io/atlasmap/atlasmap-standalone/2.5.0/atlasmap-standalone-2.5.0.jar
Then, simply start the AtlasMap UI as a runnable Java Jar:
java -jar atlasmap-standalone-2.5.0.jar
Behind the hoods, a Spring Boot application will start. You can access the Web console of AtlasMap at: http://127.0.0.1:8585/
Next, we will configure a simple mapping conversion rule between a JSON file and an XML file. To do that, we will provide a Source file and a Target file.
Firstly, we will load a JSON file, by clicking on the arrow Icon next to Source:

You can import a JSON schema file or a JSON instance file into AtlasMap. The procedure for importing each kind of file is the same. For example, we will import the following order.json file:
{
  "order": {
    "address": {
      "city": "westford",
      "state": "Massachusetts",
      "street": "1040 Notexisting St",
      "zip": "01886"
    },
    "contact": {
      "firstName": "Bob",
      "lastName": "Totton",
      "phone": "123-456-7890"
    },
    "orderId": "O001"
  }
}
Then, we will repeat the same procedure for the Target. Click on the arrow icon next to Target;

Then, point to the following order.xml document:
<order>
  <address city="Westford" />
  <customer name="Bob Totton" />
</order>
Coding the Mapping Rule
As you can see from a quick look at the Source and Target, we want to produce an XML document which contains just the city attribute in the address element. Also, within the customer element, we have the single name attribute which is a combination of firstName and lastName.
To define the mapping rules with AtlasMap is a piece of cake. Simply connect the Source and Target fields and AtlasMap will generate the mapping relations:
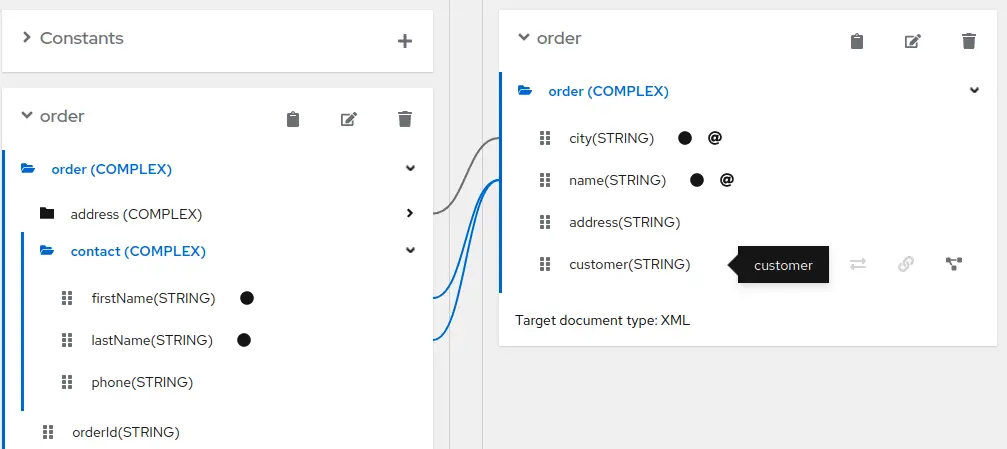
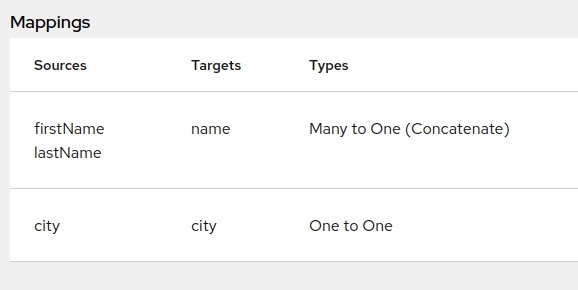
It’s pretty simple, isn’t it? Also, as you can see from the “Show Mapping Table” Icon, AtlasMap has already built for the relation types based on your selection. For example, the target customer name is defined as result of the concatenation of firstName and lastName:
Next, we will spice up a bit our mapping by adding some transformation in it.
Adding Transformation to our Mapping Definition
Finally, we can add some built-in transformations to our mapping definition. For example, we can enforce capitalization of the city target element. To do that, click on the lightning icon and select the appropriate transformation:

We can also apply a transformation on the customer name. Let’s add a transformation Rule which prepends the String “Mr.” to the customer name:

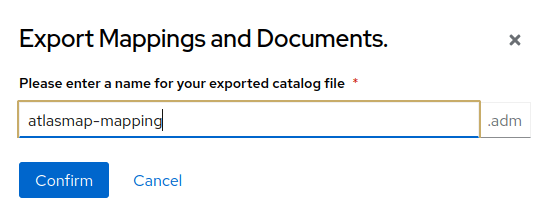
We are done now. Next, we will export the Mapping in a file, which by default is atlasmap-mapping.adm
Using the Mapping from your applications
There are several ways to use the mapping available from the ADM file. You can use directly the Java io.atlasmap API to perform the transformation in any Java Class. For example:
import java.io.StringReader;
import java.io.StringWriter;
import java.net.URL;
import java.nio.file.Files;
import java.nio.file.Paths;

import javax.xml.transform.OutputKeys;
import javax.xml.transform.Transformer;
import javax.xml.transform.TransformerFactory;
import javax.xml.transform.stream.StreamResult;
import javax.xml.transform.stream.StreamSource;

import io.atlasmap.api.AtlasContext;
import io.atlasmap.api.AtlasContextFactory;
import io.atlasmap.api.AtlasSession;
import io.atlasmap.core.DefaultAtlasContextFactory;

public class Main {

    public static void main(String args[]) throws Exception {
        Main m = new Main();
        m.process();
    }

    public void process() throws Exception {
        URL url = Thread.currentThread().getContextClassLoader().getResource("atlasmap-mapping.adm");
        AtlasContextFactory factory = DefaultAtlasContextFactory.getInstance();
        AtlasContext context = factory.createContext(url.toURI());
        AtlasSession session = context.createSession();

        url = Thread.currentThread().getContextClassLoader().getResource("order.json");
        String source = new String(Files.readAllBytes(Paths.get(url.toURI())));
        System.out.println("Source document:\n" + source);

        session.setSourceDocument("JSONSchemaSource", source);
        context.process(session);
        String targetDoc = (String) session.getTargetDocument("XMLInstanceSource");

        printXML(targetDoc);
    }

    private void printXML(String targetDoc) throws Exception {
        Transformer transformer = TransformerFactory.newInstance().newTransformer();
        transformer.setOutputProperty(OutputKeys.INDENT, "yes");
        transformer.setOutputProperty("{http://xml.apache.org/xslt}indent-amount", "2");
        StringWriter writer = new StringWriter();
        transformer.transform(new StreamSource(new StringReader((String)targetDoc)), new StreamResult(writer));
        System.out.println("Target Document:\n" + writer.toString());
    }
}
To run the above example, you need to provide the following dependencies in your Maven project:
<dependency>
  <groupId>io.atlasmap</groupId>
  <artifactId>atlas-api</artifactId>
</dependency>
<dependency>
  <groupId>io.atlasmap</groupId>
  <artifactId>atlas-core</artifactId>
</dependency>
<dependency>
  <groupId>io.atlasmap</groupId>
  <artifactId>atlas-json-module</artifactId>
</dependency>
<dependency>
  <groupId>io.atlasmap</groupId>
  <artifactId>atlas-xml-module</artifactId>
</dependency>
Source code for this example available here.
On the other hand, there is also a Camel component and a Quarkus extension which you can use to integrate AtlasMap in your existing projects.
For example, the following Application class contains a sample Camel Route. Within this Route definition, the atlas component points to the resourceURI producer. In this case, the atlasmap-mapping.adm file.
package io.atlasmap.examples.camel.main;

import org.apache.camel.builder.RouteBuilder;
import org.apache.camel.main.Main;

public class Application extends RouteBuilder {

    @Override
    public void configure() throws Exception {
        from("timer:foo?period=5000")
            .setBody(simple("resource:classpath:order.json"))
            .log("--> Sending: [${body}]")
            .to("atlas:atlasmap-mapping.adm")
            .log("--< Received: [${body}]");
    }

    public static void main(String args[]) throws Exception {
        Main camelMain = new Main();
        camelMain.addRouteBuilder(new Application());
        camelMain.run(args);
    }
}
To use AtlasMap with Camel you need to include the component’s dependency in your project:
<dependency>
      <groupId>io.atlasmap</groupId>
      <artifactId>camel-atlasmap</artifactId>
</dependency>
Finally, here is the output of the Camel Route which shows the source JSON file and the target XML file with its mapping and transformations in place:
2022-08-16 16:21:07,666 [2 - timer://foo] INFO  route1                         - --> Sending: [{
  "order": {
    "address": {
      "city": "westford",
      "state": "Massachusetts",
      "street": "1040 Notexisting St",
      "zip": "01886"
    },
    "contact": {
      "firstName": "Bob",
      "lastName": "Totton",
      "phone": "123-456-7890"
    },
    "orderId": "O001"
  }
}
]
{"delimiter":" ","delimitingEmptyValues":true,"@type":"Concatenate"}
2022-08-16 16:21:07,677 [2 - timer://foo] INFO  route1                         - --< Received:
[<?xml version="1.0" encoding="UTF-8" standalone="no"?><order city="Westford" name="Mr.Bob Totton"/>]
You can find the source code for this example here.
Conclusion
This article discussed the basics of AtlasMap data mapping solution. We have covered the basic set up of the Web UI and how to use it to create a minimal mapping file. Finally, we have discussed two simple ways to use AtlasMap in your Java projects.
Found the article helpful? if so please follow us on Socials


