In this article we will learn how to configure a JMS bridges with WildFly so that we can route messages from one destination to another.
First of all some basics: the purpose of a JMS bridge is to consume messages from a source JMS destination and send them to a target JMS destination. There are two types of bridges:
- Core bridges: which are used to bridge messages between two Artemis MQ Servers (and thus between two WildFly servers with the messaging extension activated)
- JMS Bridges: which is a Java Enterprise solution used to bridge messages from two JMS 1.1 compliant brokers.
Configuring Core Bridges
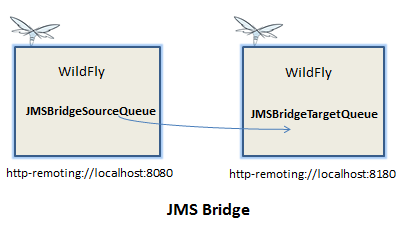
In WildFly, the broker configuration is provided by the Artemis project. We need to apply some configuration on the source Broker and on the Destination Broker. As you can imagine, the bridge has to be defined on the source Broker, while on the target broker we will just define the JMS destination. We will now create an example of a JMS bridge using two WildFly servers on the same machine, the first one with the default offset (0) and the second one with an offset of 100.
Source Broker configuration
So here is a sample bridge configuration we can add to our server:
 <server name="default">
    <cluster password="secretpassword"/>
    <statistics enabled="${wildfly.messaging-activemq.statistics-enabled:${wildfly.statistics-enabled:false}}"/>

    <!-- Source JMS Queue -->
    <queue name="JMSBridgeSourceQueue" address="queue/sourceQueue" />

    <security-setting name="#">
        <role name="guest" send="true" consume="true" create-non-durable-queue="true" delete-non-durable-queue="true"/>
    </security-setting>
    <address-setting name="#" dead-letter-address="jms.queue.DLQ" expiry-address="jms.queue.ExpiryQueue" max-size-bytes="10485760" page-size-bytes="2097152" message-counter-history-day-limit="10" redistribution-delay="1000"/>
    <http-connector name="http-connector" socket-binding="http" endpoint="http-acceptor"/>
    <http-connector name="http-connector-throughput" socket-binding="http" endpoint="http-acceptor-throughput">
        <param name="batch-delay" value="50"/>
    </http-connector>

    <!-- HTTP Connector used by the Bridge -->
    <http-connector name="bridge-connector" socket-binding="messaging-remote" endpoint="http-acceptor"/>

    <in-vm-connector name="in-vm" server-id="0">
        <param name="buffer-pooling" value="false"/>
    </in-vm-connector>
    <http-acceptor name="http-acceptor" http-listener="default"/>
    <http-acceptor name="http-acceptor-throughput" http-listener="default">
        <param name="batch-delay" value="50"/>
        <param name="direct-deliver" value="false"/>
    </http-acceptor>
    <in-vm-acceptor name="in-vm" server-id="0">
        <param name="buffer-pooling" value="false"/>
    </in-vm-acceptor>
    <jgroups-broadcast-group name="bg-group1" jgroups-cluster="activemq-cluster" connectors="http-connector"/>
    <jgroups-discovery-group name="dg-group1" jgroups-cluster="activemq-cluster"/>
    <cluster-connection name="my-cluster" address="jms" connector-name="http-connector" discovery-group="dg-group1"/>

    <!-- Bridge configuration -->
    <bridge name="core-bridge" queue-name="JMSBridgeSourceQueue" forwarding-address="jms.queue.JMSBridgeTargetQueue" user="jmsuser" password="password1!" static-connectors="bridge-connector"/>

    <jms-queue name="ExpiryQueue" entries="java:/jms/queue/ExpiryQueue"/>
    <jms-queue name="DLQ" entries="java:/jms/queue/DLQ"/>

    <connection-factory name="InVmConnectionFactory" entries="java:/ConnectionFactory" connectors="in-vm"/>
    <connection-factory name="RemoteConnectionFactory" entries="java:jboss/exported/jms/RemoteConnectionFactory" connectors="bridge-connector" ha="true" block-on-acknowledge="true" reconnect-attempts="-1"/>
    <pooled-connection-factory name="activemq-ra" entries="java:/JmsXA java:jboss/DefaultJMSConnectionFactory" connectors="in-vm" transaction="xa"/>
</server>
And this is the socket-binding-group configuration for the remote Artemis server:
<socket-binding-group name="standard-sockets" default-interface="public" port-offset="${jboss.socket.binding.port-offset:0}">
        . . . .
        <outbound-socket-binding name="messaging-remote">
            <remote-destination host="localhost" port="8180"/>
        </outbound-socket-binding>
</socket-binding-group>
As you can see, we have basically defined:
- A bridge element which contains a reference to a source Queue and a forwarding-address. An username and password is required to connect to the target server (if not included the cluster password will be used instead). Finally, a list of static connectors is included to bridge the two servers.
- A source (queue/JMSBridgeSourceQueue). Messages sent to this destination will be forwarded to the forwarding-address.
- An outbound-socket-binding which contains the renote address and port to the other server.
Target Broker configuration
Start by adding the Application user that will be used for accessing the remote bridge:
./add-user.sh -a -u jmsuser -p password1! -g guest
Then, the target bridge configuration is pretty simple, you have just to include the JMS queue definition:
<jms-queue name="JMSBridgeTargetQueue" entries="queue/JMSBridgeTargetQueue java:jboss/exported/jms/queues/JMSBridgeTargetQueue"/>
Remember that you need to create on the target broker an Application user (named in our example jmsuser) belonging to the group guest.
Now start the target broker first (in our case it’s on localhost with an offset of 100)
./standalone.sh -Djboss.socket.binding.port-offset=100 -c standalone-full.xml
And start as well the source broker, on the default port:
./standalone.sh -c standalone-full.xml
If you don’t find any connection error in your source broker you can be confident that the JMS bridge started correctly and that the connection towards tha target destination has been established:
10:02:43,742 INFO  [org.apache.activemq.artemis.core.server] (Thread-4 (
ActiveMQ-server-org.apache.activemq.artemis.core.server.impl.ActiveMQServerImpl$6@2ed13c78)) AMQ221027: Bridge
BridgeImpl@4b89c319[name=core-bridge, queue=QueueImpl[name=JMSBridgeSourceQueue, postOffice=PostOfficeImpl [server=ActiveMQServerImpl::serverUUID=950ba170-5004-11ea-9ae6-02423aae608d], temp=false]@15aa8044 targetConnector=ServerLocatorImpl (identity=Bridge core-bridge) [initialConnectors=[TransportConfiguration(name=bridge-connector, factory=org-apache-activemq-artemis-core-remoting-impl-netty-NettyConnectorFactory) ?httpUpgradeEndpoint=http-acceptor&activemqServerName=default&httpUpgradeEnabled=true&port=8180&localAddress=127-0-0-1&host=localhost], discoveryGroupConfiguration=null]] is connected
Connecting to another JMS broker using the Bridge
The JMS bridge is capable of routing messages from/to any JMS 1.1 compliant broker. Let’s see as an example how to bridge messages toward an ActiveMQ server. In this example, we have shown how to provide a Connection Factory towards ActiveMQ by means of a Resource adapter: Configuring JMS Bridge with WildFly

Just to recap, here are the resources available through the resource-adapter subsystem:
<subsystem xmlns="urn:jboss:domain:resource-adapters:4.0">
    <resource-adapters>
        <resource-adapter id="activemq">
            <archive>
                activemq-rar-5.12.0.rar
            </archive>
            <transaction-support>XATransaction</transaction-support>
            <config-property name="ServerUrl">
                tcp://localhost:61616
            </config-property>
            <config-property name="UserName">
                defaultUser
            </config-property>
            <config-property name="UseInboundSession">
                false
            </config-property>
            <config-property name="Password">
                defaultPassword
            </config-property>
            <connection-definitions>
                <connection-definition class-name="org.apache.activemq.ra.ActiveMQManagedConnectionFactory" jndi-name="java:/MQConnectionFactory" enabled="true" pool-name="ConnectionFactory">
                    <xa-pool>
                        <min-pool-size>1</min-pool-size>
                        <max-pool-size>20</max-pool-size>
                        <prefill>false</prefill>
                        <is-same-rm-override>false</is-same-rm-override>
                    </xa-pool>
                </connection-definition>
            </connection-definitions>
            <admin-objects>
                <admin-object class-name="org.apache.activemq.command.ActiveMQTopic" jndi-name="java:jboss/activemq/topic/TestTopic" use-java-context="true" pool-name="TestTopic">
                    <config-property name="PhysicalName">
                        activemq/topic/TestTopic
                    </config-property>
                </admin-object>
                <admin-object class-name="org.apache.activemq.command.ActiveMQQueue" jndi-name="java:/activemq/queue/TestQueue" use-java-context="true" pool-name="TestQueue">
                    <config-property name="PhysicalName">
                        activemq/queue/TestQueue
                    </config-property>
                </admin-object>
            </admin-objects>
        </resource-adapter>
    </resource-adapters>
</subsystem>
Now we have available in our JNDI references to external resources (MQConnectionFactory and activemq/queue/TestQueue)
<jms-bridge name="simple-jms-bridge" max-batch-time="100" max-batch-size="10" max-retries="1" failure-retry-interval="10000" quality-of-service="AT_MOST_ONCE">
<source destination="queue/JMSBridgeSourceQueue" connection-factory="ConnectionFactory"/>
<target destination="activemq/queue/TestQueue" connection-factory="MQConnectionFactory"/>
</jms-bridge>
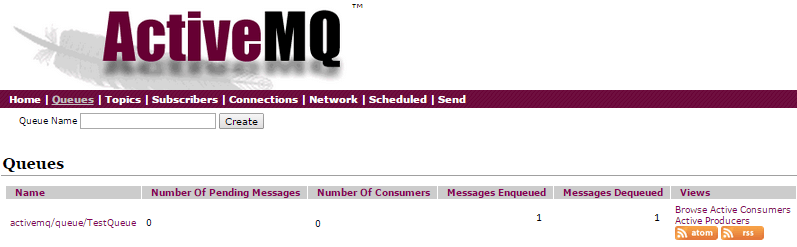
Now try to deploy a JMS producer for the Queue queue/JMSBridgeSourceQueue and one for the Queue activemq/queue/TestQueue. You will see messages are routed correctly through the two brokers.